
I hope this tutorial helps the readers who are starting out on bread making or those who have tried but failed. All the ingredients are commonly found in Australian supermarkets, bulk food stores and health food stores.
Baking bread makes sense economically, even if you make your bread in a bread maker, it will be much cheaper than buying premade bread. It will also be healthier as your homemade bread will contain only those ingredients you include, not flavour enhancers, preservatives or colourings.
You will see I've added gluten flour to this recipe. It will help those of you who have not yet got the kneading under control to still get an excellent loaf. When you're more proficient, you can leave it out.
I am happy to help anyone who is having trouble baking reasonable bread. Most problems are easy to fix. Just leave a note in the comments section and I'll get back to you as soon as I can.
THE RECIPE
1½ teaspoons dried yeast
1 tablespoon sugar
65 mls warm water
3¾ cups baker's flour - also called strong flour or high protein flour
3 teaspoons gluten flour
1 tablespoon butter/margarine (softened)
1½ teaspoons salt
1 tablespoon milk powder
250 mls warm water + more if necessary
Just a word about flour. Bread mix, which is commonly used in bread machines, is flour with bread improver and flavour enhancers added. We are NOT using bread mix. By adding the ingredients we add, we're adding natural flavour to the bread as well as giving it a lift, that as an inexperienced baker, you won't get without the gluten flour. When you start experimenting with other recipes you can leave out some of these ingredients and try others. Another thing you need to know about flour is that it's different all over the country. When baking with the various flours, they take different amounts of water. A flour in Melbourne will be slightly different to a flour in Brisbane because of the amount of humidity in the air. And even if you use the same bag of flour at different times of the year, you'll probably use slightly more or less water, according to the weather conditions. This is not a problem, it just means you have to know what your dough should look and feel like before going to the next step. Bread making is very tactile, even when making the dough in a bread machine, I feel it to make sure I have enough moisture in the dough. This recipe generally uses 315mls of water, but when I made this loaf yesterday I used about 40mls more. Sometimes the difference will be one spoon full, sometimes it will be almost a cup.
STEP 1
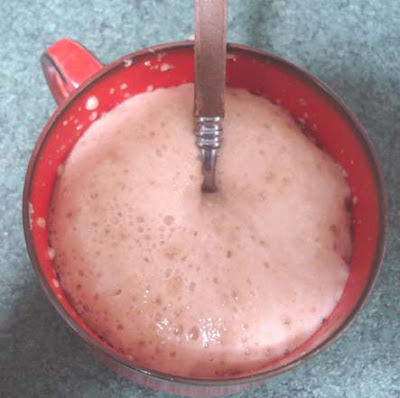
Activate the yeast. (Proofing)
You don't want to go to the trouble of making the bread and find at the end it hasn't worked. One of the ways to be confident the bread will turn out well is to make sure the yeast you're about to use is alive. Yeast needs water and sugar to activate. If it's alive, when you add the water and sugar, the yeast will start fermenting and becoming frothy. This is what you want to see. Take 1½ teaspoons dried yeast, 1 tablespoon sugar and 65 mls warm water and mix together in a cup. Leave it aside for a few minutes while you prepare your other ingredients. When you come back to it 5 - 10 minutes later, it should look like this.
 STEP 2
Mixing the dough
Then add your dry ingredients to a large mixing bowl. Add the flour first, then make a little depression in the flour to contain your other dry ingredients. When all the dry ingredients are in, add your proofed yeast and the rest of the warm water. Mix all the ingredients together with a spoon until it gets to the point where your hands will mix it better, then start bringing the mixture together with your hands. This is the first point when you check the moisture content. If you need more water, your dough will look like this after you've added all the water stated in the recipe.You can see in the photo that the dough looks dry. It hasn't come together properly and there is still flour to be incorporated into the mix. Take notice what your dough feels like.
 You're aiming for a ball of dough that's combined all the ingredients, with a slightly moist feel. You don't want it wet and not dry either. If your dough looks like the above photo, add more water by doing this: get a half a cup of warm water and a dessertspoon. Add the water to the dough one spoon full at a time. You have to be careful not to add to much so do it bit by bit. When your dough looks like the following photo, you're ready to go to the next step.
 STEP 3
Kneading the dough
If you've had problems with handmade bread before, you're probably not kneading the dough long enough. This is a very important step if you want light bread with a good crumb. If you're good at kneading, this step will take you at least 8 minutes. If you're light handed, you'll take at least 10 minutes on this step.You need a firm and stable surface on which to knead your dough. It's best done on a clean bench top. Wipe the surface of your bench top with a clean cloth and warm soapy water. Don't use antiseptic wipes, you could kill the yeast. When you're satisfied the bench is clean, wipe it with a clean tea towel. This surface is ideal for kneading. If your bench top is not suitable, use a large bread board with a slightly wet tea towel folded in half under the board. The moistened tea towel will stop the board moving while you're kneading. Sprinkle a small amount of the same flour you used in the recipe onto your bench top and place the dough on it. Before you start kneading, poke your finger into the dough and see how the indent stays in there. This is a good way to test your dough as you go through the kneading process.
 Start kneading the dough. You can use both hands to do this. In the photos, I'm using one hand because I'm taking the photo with the other one. What you're trying to do is develop the gluten by working the dough and getting the gluten strands to develop. You do this using the heal of your hand. Push the top of the dough away from you with the heal of your hand while holding the dough steady with your other hand.

The dough stays right in front of you all the time, but you push a portion of it away with every action. After you've pushed out, fold that portion of the dough back on itself like the top of an envelope. Turn the dough a quarter turn and push it out again with the heal of your hand. Fold it back on itself. Another quarter turn. When you've kneaded for one minute, your dough will look like this:
 We can see here how the dough had been folded back on itself and that it's starting to look drier and smoother. Keep kneading for another few minutes and the dough is smoother again. If you poke your finger into it now, the dough will spring back out, not stay indented. Keep kneading until your dough is smooth and elastic, like this.
 You can see that the dough is smooth and elastic and if you poke your finger in it will spring out nicely. If you've been kneading for AT LEAST 8 minutes and your dough is smooth and looking like the photo above, then you're ready to go to move on.
Don't rush things though just for the sake of a few minutes because the work you do here makes or breaks your bread. Fold all the bread into itself so the other side forms a nice smooth ball like this:
 STEP 4
First rise
Place the ball of dough, smooth side up, in a clean bowl that's been very lightly greased with olive oil. Cover the dough with a clean moist tea towel or a lightly greased piece of plastic wrap. The bread must be covered well so it doesn't start to harden while it's rising. If you've got a cold kitchen the greased plastic wrap might be the better option. You want the dough to rise in a warm draft-free area. If the dough stays cold, it will take hours to rise. So place in in an oven that you've heated to about 150C for a few minutes and turned off. Or you could put it outside in the sun (I do this). Make sure it's covered properly though, you don't want flies or ants in your mix. Or place a heated wheat bag near the bowl. If you have a pot of soup on the stove that is still warm, place the bowl near the stove. If you have a hot water system that is warm during the day, that might be a good place for you. You're looking for a a temperature of around 20 - 24 C. If the area is too hot or too cold it will effect the taste and texture of the finished loaf. Leave the covered dough in the warm spot untouched for about 30 minutes and check. It needs to double in size, like this:
 When you dough looks like this, you're ready to go to the next step.
STEP 5
Punching down and forming the dough
Punch the dough to deflate it. It will look like this:
 Scoop the dough up out of the bowl, sprinkle flour on your bench top again and place the dough on the flour.Turn your oven on to its highest setting. Start kneading the dough again. Use the same technique as before with the heal of your hand and knead for two minutes:
 After two minutes of kneading, flatten the dough and roll it into a cigar shape.When it looks like this, you're ready to add some seeds:
 On my loaf I used a mixture of sesame and poppy seeds with oats. This stage is the opportunity to add more nutrition to the loaf with oats, wheatgerm, sesame or poppy seeds, soaked linseed or any other topping you want to use.
 Pick the loaf up with the smooth side on top and with your other hand, moisten the loaf all over with water. Roll the loaf in the seeds/oats so that's it's completely covered. The water will stick the coating to the loaf. If you don't want seeds on the loaf but would like a crusty loaf, moisten the dough with the water but don't add the seeds. If you want a softer loaf, don't add the water at this stage but put the loaf straight into a lightly greased loaf tin and sprinkle with a small amount of flour. If you like, you can make a slashes in the top of the loaf.
STEP 6
Second rise
Let the loaf sit in the loaf tin for the second rise until it's lifted a couple of inches but not bulging over the sides.
 STEP 7
Baking
You need a hot oven to get a good lift, so when the oven is hot, place the loaf in to cook. After 10 minutes, turn the oven down to 200C and cook for another 15 - 20 minutes, or until you can smell baked bread and the bread is golden brown. Put the bread on a cake rack and get the butter ready because you are about to enjoy your bread.

Baking bread makes sense economically, even if you make your bread in a bread maker, it will be much cheaper than buying premade bread. It will also be healthier as your homemade bread will contain only those ingredients you include, not flavour enhancers, preservatives or colourings.
You will see I've added gluten flour to this recipe. It will help those of you who have not yet got the kneading under control to still get an excellent loaf. When you're more proficient, you can leave it out.
I am happy to help anyone who is having trouble baking reasonable bread. Most problems are easy to fix. Just leave a note in the comments section and I'll get back to you as soon as I can.
THE RECIPE
1½ teaspoons dried yeast
1 tablespoon sugar
65 mls warm water
3¾ cups baker's flour - also called strong flour or high protein flour
3 teaspoons gluten flour
1 tablespoon butter/margarine (softened)
1½ teaspoons salt
1 tablespoon milk powder
250 mls warm water + more if necessary
Just a word about flour. Bread mix, which is commonly used in bread machines, is flour with bread improver and flavour enhancers added. We are NOT using bread mix. By adding the ingredients we add, we're adding natural flavour to the bread as well as giving it a lift, that as an inexperienced baker, you won't get without the gluten flour. When you start experimenting with other recipes you can leave out some of these ingredients and try others. Another thing you need to know about flour is that it's different all over the country. When baking with the various flours, they take different amounts of water. A flour in Melbourne will be slightly different to a flour in Brisbane because of the amount of humidity in the air. And even if you use the same bag of flour at different times of the year, you'll probably use slightly more or less water, according to the weather conditions. This is not a problem, it just means you have to know what your dough should look and feel like before going to the next step. Bread making is very tactile, even when making the dough in a bread machine, I feel it to make sure I have enough moisture in the dough. This recipe generally uses 315mls of water, but when I made this loaf yesterday I used about 40mls more. Sometimes the difference will be one spoon full, sometimes it will be almost a cup.
STEP 1
Activate the yeast. (Proofing)
You don't want to go to the trouble of making the bread and find at the end it hasn't worked. One of the ways to be confident the bread will turn out well is to make sure the yeast you're about to use is alive. Yeast needs water and sugar to activate. If it's alive, when you add the water and sugar, the yeast will start fermenting and becoming frothy. This is what you want to see. Take 1½ teaspoons dried yeast, 1 tablespoon sugar and 65 mls warm water and mix together in a cup. Leave it aside for a few minutes while you prepare your other ingredients. When you come back to it 5 - 10 minutes later, it should look like this.

Mixing the dough
Then add your dry ingredients to a large mixing bowl. Add the flour first, then make a little depression in the flour to contain your other dry ingredients. When all the dry ingredients are in, add your proofed yeast and the rest of the warm water. Mix all the ingredients together with a spoon until it gets to the point where your hands will mix it better, then start bringing the mixture together with your hands. This is the first point when you check the moisture content. If you need more water, your dough will look like this after you've added all the water stated in the recipe.You can see in the photo that the dough looks dry. It hasn't come together properly and there is still flour to be incorporated into the mix. Take notice what your dough feels like.


Kneading the dough
If you've had problems with handmade bread before, you're probably not kneading the dough long enough. This is a very important step if you want light bread with a good crumb. If you're good at kneading, this step will take you at least 8 minutes. If you're light handed, you'll take at least 10 minutes on this step.You need a firm and stable surface on which to knead your dough. It's best done on a clean bench top. Wipe the surface of your bench top with a clean cloth and warm soapy water. Don't use antiseptic wipes, you could kill the yeast. When you're satisfied the bench is clean, wipe it with a clean tea towel. This surface is ideal for kneading. If your bench top is not suitable, use a large bread board with a slightly wet tea towel folded in half under the board. The moistened tea towel will stop the board moving while you're kneading. Sprinkle a small amount of the same flour you used in the recipe onto your bench top and place the dough on it. Before you start kneading, poke your finger into the dough and see how the indent stays in there. This is a good way to test your dough as you go through the kneading process.


The dough stays right in front of you all the time, but you push a portion of it away with every action. After you've pushed out, fold that portion of the dough back on itself like the top of an envelope. Turn the dough a quarter turn and push it out again with the heal of your hand. Fold it back on itself. Another quarter turn. When you've kneaded for one minute, your dough will look like this:


Don't rush things though just for the sake of a few minutes because the work you do here makes or breaks your bread. Fold all the bread into itself so the other side forms a nice smooth ball like this:

First rise
Place the ball of dough, smooth side up, in a clean bowl that's been very lightly greased with olive oil. Cover the dough with a clean moist tea towel or a lightly greased piece of plastic wrap. The bread must be covered well so it doesn't start to harden while it's rising. If you've got a cold kitchen the greased plastic wrap might be the better option. You want the dough to rise in a warm draft-free area. If the dough stays cold, it will take hours to rise. So place in in an oven that you've heated to about 150C for a few minutes and turned off. Or you could put it outside in the sun (I do this). Make sure it's covered properly though, you don't want flies or ants in your mix. Or place a heated wheat bag near the bowl. If you have a pot of soup on the stove that is still warm, place the bowl near the stove. If you have a hot water system that is warm during the day, that might be a good place for you. You're looking for a a temperature of around 20 - 24 C. If the area is too hot or too cold it will effect the taste and texture of the finished loaf. Leave the covered dough in the warm spot untouched for about 30 minutes and check. It needs to double in size, like this:

STEP 5
Punching down and forming the dough
Punch the dough to deflate it. It will look like this:


STEP 6
Second rise
Let the loaf sit in the loaf tin for the second rise until it's lifted a couple of inches but not bulging over the sides.

Baking
You need a hot oven to get a good lift, so when the oven is hot, place the loaf in to cook. After 10 minutes, turn the oven down to 200C and cook for another 15 - 20 minutes, or until you can smell baked bread and the bread is golden brown. Put the bread on a cake rack and get the butter ready because you are about to enjoy your bread.
