Lisa J, one of the lovely ladies who comments here, asked if I would give some instructions for doing stitcheries. I'm happy to do that as stitchery can be used to make a wide range of gifts for the people in your life and for beautiful things in your own home. It's a great skill to have.
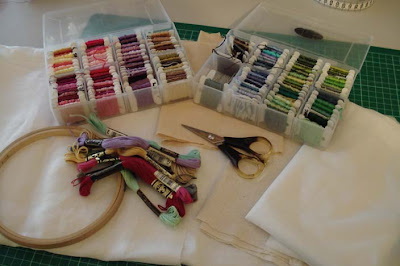
These are the fabrics I use. On the left is a white cotton and the right a beige linen.
I always draw my own designs because I like to customise my gifts for my friends, but there are free patterns on the web and I have some here for free down load. You can also buy patterns at the craft store. If you can draw, try doing your own design. They don't have to be perfect because stitchery should have a handmade look. The appeal of stitchery is that it's not like mass produced embroidery.
Once you have your pattern, which is usually just a piece of paper, you need to transfer it to your fabric. I just pin the pattern to the back of the fabric and trace it onto the fabric with a dark soft pencil. Here are some instructions on how to transfer a pattern. How to transfer the pattern to your fabric.
Once you have transferred the pattern and attached the backing to the fabric, you'll need to work out your colours and prepare your threads. You will start in the centre and work your way outwards, so choose a colour for the centre and thread your needle with two strands of thread about 75 cm long. The needle you use should be the finest needle you can manage to thread. Pull the thread through the eye of the needle so the thread closest to the eye is doubled (4 strands) and the end of the thread, the thread that will be in your fabric, is single (two strands). Now you're ready to start. You can use an embroidery hoop if you like. I don't like working with a hoop but many stitchers do.
Most of the stitches you'll do will be back stitch. This makes up about 90% of your stitches. Here are some instructions: How to do back stitch. And here are some photos of me starting a back stitch. Start under the fabric.
And following along in a straightish line. Pull each stitch firmly but not tightly.
Here are three stitches completed. Try to keep your stitches to an even length.
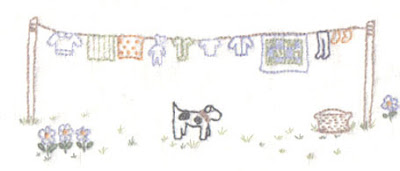
So you just follow your pattern with back stitch, from the centre out and when you need to do dots, like in the pattern below, they are colonial or French knots. How to do a colonial or French knot. The leaves, or to make a flower, are detached chain or daisy stitch How to do detached chain or daisy stitch.
Instructions for other stitches.
Tutorial for using finished stitchery.
I hope these instructions help get you started as you can make gifts for women, men and children with stitchery and a bit of know-how.




.jpeg)

.jpeg)
.jpeg)
.jpeg)

24 Comments
Just gorgeous! Youre stitchery's are greatly admired here. :o)
ReplyDeleteThank you for that link to "Pink and Barbara". How beautiful!
Hmm, makes me wanna pull out my emb threads and start stitchin' coz you know I don't already have enough to do each day. Ha ha!
Maybe after I clean out the chook shed.......... LOL!
Hi Rhonda,
ReplyDeleteYour embroidery is lovely! You have me curious about backing it though, I've never backed mine. It sounds like a very sensible idea and would give the stitches greater life I would imagine.
I love the feeling I get when I embroider, it is almost like a kinship with women from centuries past, sewing in front of the fire, darning socks, knitting for loved ones. It is a very valuable and beautiful skill to possess and I look forward to teaching my own daughter as she grows.
I'm sure you will start a new trend with your tutorial!
Warmly,
Shell.
Do you ever use aide cloth. I sometimes use it for cross-stitch. Is the fabric you use just for stitchery?
ReplyDeleteThank you,
Renee
In Ky
hello Dot love! I hope I've made you get those threads out. LOL
ReplyDeleteThank you Shell. Backing does tend to give a nice finished look. It also hides thread tails and if you're using dark colours, a backing helps hide any untidyness (which I'm often guilt of). ; )
Hello Renee. I've never used Aide cloth and I'm not sure what it is. I tend to be a plain and simple women so I just go with regular open weave cotton or linen. I generally buy it at a craft store, not a dress fabric store. : )
Aida cloth is for cross stitch; it has an open even-weave canvas type fabric, making it easy to count the threads for a counted cross stitch design. It is not a good choice for the stitching spoken about in this post. For surface or free form stitching any plain fabric is fine but a medium weight cotton or linen is ideal. Even-weave fabric will be fine too but it isn't necessary.
DeleteAida is a standard fabric for a lot of cross stitchers especially beginners. Even-weave can be a bit daunting at first
Nell
I am just loving your site! You are so much like my mum would have been... Thank you so much for all your little insights into healthy living (we already do much of what you suggest but it's great to have it reinforced)!
ReplyDeleteDear Rhonda;
ReplyDeleteYour stitchery is lovely. I have a box of threads which I bought at a garage sale-eons ago.
I now want to make something and begin to create gifts. The perfer gift is definately the one that was made with love and attention to detail.
Thank you for sharing.
Maria
Thank you for this post! I've always wanted to do stitchery, but have been intimidated for some reason. Now I can't wait to try!
ReplyDeleteRebecca, Riverview Street, Joy, thank you so much for your comments. I hope you're encouraged to try this simple craft. I tell you, if I can do it, anyone can.
ReplyDeleteRhonda- I love your stitchery. Where do you get you patterns and ideas. Sharon
ReplyDeleteHello Sharon, I draw the patterns from what's in my head. Sometimes they work, sometimes they don't. It's all part of the mix. : )
ReplyDeleteLove your stitchery, Rhonda. I'm an avid cross-stitcher myself!
ReplyDeleteIt may help people who are starting out to work with a premade pattern or two first before moving on to their own designs. It may help them to get a feel for what they're doing. Aida cloth is also an easier tool to work with when you're a beginner. I hope you inspire lots of people to pick up this useful and satisfying skill!
ReplyDeleteDear Rhonda, thank you for your blog. You are so generous with your sharing. I have recently found your blog through Jewels (bless her) and I have been so grateful for all the information you have here. I live a simple life in NSW near the blue mountains and although I have three young children there are so many things I want to do. I had never heard of homemade dishcloths. Fancy that!!! Now that I do know guess what my relatives will be getting for Christmas - that's right, dishcloths :0} You have a gift for making everything sound easy and able to be done.
ReplyDeleteWarmly Mrs MacKenzie
Thank you! I love to embroidery, but only use a running stitch, satin stitch or french knots as they were the only stitches I learned when my aunt was teaching me. Now I can expand my repretoire!
ReplyDeleteWow Rhonda Jean you are so talented and organized. I do like to cross stitch but my thread is no where near organized as yours.
ReplyDeleteI just wish I could finish one of my projects. I have bins of half finished things.
I had to get my cousin finish a cross stitch of the Sydney Harbour Bridge and I have it framed and on the wall at home. Maybe one of these days I'll get to them.
Paula
thank you anna. : )
ReplyDeletefarm mom, thanks for explaining what aida cloth is, and for your suggestions. I too hope more women start stitching.
Welcome Mrs Mackenzie. My sister lives at Faulconbridge right near Norman Lindsay's house : ) I wish you well with your Christmas knitting. If you look at my last post on dishcloths (I think) there is a photo of some italian silky looking pure cotton I bought recently at Spotlight. It's made up the best dishcloths I've even knitted. Keep your eyes open for it. It's worth its cost.
marianna, if you can do those stitches, you can do back stitch. I hope you enjoy your stitching. : )
paula, I want you to get out your favourite half finished project and keep it by your chair. Hopefully that will motivate you to start stitching again. : )
I love stitcheries too! I also love to doodle on paper and come up with my own designs.It's a great creative outlet and I like to combine it with my quilting...
ReplyDeleteYou did a great job in explaining how to make them.
Love,
Joy
ahh rhonda jean! when i grow up i want to be just like you! you've managed to inspire me yet again!
ReplyDeleteRJ, Just the tuition I needed. Once the knitted bathroom cloth is finished, a handdrawn stitchery is my next project. I think I can have it finished by next weekend for a one year old birthday party. Do you wash your fabric before use? BTW - I really love the photos you take of your things, like the one of the thread boxes. Ordinary items made beautiful.
ReplyDeleteHi Joy and Jayedee. : ) Lisa, no I don't wash before I use the fabric. I sometimes wash after I've finished. If I've been messy with my pencil lines and haven't covered them properly, I wash the finished stitchery and then iron it.
ReplyDeleteHi Rhonda !
ReplyDeleteI just found your Blog and it is Wonderful !!!
I am hoping you can tell me ... the small sampler to the right /bottom of your blog is one that I would like to 'do' for my home.. live simly etc..I can not read the blocks on the far right.. could you tell me what they say ??? thanks ! Gina
???is stitchery embroidery? new to this have been hearing on primative pages alot about stitchery so I was wondering? I have read you instruction & they were great for me as a starter, although I did not atempt the backing (just did pillow case ends with grandkid name to practice. Thanks! I have made some country pillows & want to stich some wording on them. I got some Muslin to do it on would I still need backing if I'm gonna make this a seperate peice to mbe sew on afterwards? Thanks! Cathy
ReplyDeleteYes Cathy, stitchery is simple embroidery. You'll probably be fine without a backing on your muslin if it's not too flimsy. Good luck!
ReplyDeleteI welcome readers' comments. However, this blog never publishes business links or advertisements. If you're operating a business and want to leave your link here, I will delete your comment .
Note: only a member of this blog may post a comment.