Once you’ve mastered a good everyday loaf of bread, it’s time to branch out and push your own boundaries. You could do that by either experimenting with new recipes or making the bread look great. Either way you'll probably get around to both at some point, the aim here is to add to your basic skills and be creative.
Let me first say that you aren’t at this stage yet if you haven’t mastered basic bread baking. You can read about baking here and here in some previous posts I’ve written. Both these recipes are easy, but you need time when baking, it’s slow food. Don’t try this when you’re ready to rush out the door to pick up the kids, or 15 minutes before your guests arrive. Put these things on your lists for alone time, slow yourself down, concentrate and think about what it is you’re doing. Hopefully what you will be doing it to develop a simple skill that will stand you in good stead for years to come, hopefully you will give it the time and attention it deserves, and hopefully this skill will be passed down to your children and grandchildren. It needs time but it will stand the test of time.
Let me first say that you aren’t at this stage yet if you haven’t mastered basic bread baking. You can read about baking here and here in some previous posts I’ve written. Both these recipes are easy, but you need time when baking, it’s slow food. Don’t try this when you’re ready to rush out the door to pick up the kids, or 15 minutes before your guests arrive. Put these things on your lists for alone time, slow yourself down, concentrate and think about what it is you’re doing. Hopefully what you will be doing it to develop a simple skill that will stand you in good stead for years to come, hopefully you will give it the time and attention it deserves, and hopefully this skill will be passed down to your children and grandchildren. It needs time but it will stand the test of time.
So let’s assume you’ve got your bread to something you really enjoy eating. It’s a good healthy basic loaf that your family loves and lines up for when they smell that distinctive aroma of fresh bread. But it looks a bit boring, or it looks the same every day. What is the next step in expanding your repertoire before moving on to more advanced recipes? It’s shaping and decorating the loaf.
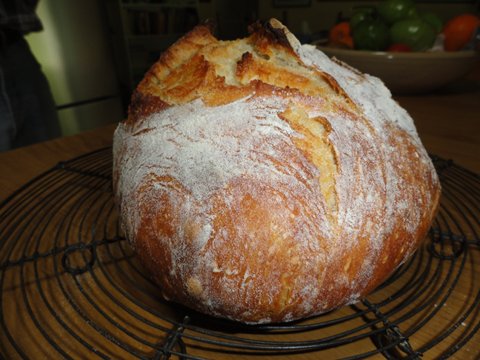
The reason bakers get those wonderfully crusty loaves is that they often have wood fired or steam ovens. A little bit of moisture in the oven will work its charm by making a good crust. While you can’t really duplicate the baker's crustiness in a domestic oven, you can get almost as good as a baker’s crust by brushing the loaf with cold water just before it goes in the oven.
Once you have moistened the loaf, you have also created a kind of glue on which to stick all manner of seeds and grains. The traditional seeds for white bread are poppy seeds and sesame seeds. Caraway seeds are used on rye bread (see loaf below). Adding seeds will add extra nutrition to the bread; here is some nutritional info about various seeds. But you can also add things like rolled oats, polenta, crushed wheat (burghal), pumpkin and sunflower seeds. When you add anything to your loaf, sprinkle it on for a light covering and then press it in lightly. For a heavy coating, like the loaf above, place your seeds/oats on the bench and roll the loaf over the seeds.
If you want a soft crust, brush the top of the bread with melted butter or olive oil just before it goes into the oven for baking. You can also do this after baking to give the loaf a very shiny appearance.
I have also seen bread with a sprinkling of rock salt on the top, as well as a floured top. If you decide to go for the old fashioned floured top, pat off the excess flour. You can also get a good effect for the kids by having a floured top and then painting their name or a smiley face on the bread with a wet brush. As the bread bakes, the face or name will show up in the space where the flour has been brushed off.
Decorate your loaf after the first rise and punch down. Reform the dough into the shape you want, add your seeds/decoration, then slash it if you want to and leave it to rise for the second time. Slashing will allow the dough to rise to it's full potential.
Don't forget that most bread doughs can be formed into plaits/braids, bread rolls, or rounds if you don't want a traditional loaf. Experiment with the dough and see what happens. You may go back to your traditional loaf, but you may discover something you really like that will make the bread you bake distinctive.
One thing is certain, once you know how to make good bread, it's wise to try new recipes, add things to your favourites and play with the shape. As with all things in this simple life, you push your boundaries and see where it will take you.
Never stand still.
EXCELLENT RESOURCES


.jpeg)


.jpeg)
.jpeg)
.jpeg)

19 Comments
Hi Rhonda!
ReplyDeleteAs usual, you're post is quite timely...I'm still at the stage of mastering some basic good loaves, and just posted on that subject yesterday. Now I came here just in time to see inspiration for what those can someday be, yay!!
I'll be trying your recipe soon, hopefully, as homemade loaves, whether amateurish or beyond ALWAYS taste better than what's in the package at my supermarket :) Thanks for sharing your wisdom and expertise so generously!
OK, now I reread my comment and am adding that I didnt mean to imply your recipe is amateurish but rather that the best recipe in the hands of an amateur such as myself will be delicious, even if the baker is a novice and makes mistakes...like I do :) That bread still comes out of the oven tasting soooooo delicious
ReplyDeleteRhonda-
ReplyDeleteI have been baking bread since I got married twenty-six years ago, but I have a question? I cannot seem to solve the problem of my bread cracking on one side of the top when it is baking, so that the loaf comes out rather lopsided. Basically, the top cracks open when it rises the rest of the way in the oven. I have had a bit of luck by cutting a slash in the top. But, I never get the pretty loaf of bread - always a broken crack in one side. Any suggestions as to what I am doing wrong?
I put the dough through two risings and let it rest after dividing it before I shape my loaves. I suspect my problem is in my shaping method. I use the method in my old Betty Crocker cookbook which consists of a series of pressings and foldings until a nice loaf is shaped. I wish I could be more specific. The bread tastes great - I just wish it was prettier!
Thanks,
Laura
In a previous life time when i was being formally educated, i had the priveledge of being taught about bread and pastry by a great pastry cheff, when it came to getting extra moisture for lift in the oven, he would just splash some water on to the oven floor, causing steam. I still do this, about a tablespoon full of water just splashed into the oven when i put in the bread.
ReplyDeleteOn a bread variation, there is a man at the markets who makes Langos,(Hungarian), its just a basic bread dough, flattened into pieces like pizza, and deep fried, and served with garlic oil, sour cream and grated cheese. I made it this weekend, and the little piggies, gobbled it all up. (daid it was as good as the market mans) I didn't use all the dough, so for dinner, i spread it out like pizzza, and filled it with chopped left over veggies, bacon and cheese. served with soup. Yumm.
Bread baking/yeast dough cooking, is so versatile, and fun, and great for kids, because the dough does need beating into submission.
You just need to make sure you get strong flour, it hasn't had all the gluten (protien) removed, its the gluten that makes it all elastic. Off the shelf plain flour won't do the job. I have noticed on my local supermarket shelf (south east Qld) that there is fancy boxed pasta/bread flour. It would be good for a first time, but is quite expensive.
Ahh bread, the food of life, thanks Rhonda. Jacky
Rose Levy's Bread Bible suggests putting a pan at the bottom of the oven when preheating and throwing in a handful of ice chips as you put the bread in to give that moisture blast. The oven needs to be hotter than you want, so you don't cool it down too much, but she suggests that in any case because the oven loses heat when you open the door to put the bread in. Just turn to the correct heat at that point.
ReplyDeleteI also like to brush bread with an egg white wash sometimes (beaten egg white and water). That results in that crackly brown crust that you couldn't resist picking off the bread when you were a child :-)
A crackling sound when bread comes out of the oven and starts to cool is also a sign that its properly cooked - I love that sound.
You're right, the first time you make bread you need to concentrate. However, the first (and every time since I think) that I made no-knead bread I had my son in the high chair next to me for at least one stage. Fortunately none of the stages are very long, and it isn't very time sensitive (you can leave it an extra half an hour or hour and it's fine). The recipe is here http://www.nytimes.com/2006/11/08/dining/081mrex.html and it's mother of baby/toddler proof.
ReplyDeleteIf you're making it in cold weather leave the first rise for closer to 18-20 hours than twelve. The recipe calls for a heavy dish (cast iron would be ideal), I've found my ancient pyrex casserole is pretty good.
I'm adding you to my favorite bloggers, I love making bread from fresh ground wheat, however, I'm still a novice. My loaves taste great and are gobbled up by my family but they don't always look great. I'll be checking in to learn more tips.
ReplyDeletethanks
Tracey
www.in-word-adorning.blogspot.com
Hi Rhonda,your bread looks so gorgeous,I love to make my own too and taught my children when they were little and they still love it!
ReplyDeleteMy cooker is broken at the moment and I am so frustrated seeing all the lovely recipes in blogland so I am making notes for when its fixed!!!!!
Love from Kathyann and the girls
Boo hoo I still haven't mastered a basic loaf yet - I have made two loaves but both have been gluggy and heavy,not light or fluffy. Two reasons - one I can't find gluten flour anywhere and two I don't think I am letting the second rise go long enough. But I will soldier on and master it EVENTUALLY :-)
ReplyDeleteAnonymous-- I've found that all-purpose flour works just fine when I can't find bread flour at the store. It has a medium gluten content in it and is suitable for most other baking needs. It is also cheap.
ReplyDeleteHi Rhonda!
ReplyDeleteJust as my soap -- I have a basic bread recipe which I use to make rolls, braids, and other yummy things. With that basic bread recipe -- I can make most anything by simply adding a little of this and a little of that (eggs, raisins, onion, granola, cranberries, flax, etc.)
As always, I adore your blog. Your posts never fail to inspire me or to remind me to take a moment to really enjoy my simple life.
I must catch up on your posts. We've had some rotten spring/early summer storms so my internet has been acting up. So has my blog host. Grrr...
Blessings to you, my friend!
Lacy
I'm making most of the bread for our family of four. I bake twice a week and make four big loaves.
ReplyDeleteI've experimented for a long time and now this is my basic recipe:
(i use cups of 250 ml)
1 cup rye flour
4 cups whole wheat flour
3 cups plain white flour
1 tablespoon salt
1 tablespoon yeast
1 tablespoon oil (i use mostly coconut or oliveoil)
1 tablespoon sucanat (or other sugar)
3,75 cups of warm water
I make this the usual way and let it first rise one hour.
Then another short kneading and a shorter second rise. About 45 minutes. That gives a better structure. Then i bake it about 35 minutes in a heated oven of 200 degrees Celsius.
This gives a very tasty, healthy bread and it stays fresh for a couple of days. The rye flour gives it some softness. It's not a bread for starters because it's heavy kneading, but that's the only difficult part of it.
I also have a recipe for very simple and quick white bread. It tastes a bit like the french bread with a lovely crust.
This is what you need:
1 kilo of plain white flour
1 tablespoon salt
2 tablespoons yeast
1 tablespoon sucanat (or plain sugar)
About 3 cups of warm water
You make the dough on the usual way and let it rise for 20 minutes.
Then you make two loaves of it. Don't use a pan but lay them on the ovensheet. Scarf with a sharp knife an + or an x and put the breads in a cold oven. Also put a cup with hot water in the oven (for moist and a lovely crust)
Set the oven on 200 degrees Celsius and bake it about 45 minutes or till the breads are golden brown.
Greetz Annikka (from Holland who has made yesterday a huge storage of syrup. The sambucca has flowers now and you can make a very tasty lycheetasting syrup of them with citric acid and sugar.)
Oops, the recipe for my first bread i've posted is for two big breads. I forgot to mention that.
ReplyDeleteI guess I'm still working on getting the basic loaf right.
ReplyDeleteThey never rise like they should around here. :-(
I've also checked out the no-knead bread lots of times, but I still haven't found the right pot for it to bake in.
Christine from the NL
I really like Carol Bates' (I think that's her name) book "Simply no Knead", I find the recipe fool proof, it uses "normal" bread tins and I get nice crusty loaves. They take about 5 minutes to measure out and mix, 1 hour total rising time and 1/2 hour baking....yummy!
ReplyDeleteI love brad but try not to have too much in the house... I still bake 4 loaves a week!
I am so glad that I found your blog! It is wonderful!
ReplyDeleteThanks to Annikka from Holland because I always wondered what lycee tastes like, and she writes it is like Elderflower which I know very well.
ReplyDeleteThank you for taking me back to my bread making days. Those days when I was a stay at home mom. I am hoping to revisit those days sometime in the future. Right now I work too many hours outside my home to attempt the process properly. I learned to make bread by watching my grandmother. It is such a wonderful tasty art!
ReplyDeleteI generally make just a plain white loaf, but one that my family really enjoys is when I add rosemary, basil, parsley, oregano, and garlic powder to it.
ReplyDeleteRhonda, thanks so much for sharing all these breadmaking tips. I learn so much every time I come here!
:)
I welcome readers' comments. However, this blog never publishes business links or advertisements. If you're operating a business and want to leave your link here, I will delete your comment .