What's not to love about bread? Well, maybe I should clarify that statement somewhat - what's not to love about good wholesome bread. The common, plastic-wrapped, supermarket loaf does not have any part in this post. I'm talking about homemade rye bread today and the common supermarket loaf is about as far away from homemade rye as it could be. This rye loaf will give you good nutrition, complex carbohydrates, high fibre with a low glycemic index, as well as many vitamins and protein. There are a few types of rye bread. My favourites are pumpernickel, which is 100% rye, and this loaf which is 75 percent rye flour and 25 percent unbleached white flour/wholemeal wheat flour. If you're buying bread flour for the first time, buy it in small quantities until you find type of bread you like, then buy flour for that type of bread. If you're buying rye flour, look in the shop for caraway seeds too and get 15 - 30 grams if they're there. Caraway is the traditional seed used with rye and it's a marriage made in heaven.
Many people are put off making bread because they believe it is difficult and time consuming. This bread is called five minute bread because you'll only be working on the dough for five minutes. Making good bread is certainly a skill, but it's just a matter of learning how and then practising enough to perfect it. This bread is a very good loaf to start off any new baker because there is almost no kneading and there are few ingredients. Here they are:
Ingredients:
- 2 cups rye flour
- 1 cup white or wholemeal wheat flour
- ¼ teaspoon dry yeast
- 1 teaspoon salt
- 1½ cups warm water If you have to add slightly more water to get a moist dough, do so. The amount water you use will depend on the type of flour you use, and your climate. Flour is affected by humidity so you'll use less water in humid weather.
You can make this bread using all white bread flour or any mix of bread flours, just make sure it's three cups in total.
Equipment:
- large mixing bowl
- measuring cups and spoons
- Dutch oven or covered cast iron casserole pot. This provides the ideal conditions for cooking the loaf.
Time frame:
You'll need to make the dough about 12 hours before you want to bake the loaf. I usually make my dough late in the afternoon on the day before I want to bake it.
Your time periods will be:
Making the dough - about three minutes, at least 12 hours before you intend to bake the loaf.
Shape the dough - one minute, one hour before you intend to bake.
Place the dough in the pan to bake - less than a minute.
Baking will take about 30 - 35 minutes.


- Late in the afternoon on the day before you want the bread, take a large bowl and measure in three cups of flour, ¼ teaspoon of dry yeast and a teaspoon of salt. Mix the dry ingredients together. Add 1½ cups water and mix the ingredients together with your hands until all the flour and water have mixed together completely. This mixing (not kneading) will take less than a minute. Just continue mixing the dough with your hands until all signs of dry flour have gone.
- Cover the top of the bowl with plastic wrap and leave the bowl on the kitchen bench overnight.
- The next day, about an hour before you want to bake the bread, sprinkle a small amount of flour onto your clean kitchen bench. Tip the dough out onto the floured surface. At this stage it will look like a sloppy mess.
- Take the top portion of the dough (at 12 o'clock) and fold it down onto the bottom portion (6 o'clock) and push in with the base of your hand. Turn the dough slightly and repeat the folding from top to bottom for about a minute or until the dough is smooth and you can shape the dough into a smooth round ball - see below.
- Move the dough ball to a clean tea towel sitting inside the mixing bowl, cover the dough with the tea towel and let it sit there to rise for about an hour - see below. If you have caraway seeds, or want to add seeds, oats or polenta to the top of the loaf, wet the top of the dough and sprinkle it on.
- Fifteen minutes before baking, place the cast iron pot and lid in the oven and turn the oven on to the top temperature - I use 230C/445F.
- Just before you place the dough into the baking pot, clip the top of the dough with scissors or slash the dough with a very sharp knife.
- When the pot is extremely hot, carefully place the dough in the pot, put the lid on and close the oven door. Leave the temperature on high.
- Twenty minutes later, take the lid off the pot and turn down the temperature to about 200C/395F.
- After another 10 - 15 minutes, when the loaf is golden brown, remove the loaf from the oven onto a wire rack.
All our ovens are different, if you think the bread needs more time in the oven, leave it in. Check the loaf when you cut it and if it's slightly doughy in the centre, it will need an extra five minutes next time you bake it.
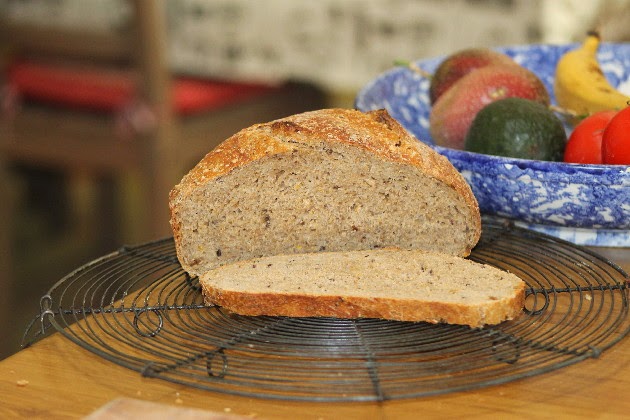
This bread is not sour dough but it's similar to sour dough. When the loaf is hot, the crust will be crusty and chewy like sour dough. The inside of the bread has a slightly chewy texture, also like sourdough. The bread can be eaten fresh or toasted.

This is one of the easiest loaves of bread you ever bake so even if you've never baked before, try this and see how you go. You never know, you may love baking and this might be the beginning of that. If you do bake the loaf, please take a photo and put it on your blog, then leave the link to the photo here so we can all visit and see your bread. If you don't have a blog, post the photo on the forum.
Good luck, bakers!


.jpeg)
.jpeg)
.jpeg)


42 Comments
It's one of the easiest! I have a similar recepie and It's yummy!
ReplyDeleteOh my husband is going to love this bread! Thank you for sharing Rhonda
ReplyDeleteMorning Rhonda.........would you just bake it in a normal loaf pan if you don't have a dutch oven or covered cast iron pot? Thanks for the recipe.
ReplyDeleteNanette, this loaf relies on the steam created in the sealed iron pot to create its unique taste and crust. If you don't have a cast iron pot, just make normal rye bread.
DeleteOk, thanks Rhonda.
DeleteThe recipe and your directions, very inspiring and encouraging, seem easy. I will try to make the bread this week.Thank you for sharing. Blessings to you!
ReplyDeleteI make my own bread too Rhonda. I'd like to try this one. How do you define a cup please?
ReplyDeleteBest wishes,
Angela ( south England) UK
Angela, I use a Pyrex measuring cup of 250ml.
Deletewe have been away for a month long holiday which included a cruise & the indian pacific, both of which had beautiful food, but the best taste ever was toast for breakfast the morning after coming home -- it was my homemade bread & it was delicious
ReplyDeleteRhonda what size pot do you use? I know this won't be crucial to this recipe but I am in the market to acquire a new one as I only use a braiser type flat le creuset and need something deeper.
ReplyDeleteAlso, any thoughts on cooking in plain cast iron camping type pots versus enamelled cast iron pots?
I think my pot is about a 6 litre capacity - it's enamelled. As long as the camping-type cast iron pot is properly seasoned, it should be fine.
DeleteI've just started baking my own bread-we really enjoy it. Having homemade bread in the house is still quite a novelty for us-we may be enjoying it a little too much! :-)
ReplyDeleteWe, daughter and I, have breadmaking on our plan for this morning. I have a really good whole wheat honey recipe, but no whole wheat flour in the house, so we will just make a simple white bread. This the first time for DD to help with breadmaking.
ReplyDeleteHappy Wonderous Wednesday!
AnnDenee
Thanks for sharing this recipe Rhonda, I have had trouble with baking bread and have become disheartened, but this process looks much simpler, I will be giving this loaf a go :)
ReplyDeleteThis looks and sounds so delicious! But, would you leave it out all night in the height of summer's heat? Just wondering. The most exciting thing about this bread is the low amount of yeast! Only one quarter teaspoon.
ReplyDeleteyes, leave it out no matter what the temperature. In warmer weather it just develops a bit more flavour.
DeleteI made this bread a couple of weeks ago and put it in a corningware with a lid or pyrex with lid. Last weeks River Cottage Everyday episode was on "Bread" and it was great. If people can re-watch this I highly recommend it. I got my two kids and I (10 and 8) to watch it with me after school the other afternoon. Regards Kathy A, Brisbane
ReplyDeleteI would not recommend using pyrex or corning ware at the high temperatures needed for this loaf.
DeleteHI Rhonda,
ReplyDeleteThanks for the inspiration to give bread baking a go! You make new things seem possible and obtainable. Are your oven temperature recommendations for a conventional or fan-forced oven? My oven is fan-forced. I don't want to mess up by using the wrong temperature!
Many thanks, Kelly
My oven is fan-forced. Whatever oven you use, it needs to be at its highest setting.
DeleteRhonda I wanted to say thank you for all your articles.You take the time to post about all things that matter to simpler living. Or better yet the quality of better living. I don't get to read every day but try to.You know how that goes with taking care of family and a house. This bread sounds wonderful. Does it taste as good!!! will be trying it this weekend. Thanks again
ReplyDeleteI will definitely try this loaf on the weekend. I have some pea and ham soup in the freezer so what could be better than some homemade bread to go with it!
ReplyDeleteThanks for sharing the recipe, written in simple terms, as always.
Cheers - Joolz xx
I used to make bread by hand a lot when I was a student but since having a baby I'm far more reliant on the bread machine which I'm ok with right now. At least it is still homemade and I'm still totally in control of the ingredients.
ReplyDeleteI love the idea of trying this though as it will be no more effort really than making it in the bread machine and I love the flavour of caraway (I sometimes put it in plain white loaves just because I like it).
I even have rye flour because I made some dark chocolate and rye muffins with seasalt on the top a little while ago (they were amazing!)
I don't have a dutch oven sadly and I wondered if I could put the dough in the bread machine and just use the "Bake" setting? Do you think that would work?
No, it needs the highest heat and 12 hours sitting on a bench to work. You can make a plain rye loaf in the breadmaker. I did one this afternoon, kneaded in the breadmaker and baked in the oven.
DeleteSorry - my mistake I wasn't being clear, I meant I'd try making the dough up as you suggest with the 12 hours sitting and then put it in the bread machine just to bake. Sounds like that wouldn't work though so I'll see if I have something metal I can use to bake it in!
DeleteLovely post Rhonda I will have to see if I got any thing I can use as a Dutch oven would a slow cooker pot be ok ? since re making bread I am the only one eating it as other half would rather it supermarket rubbish instead for his pack up never mind have a blessed week
ReplyDeleteNo, it has to be metal, Linda. Just make an ordinary rye loaf, it will be just as good.
DeleteHello Rhonda,
ReplyDeleteI'm enjoying reading your blog very much. I would like to make my own bread and am wondering if it would be possible to make a gluten free loaf.
Thank you for sharing your wonderful approach to living a fulfilling and peaceful life.
Kind regards,
Betty
You're asking the wrong person, Betty. I've never done any gluten-free baking.
DeleteRhonda, do you have alternative for people allergic to rye? Can we use only wheat flour? It's so quick and easy recipe that everyone wants to use it
ReplyDeleteAny bread flour will work in this loaf. Good luck.
DeleteThank you so much for showing this no knead technique so well. I have been baking all my bread like this for the past year and have found that after the folding in I would place the bread on a piece of parchment paper for the final rise and then just lift the whole thing into the Dutch oven avoiding the loss of lift and also the need to wash the pot!!!
ReplyDeleteI leave a piece of parchment paper in the bottom of the pan. When I first started baking like this I tried what you do but found I was a bit uncoordinated and after lifting the dough on the paper, while trying to avoid the extreme heat of the pot sides, it always had a fold of paper embedded in the side of the dough. With the tea towel, I can just roll it.
DeleteRhonda, this bread is one of my standard bread recipes...as close to sourdough bread as can be...
ReplyDeleteMine too. I've been making this for two years now and it's the loaf I always make when I'm really busy.
DeleteThis sounds like a good, tried and tested recipe. I don't, however, have a cast iron pot big enough and no real need for one or space for one :(
ReplyDeleteYou say that a Pyrex or similar is not suitable as the oven needs to be so hot. I was not aware of a temperature restriction on any of my dishes surely they need to be safe at all temperatures a domestic oven is capable of heating up to, am I wrong on this one?
I know two women who've had pyrex explode in the oven. I doubt it just the high temperatures, it would also be during the heating up and cooling down periods. And I would never use vintage corningware or pyrex at high temperatures.
DeleteMy husband has been wanting me to make rye bread and I've been wanting to try one of the five minute recipes. This will be a perfect win sin situation. I can't try it as I will be busy about another week but just wait...
ReplyDeleteOh, I had a Pyrex dish explode, too. It absolutely shattered. I was baking the Easter ham one year and added a little more water and it exploded. I have heard of others shattering, too, since then. It seems to happen most often 1) when baking at a higher than 350 heat, and 2) at any temperature when water is added after it has run dry. Both of which applied to my situation.
Does the pot need to be greased?
ReplyDeleteIf your pot is properly seasoned, no. I sit mine on an oval of baking paper that I leave in until it turns dark brown.
DeleteCounting down the minutes until my oven alarm goes off and I can pull my dutch oven out with the divine smelling bread in it. I am so excited. This is my first time making any kind of bread. I just used the plain wholemeal flour from Woolworths for my first attempt. I am guessing I could prep a few of these the evening before and then cook them one by one throughout the next day. My kids love bread but I am increasingly concerned about the commercial ones and much prefer to make my own. How well do these freeze Rhonda?
ReplyDeleteVicky, I never buy supermarket bread. If I have to buy a loaf, I get it from my local baker. I've never frozen these loaves so I can't say. I think the crust might be quite chewy when it's defrosted.
DeleteI welcome readers' comments. However, this blog never publishes business links or advertisements. If you're operating a business and want to leave your link here, I will delete your comment .