From the archives - Flowerpot bread (Oct 2008)
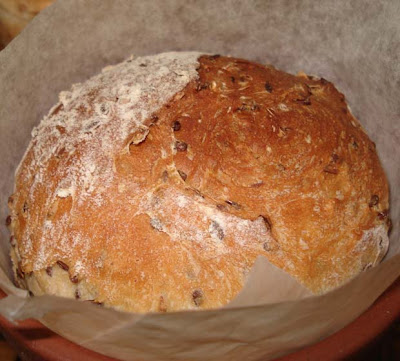
If you're not already baking your own bread, I want you to think about doing it. Not only is it preservatives-free, it's cheaper, tastes better and it a great skill to have. Bread is one of our staple foods and in days gone past everyone, and I mean everyone, knew how to make it. Bread baking is just one of the skills we've traded for the sake of convenience - we give them our money and our independence, they give us back a loaf of bread (usually inferior to what we'd make) and the convenience of not having the bake the bread ourselves.
I know that many of you don't have a lot of time to spend in the kitchen baking bread. If you are one of those people, I encourage you to buy, barter, or swap your way to a breadmaker. It doesn't have to be new or fancy, it just has to knead the dough for you. Then you shape the loaf and bake it in the regular oven. Making bread this way will take you about 10 minutes in the various stages of putting the ingredients in the machine, shaping the loaf and taking it from the oven. Baking bread using a breadmaker does NOT make you an inferior cook. If using a breadmaker allows you to make your own bread, then go for it. Don't think you HAVE to make the dough by hand, it doesn't matter! The object of the exercise is to produce bread and if using a bread maker is how you do it, so be it.
I did a tutorial for hand making bread so you can try that if you want to. I added gluten flour to that recipe because it is a beginner's loaf and the gluten flour helps with the rise. You can leave it out if you can't find gluten or if you feel you'll knead the dough well enough without it.
In the posts here and here I'm talking about the cost of bread. If you can find a supplier of good high protein flour - or bakers flour - you will be able to produce loaf after loaf at a fraction of the price of store bought bread. BTW, the protein in bread flour is gluten so if you can't find high protein flour or bakers flours, use your plain all purpose flour and add gluten to it - ratio is one cup of flour to one teaspoon of gluten.
There are two more posts about bread making here and here.
There are thousands of recipes for bread and this is the one I used to make my flower pot loaves last weekend.
SOY AND LINSEED BREAD - MADE IN A BREADMAKER
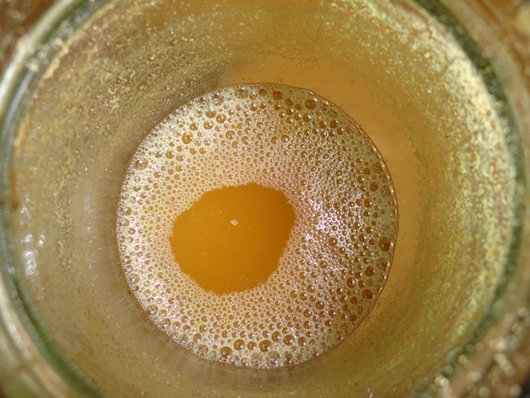
First take two teaspoons of dry yeast and a tablespoon of sugar or honey, add to a cup of warm water and stir. Let that sit on the bench to prove (bubble up) while you prepare your other ingredients.
In this order, or the order described in your breadmaker manual, place in your breadmaker:
3 cups bread flour/bakers flour/high protein flour or plain flour with 3 teaspoons of gluten flour added to it. I used soy and linseed flour, you can use white, wholemeal, wholegrain or whatever flour you have.
1 teaspoon of salt
1 tablespoon of milk powder -- if you have no milk powder leave it out
If you have no milk powder, add some milk as part of your liquid component. You've already got a cup of water that the yeast is proving in, when the yeast has bubbled up (therefore you know it's alive and will activate the bread properly) pour the cup of yeast water in the breadmaker on top of the flour. If you didn't add milk powder, add half a cup of milk. If you did add milk powder, add another half cup of water.
Now, here is where you have to use your common sense. Turn on your machine on the "dough" setting and let it mix all the ingredients for a few minutes. Stay at the machine and watch it. You probably need to add more liquid. I can't tell you how much to add because all flour is different and even the humidity in your home will effect the amount of water you'll need to add at this point. If the dough is too dry, start adding water from a cup in very small amounts. Let the machine mix it in well before you judge whether you need more. One of the skills of breadmaking is judging the right amount of water and I always poke my finger in to check it. You're hoping for a moist dough that has mixed in all the ingredients - you don't want dry dough and you don't want sloppy dough. When you're happy that you've got it right, let the machine do it's work. I'll just say that the amount of liquid you'll add will be between 1½ cups and 2 cups. How much of that extra ½ cup you add you'll have to decide.
When the machine is finished, take the dough out, sprinkle a small amount (one tablespoon) of flour on your bench and knead the dough into a smooth ball. You'll notice at this stage, the dough is elastic - if you pull a piece out, it's springy. Shape the loaf, put it in a greased or lined bread tin and let it sit in a warm place until the bread has risen. This will take about 30 minutes in a warm kitchen but up to an hour in a cool one. You could also put your tin on top of a hot water system, or in the sun with a moist tea towel on the top to help it rise. I used three flower pots and divided the dough equally into three portions and added them to the pots.
When the dough is doubled in size and has risen just above the top of the bread tin, place it in a hot oven. Preheat your oven to its highest temperature, then when you put the bread in, lower the temp to 200C (395F). Bake until you smell the delicious smell of bread and the top is golden. It will take between 20 - 30 minutes.
And that's it. Even though there are a lot of instructions above, they have been written for those of us who have little experience. Anyone who has baked before will just need the recipe and will go on with it. As I said, it will only take about 10 minutes in various stages.
The little flower pot loaves were baked in real plant pots, but they need to be seasoned. DON"T BUY CHINESE POTS and don't use old pots that have had plants in them. I think mine were 5 inch pots. Clean them thoroughly with soap and warm water, rinse well and allow to dry for at least 12 hours. Rub cooking oil into the pots and make sure you cover ever part of every pot. The oil will soak into the terracotta. Make sure you apply a good amount of oil. Put the pots into a COLD oven and turn the heat up to 180C (350F). Let the pots cook in the oven for 20 minutes, then turn the heat off. Leave them in the oven, with the door closed, overnight to cool completely. Next day, repeat that process again. When they come out of the oven the second time, they're ready to be used for baking.
You can bake anything in these pots. I have used them in the past for baking little Christmas cakes that I gave as Christmas gifts - still in the pot - and tied with a red ribbon. They were a real hit. But on the weekend I baked bread in them. I lined them with parchment paper, both on the bottom and sides, to make sure the bread didn't stick.

If you're not a baker, or if you're young and new to home cooking, I hope you'll try making bread. It will save you money and it's better for you because there is no preservative in home baked bread. But best of all, it tastes like bread should taste and you'll be gaining back your independence because you'll be able to provide for yourself.
I wonder how many of you are having problems with bread making. Are there many? Read through my tutorial and try the recipe above and see how you go with it. If there are a few still having problems making a decent loaf, I'll do a troubleshooting post in the next week or so and well see if we can work out the problems together.
Happy baking!




.jpeg)


.jpeg)
.jpeg)
.jpeg)
.jpeg)
14 Comments
I grew up baking bread but haven't done it recently. One of my goals this year is to make my own bread as often as possible. I've been collecting recipes and hopefully this weekend will see the first of many baking days. :-)Thank you for inspiring me today!
ReplyDeleteOh, I love the idea of using flower pots! Not only cheap and convenient- it's also cute! Thank you Rhonda!
ReplyDeleteThe Girl in the Pink Dress
I'm enjoying reading your 'from the archives' there is always something that I have missed from the first time around. Hope you are enjoying the cricket, hubby is, and two wins under their belt.
ReplyDeleteI just love your blog, sorry I don't drop around often enough to say so.
ReplyDeleteYou have inspired me to make some bread; when the weathyer isn't so hot.
regards, Liz
That bread looks amazing..great photo Rhonda! I love baking bread in unique containers.
ReplyDeleteRhonda,
ReplyDeleteYour tutorial is very clear, in my opinion. It outlines exactly how I use my bread machine to make the dough, and the amounts of ingredients are exactly the guidelines I follow. I do add about 1-2 tablespoons of butter or olive oil. Not sure why, it's just the way I've always made my bread.
It's fun to play around with the ingredients after becoming comfortable with bread making. This week I had buttermilk to use up so in it went. Some weeks I add ground flax, other weeks I have a dab of cooked oats, etc.
It's amazing (and a relief) how flexible the whole process can be.
Great post. Thank you for digging this one out from the archives.
~Sarah
When Dh and I were first married I made bread fairly often and got pretty good at it. 20 pounds later and then the birth of our son, I quit making it.
ReplyDeleteWell our son is going to be 19 this month and this will be my year to start again.
This will be the year for alot of changes actually.
----Krystal
I never made bread until I started reading your blog. Now I make 3 loaves in a two week period. I tried freezing a second loaf, both sliced and unsliced, but they always seem to get stale so fast, so I just bake more often - but that fine, I enjoy the kneading process.
ReplyDeleteIt also seems that my white bread rises and bakes much better than when I use whole wheat, can't figure it out ...
Thank you for always having great inspirational posts.
Yvette
Thanks for the frugality points you make in this article. I've been buying the lower calorie bread, as we are careful with carbs. But truth is, we don't eat that much bread anyway, and the benefits of high-nutritional-density bread probably outweigh saving a few carbs. I dearly love the "seed bread" that the grocery store bakery sells, but it has gone up to almost $4 a loaf! It never even occurred to me that making it would be way cheaper. The unused bread machine in the pantry will get revived soon! Do you have any suggestions for adding more types of whole grains and seeds to the recipe?
ReplyDeletehi
ReplyDeleteI discovered your blog yesterday but since then i have been reading only your blog since yesterday and ilove it.. I like the way you live and like the way you treat life....
i am reading it right from the beginning and there is so much to read
THANKS FOR SUCH A GREAT BLOG , KEEP UP THE GOOD WORK...
Such a cute idea! I hope that others are encouraged to make their own bread. With two teenagers in our house, we go through a lot of bread. I do the same thing -- use the breadmaker to make the dough and bake it off in the oven. It's so fast that way! Thanks for the inspiration to continue to try new things!
ReplyDeleteBaking bread was the first thing we started when we started on our road to self-suffiecincy. I don't make as much as I should (and we end up eating tortillas or crackers instead!), but am working on a schedule to keep up with the family. Thanks for this post. I just might have to try to make a bread loaf or two in flower pots!
ReplyDeleteWe just recently purchased a breadmaker with help from a Christmas gift card from my sister. While initially I was hesitant about getting one, as we never attempted to make bread by hand even....the purchase has been phenomenal. It's been great to have healthy homemade bread in our home and to know that there's absolutely no need to buy it at the store! Our breadmaker also bakes it so there's no need for the oven and it can make jam and pizza dough as well. It's definitely helped me feel that we will make greater strides toward a more self-sufficient life together.
ReplyDeletehi
ReplyDeleteRhonda,
I was just reading your earlier post
where you stockpiled for 2 months...
I noticed that you have lentils what are the recipes that you do with lentils as in India lentil play a very important part in the day to day meal and we have them almost everyday...
I welcome readers' comments. However, this blog never publishes business links or advertisements. If you're operating a business and want to leave your link here, I will delete your comment .