Before I start today, I want to thank you all for such beautiful comments on my 12 year anniversary post. I was surprised and touched that so many would take the time to tell me what they thought of my writing, my blog and me. Thank you. Now, let's get on with the next 12 years.
~~~ ❤️ ~~~
Hanno's had trouble with a sore mouth for a while so I've been working on a new softer loaf so he can continue to eat bread. When you make bread you generally add flavour with salt, sugar or liquid, or you allow it to ferment and develop natural flavour. The main change in this bread recipe is the addition of milk and I've changed the amount of salt and sugar to what I think is a good balance. The milk, salt and sugar add taste to the loaf so you can leave out, or reduce, the salt and sugar but it will change the taste of the bread.
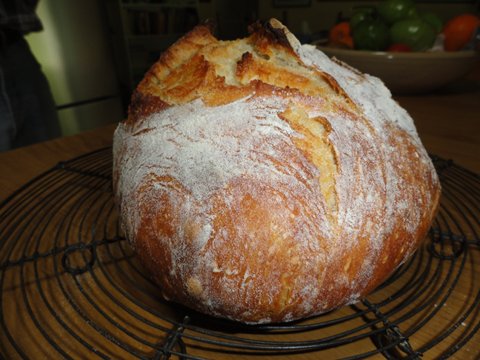
This is today's loaf.
The recipe below is what I think is a delicious balanced loaf which stays fresh for at least two or three days, then we use it for toast. It will make two loaves. I bake one loaf and freeze the dough for a second loaf. One of these loaves lasts us for four or five days. I remove the frozen dough from the freezer 24 hours before I want to use it.
This is the flour I use - unbleached white baker's flour.
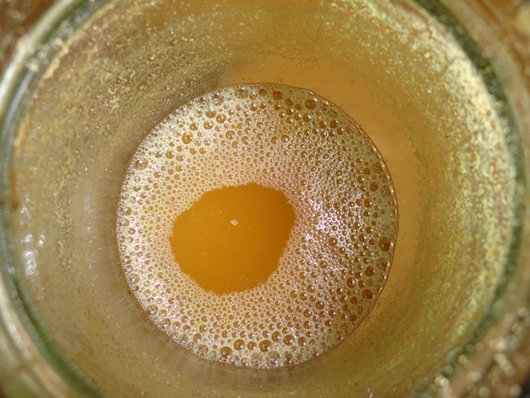
1. To prove the yeast, add 7 grams yeast to ½ cup warm water and a tablespoon sugar, mix and allow to stand. This should form froth on the top. If, after 5 minutes, there is no froth, the yeast may be dead. Check the use-by date and if it's old yeast, you'll have to buy fresh yeast. The sugar is not essential, though it adds to the flavour. If you're not eating sugar, leave it out.
2. If you're hand kneading, add the following ingredients to your bowl, mix, then knead for at least ten minutes.
If you're using a bread machine add the ingredients in this order:
- 1 teaspoon salt
- 6 cups baker's flour/high protein flour. If you decide to use it, add ½ teaspoon *bread improver/gluten flour to each cup of flour - see below.
- 2½ cups whole milk, or **the milk of your choice (see below). Remember, you may need to use more milk but start with the 2 ½ cups and if you need more, add small amounts until you have a moist dough.
- the proved yeast mixture
3. Use the dough setting on the bread machine, turn on the machine and allow the dough to mix.
4. When the dough is mixed, this usually takes about 90 minutes, turn it out onto a lightly floured surface. Knead the dough for one minute to remove the air, then shape the loaf.
5. To shape the loaf, flatten the dough then shape it to form a long rectangle the width of your baking tin. Fold both long ends in on themselves, roll the dough into a loaf shape and place it smooth side up in the baking tin. The baking tin I use is 24cm x 13cm.
6. Allow the dough to sit until it doubles in size.
7. Turn on your oven to 220C.
8. When the dough has risen, gently moisten the top with a brush or your hand, then add your toppings. I usually use seeds, oats or polenta - press them into the dough slightly.
9. When the oven has reached 220C, place the loaf in the oven to bake. After 10 minutes, turn the temperature down to 190C and check it when it's been in the oven 35-40 minutes.
10. When the loaf is golden brown and you can smell that it's cooked, turn it out onto a rack to cool.
11. When the loaf is cold, slice it and place it in a plastic bag or container and store in the fridge.
I hope you try this bread and you and your family enjoy it. It's a plain and simple loaf that you can add a lot of healthy fillings to and it can be used for sandwiches and toast. It has fewer ingredients than your standard supermarket loaf and it will be cheaper to make than buy a plastic-wrapped, supermarket loaf. You know exactly what's in this loaf, and can adjust the salt, sugar and type of liquid to suit your family and dietary requirements.
PLEASE READ THE FOLLOWING
**MILK
The milk can be either dairy milk, oat milk or any of the nut milks. The addition of the milk gives the loaf a tender dough and adds to the keeping qualities. If you use one of the non-dairy milks with little or no fat, add a teaspoon of olive oil.
FLOUR
I use unbleached white flour for this recipe but you could also use wholemeal or whole grain flour. The liquid in my bread is full fat, A2 dairy milk and I use white sugar and either cooking salt or pink salt. You could use honey or raw sugar.
KNEADING
Apart from getting the ingredients right, another important thing in bread making is kneading the dough. I usually use a bread machine to knead, I put it on the dough setting and the bread maker makes the dough, kneads it and allows it to sit for the first rise. When it's risen, I take it out, knead it for about a minute to get most of the air out of the dough, then I shape it and place it in the bread tin for the second and final rise. Just before it's ready to go into the hot oven, I gently wet the top of the bread, sprinkle on my topping (sesame seeds, oats or polenta) and place it in the oven.
Here is a good look at Julia Child's Sandwich Loaf which is different to my recipe but very much like another of my bread recipes.
PROVING
Proving the bread correctly is essential. It's easy to over-prove or under-prove bread. After the dough is put into the bread tin for the second rise, it should double in size before going into the oven. If it sits and continues to grow in size (over-proving) your bread will be light with a lot of holes and won't have the structure of good bread. If you put the dough in the oven before it doubles in size (under-proving), your bread will be dense and heavy. Make sure you give yourself the time to bake well. This is not a job that can be rushed. When you're dealing with yeast, it takes its own time and rushing it will ruin your bread.
* BREAD IMPROVER OR GLUTEN FLOUR - if you can eat gluten
When you first start baking, the main problem many people have is the dough failing to rise. This is generally caused by the dough not being kneaded long enough. High protein or baker's flour is used in this recipe and the protein in the flour is gluten. Kneading develops the gluten in flour so if you don't work the dough enough, the bread will be dense and dull. That's why it's a good idea to use a bread machine - it is programmed to knead the dough for the right length of time. If you're kneading by hand, make sure you knead for AT LEAST 10 minutes.
If you've tried making a sandwich loaf before and the bread didn't rise, buy some bread improver or gluten flour from the supermarket, bulk store or health food store and add ½ teaspoon to each cup of flour. When you have more experience and work the dough more, you can stop using this ingredient.
SLICING
Of course, we all like eating hot bread and there are times when you'll want to slice into the bread when it comes out of the oven. Most of the time though, you should leave it to sit and cool for a couple of hours before you slice it. I use an electric knife or a meat slicer. If you're going to set yourself up to bake your own bread, having an electric knife will give you clean and neat slices for sandwiches which are perfect for school and work lunches. Store the bread in a plastic bag or plastic container in the fridge. I use the same plastic bag for a couple of months, I wash and dry it in the sun every week.
BAKING TIPS
Baking isn’t just about recipes, it’s about technique, knowing your ingredients and doing the right thing. Don't be a passive bystander when you're cooking, become involved in it. Learn about your ingredients and what they do. Know why you're using them and how to fix mistakes.
So here are a few hints:
- If you store your yeast in the fridge, and you should, mix it in warm water to bring up the temperature before you add it to the flour. You can either mix it in with the flour and use it after it's warmed up, or mix it with warm water and wait till it bubbles, so you know the yeast is active. If you’re using water from the hot kettle, pour the water into the cup first, add cold water to bring it to blood temperature, put your finger in to make sure it’s not too hot, then add the yeast. Pouring hot water into yeast will kill it.
- No matter what type of flour you use, it will absorb differing amounts of liquid depending on the weather. If it's a humid day you might find you use less liquid (because there is more water in the air and potentially in the flour); on a dry day, or in a heated home, you might need slightly more liquid. When you go through a recipe, be flexible with the liquid. If a recipe calls for 1¼ cups, add one cup and mix, adding the ¼ cup slowly until the dough looks and feels right. If you don't add all the ¼ cup, or if you add a little more, that is okay.
- Your bread will be better if the dough is slightly moist, so if your dough looks nd feels dry, add a small amount of extra liquid.
- Whether you use your hands or a bread machine, you need to touch the dough. Learn the feel of good dough so you know what to look for. Remember all stages of the dough - it changes a lot through the process. Basically, when all the ingredients are mixed together, you want a dough that isn't too wet (although almost all rye dough will be more sticky than wheat dough) and isn't too dry. Feel it between your fingers and thumb, just like feeling a piece of fabric. Wheat dough will be soft but not too sticky. If you've just started kneading, you can add a little more flour or liquid, according to how the dough feels. Don't add anything at all at the end of the process, you'll ruin the bread.
- Don't use too much flour to knead the dough. A light sprinkling is enough. Adding more flour when kneading adds more flour to the dough and at the end of the process that will give you a tough loaf.
- You need a hot oven to bake bread successfully, and the oven needs to be pre-heated for the best results. Bread has two types of rising - one is from the yeast you use, the other is called "oven lift" - you get this when you put properly proved bread dough into a HOT oven. The heat immediately starts to lift the bread. That is what you want. Adding dough to a warm oven won't give you the same result.


.jpeg)


.jpeg)
.jpeg)
.jpeg)
.jpeg)
38 Comments
Thank you Rhonda for all your wonderful posts over the years. I was wondering if I was to use the bread machine to knead the dough, could I also use it to bake the bread?
ReplyDeleteYou can bake it in the bread machine, Kerryann.
DeleteWhat a beautiful and delicious looking loaf. Just makes my mouth water! Thank you for the recipe and sound instructions you took the time to share. I bake gluten-free bread, but am saving up for a bread baking machine so I can make gluten-bread for the rest of the family. Do so want us all to enjoy homemade bread. Gluten-free flour is super-expensive here, so I want to bake with regular flour for those without celiac disease. Pam
ReplyDeleteWhat a cracker of a loaf that is! I've printed off your recipe and notes (so helpful to have first hand knowledge and tips on the product) and can't wait to give it a try. Congratulations on 12 year of blogging and I wish you many, many more, dear Rhonda!
ReplyDeleteCheers - Joolz xx
You’ve completely inspired me to try this tomorrow. I love the idea of a soft loaf and hope Hanno is enjoying it. I’ve wanted to be a baker of bread for so long but never seem to get it quite right. Perhaps this will be my recipe. I love reading your blog Rhonda - thank you so much for the wonderful work you do.
ReplyDeletegreat looking loaf; i have a bread machine but haven't used it yet, want to have a go at making sour dough (like the one i buy) but have no where to set the machine up, limited benches; it will happen one day :))
ReplyDeletegreat post
thanx for sharing
Thanks, Rhonda, such a good recipe! I made a loaf tonight to go with the first pea & ham soup of the season and popped half the dough in the freezer as you suggested. I've been wedded to the 5-minute overnight bread, which is just too easy, but this sandwich loaf is so old-fashioned, I'll have to earmark it for peanut butter toast in the morning!
ReplyDeleteThank you for the wonderful reciepe, I bake 2 loaves a week and this will be my next loaf. I love your idea for an instagram baking site, I would love to see what everybody else bakes.
ReplyDeleteGorgeous loaf! I think I will make one today.
ReplyDeleteI learned to make bread from my grandmother. I used to bake a few loaves every week when my girls were small. When they got older and into many outside of the house activities, I stopped making the bread. I think it's time I start making it again, except maybe one loaf at a time!
ReplyDeleteI used to make all my own bread by hand. Now I use a bread machine. I never use bread improver anymore since I read the list of ingredients on the packet.
ReplyDeleteJill N
Hi Jill. What was your problem with bread improver?
DeleteWhat a beautiful loaf of bread, thank you Rhonda for sharing your recipie, I will be having a go at making this later toaday, I make my dough in my 37 year old kenwood chef mixer using the dough hook(the bread machine died and I decided not to replace it and make do with what I already had), then I transfer my dough to an ovenproof bowl and prove it in the warming oven of my woodstove, then I transfer back into the kenwood bowl for a final kneading for a minute after the first rise then into the bread tin and back to prove in the warming oven again, this seems to be working well for me, looking forward to trying your recipie, cheers Kat.
ReplyDeleteThat loaf looks so wonderfully munchable! Kate (Tassie)
ReplyDeleteThanks so much for this Rhonda, and for all the thorough tips to go with it. I have used your tip already about making sure the yeast is fresh, such a help. Blessya!
ReplyDeleteLooks delish. I'm going to try it. Thank you Rhonda.
ReplyDeleteYour breads always look so professional. Thanks for the tip about the yeast.
ReplyDeleteOh, Yum. Nothing better than homemade bread.
ReplyDeleteWanting to print out the recipe but was unable to find the 'print' button.
ColleenB. ~ Texas
Hi Colleen, there is no print button.
DeleteHello Rhonda,
ReplyDeleteThat sounds a lovely recipe.
Two questions I’d be really grateful for answers to.
1 Do you think the recipe would work if I baked it in a bread machine rather than just proving it in one?
2 I would love to buy both of your books but can only justify buying one at the moment. Maybe later.......
Which one would you suggest?
( I have spend 50 years running a frugal home out of necessity in the early years and later, horrified by the throwaway mentality, through choice.)
Sue
Hello Sue
DeleteYes, the milk loaf can be baked in a bread machine.
Read Down to Earth first. I wrote it first and hope it provides motivation to change to a simpler way of living. The Simple Home is about a simple year at home - month by month, and if you're not aware of some of the basic principles set out in Down to Earth, you'd have to go looking for that information. I think both books are stand alone books but if you intend buying both, I'd suggest starting at the beginning, then moving on to Simple Home. I hope you enjoy the read.
I will say that I did make the loaves and am so glad I did. Although I make my bread by hand and have for years (my mum taught me to make bread; and I still use her tins), I am considering a bread machine because I need to save some time and would love to have homemade bread more frequently; and healthier homemade bread as opposed to having to buy from the supermarket at ridiculous prices. This recipe was well worth the time though!
ReplyDeleteGreat looking loaf Rhonda. Makes my mouth water, particularly since these days I must eat very little bread.
ReplyDeleteYou say back near the top of this article that this recipe will make two loaves.
At what stage do you split the ingredients or the dough?
My bread maker makes up to a 900gm loaf. It just couldn't cope with 6 cups of flour plus two and a half cups of liquid as well.
Clissa, I split the dough after it comes out of the machine, so it's had the first rise. I put it on the bench, shape it to an even rectangle and cut it right down the middle with my bread scraper. One half is then shaped and baked, the other half goes straight into a plastic bag and into the freezer. When you want to bake the second loaf, take the dough from the freezer 24 hours before and leave it in the fridge to defrost. Six hours before baking, I sit the dough on the bench to return to room temperature, then shape, allow to double in size and bake.
DeleteHi Rhonda
ReplyDeleteJust love reading your blog and I look forward to the future years you write it. I'm really hoping to make this delicious looking loaf but was wondering what type of tins you use?
Sharyn
Hi Sharyn. Thank you. I use an ordinary bread tin for this loaf. This is a link to the one I bought at Spotlight a couple of years ago: https://www.spotlightstores.com/party/bake-make-decorate/bake/baking-trays-cake-tins/wiltshire-wilt-easybake-loaf-cake-pan/BP80474411
DeleteIt's 24cm x 13cm. Happy baking.
This recipe came just in time as we were totally out of bread. Since our family decreased due to the kids being all grown up and not living with us anymore it is so hard to eat through the food I make. I still make large batches of food as I can't get acclimated to fewer people! We used to make 12 loaves of bread per week when the children were young so now we don't eat even one loaf per week. I sent you a picture of my two loaves and one is almost gone already! It is a perfect recipe and that it makes two loaves is perfect. I froze one already baked and ready to use.
ReplyDeleteI still haven't found a perfect rye bread recipe. Maybe you could give hints and a recipe for a good rye bread.
Alice
Thanks for sending the photo of your bread, Alice. I've just put it up on the IG gallery. If you search my blog (in the side bar) you'll find some recipes for rye bread. The four cup recipe is Hanno's favourite rye. Maybe you could adjust the quantities to make it a six cup-two loaf recipe.
DeleteI love baking bread. I'm having problems eating loaves with lots of seeds, so I may have to try your recipe. If anyone is using a Kitchen Aid to knead the dough, I found it's helpful to let it run for 9 minutes. I learned about that in a cookbook and my bread is better since I started doing that.
ReplyDeleteThanks for sharing your Kitchen Aide info, Teri. I think that will help a number of our bakers.
DeleteI made this last night. I bought a near new bread maker on gum tree for $30 a couple of years ago and I love it. I just knead the dough on pizza setting. I don’t have bread tins so I usually make my bread or rolls on a pizza stone. I made two lovely fat loaves. I only used a bit over 2 cups of milk and a bit of olive oil. Really nice bread - next time I’ll do 50/50 with multi grain
ReplyDeleteI'm glad you liked it and I love that you're making do with what you have. xx
DeleteThank you so much for this recipe Rhonda - I've finally made a loaf of bread that my husband approves of! xx
ReplyDeleteWell let's chalked that up to a win for the home bakers, Leonie. Well done.
DeleteI switched to a milk loaf several years ago because it keeps so much better and it helps us keep ahead of the milk. When milk comes up on it's date I pour it into a green glass bottle and that milk is used for bread and cooking. I do bake mine in the machine and then move it to a bread keeper which helps to soften the crust. We have just returned from two weeks away and eating store bought bread. We are always glad to get back to homemade bread.
ReplyDeleteThis may seem like a bizarre question, but what brand is your electric knife? I was considering trying to find a second hand one for bread, but I've read heaps of reviews online of people saying various brands are no good for slicing bread. Which seems unlikely, but there you go...
ReplyDeleteMine is a Breville Ezy Carve Electric Knife and it gives me neat slices, either thin or thick.
DeleteExcellent - thank you! (Bread was delicious, by the way.)
DeleteI welcome readers' comments. However, this blog never publishes business links or advertisements. If you're operating a business and want to leave your link here, I will delete your comment .