down to earth

  • Home
  • About Us
  • Down To Earth Book
  • Privacy Policy
I've been tidying up my photo albums this morning because it's too cold to go outside to the garden. I found this little card I made a couple of years ago that I thought some of you might like to see. We owned a shop when I made a few of these cards for Xmas and I got some very strange looks from customers who wondered what on earth I was doing knitting on tooth picks. Truly, there is no easy explanation.
I've also spent some time this morning looking for blogs I like to add to my links list. I did find some lovely Australian ones and I invite you all to check them out by clicking on the links on the left side of the screen. Five and two and soozs. I'm still looking, so hopefully I'll be adding more.

It always pleases me a lot to cook local and home grown food. When I can combine that fresh food with something from my preserving cupboard it makes it even better. Last night I made pizza. I used the bread recipe below (without the gluten flour) and added two tablespoons of olive oil to make a tender and pliable dough. The topping was my homemade chunky tomato sauce (five jars of it was made last November), some locally grown mushrooms and local cheddar cheese. Perfecto!

We followed that up with a real egg custard danish with home preserved apricots. Unfortunately the pastry was a frozen square of the store bought stuff, but it was lifted by the wholesome homemade topping. The custard was made with our backyard eggs and milk from the local dairy. One of our Rhode Island Reds has just started laying, so her first egg was included. The apricots were part of a batch I preserved last summer. We were both smiling when we finished our dinner last night. Good food does that to you.

I hope this tutorial helps the readers who are starting out on bread making or those who have tried but failed. All the ingredients are commonly found in Australian supermarkets, bulk food stores and health food stores.

Baking bread makes sense economically, even if you make your bread in a bread maker, it will be much cheaper than buying premade bread. It will also be healthier as your homemade bread will contain only those ingredients you include, not flavour enhancers, preservatives or colourings.

You will see I've added gluten flour to this recipe. It will help those of you who have not yet got the kneading under control to still get an excellent loaf. When you're more proficient, you can leave it out.
I am happy to help anyone who is having trouble baking reasonable bread. Most problems are easy to fix. Just leave a note in the comments section and I'll get back to you as soon as I can.

THE RECIPE
1½ teaspoons dried yeast
1 tablespoon sugar
65 mls warm water
3¾ cups baker's flour - also called strong flour or high protein flour
3 teaspoons gluten flour
1 tablespoon butter/margarine (softened)
1½ teaspoons salt
1 tablespoon milk powder
250 mls warm water + more if necessary


Just a word about flour. Bread mix, which is commonly used in bread machines, is flour with bread improver and flavour enhancers added. We are NOT using bread mix. By adding the ingredients we add, we're adding natural flavour to the bread as well as giving it a lift, that as an inexperienced baker, you won't get without the gluten flour. When you start experimenting with other recipes you can leave out some of these ingredients and try others. Another thing you need to know about flour is that it's different all over the country. When baking with the various flours, they take different amounts of water. A flour in Melbourne will be slightly different to a flour in Brisbane because of the amount of humidity in the air. And even if you use the same bag of flour at different times of the year, you'll probably use slightly more or less water, according to the weather conditions. This is not a problem, it just means you have to know what your dough should look and feel like before going to the next step. Bread making is very tactile, even when making the dough in a bread machine, I feel it to make sure I have enough moisture in the dough. This recipe generally uses 315mls of water, but when I made this loaf yesterday I used about 40mls more. Sometimes the difference will be one spoon full, sometimes it will be almost a cup.

STEP 1
Activate the yeast. (Proofing)
You don't want to go to the trouble of making the bread and find at the end it hasn't worked. One of the ways to be confident the bread will turn out well is to make sure the yeast you're about to use is alive. Yeast needs water and sugar to activate. If it's alive, when you add the water and sugar, the yeast will start fermenting and becoming frothy. This is what you want to see. Take 1½ teaspoons dried yeast, 1 tablespoon sugar and 65 mls warm water and mix together in a cup. Leave it aside for a few minutes while you prepare your other ingredients. When you come back to it 5 - 10 minutes later, it should look like this.

STEP 2
Mixing the dough
Then add your dry ingredients to a large mixing bowl. Add the flour first, then make a little depression in the flour to contain your other dry ingredients. When all the dry ingredients are in, add your proofed yeast and the rest of the warm water. Mix all the ingredients together with a spoon until it gets to the point where your hands will mix it better, then start bringing the mixture together with your hands. This is the first point when you check the moisture content. If you need more water, your dough will look like this after you've added all the water stated in the recipe.You can see in the photo that the dough looks dry. It hasn't come together properly and there is still flour to be incorporated into the mix. Take notice what your dough feels like.

You're aiming for a ball of dough that's combined all the ingredients, with a slightly moist feel. You don't want it wet and not dry either. If your dough looks like the above photo, add more water by doing this: get a half a cup of warm water and a dessertspoon. Add the water to the dough one spoon full at a time. You have to be careful not to add to much so do it bit by bit. When your dough looks like the following photo, you're ready to go to the next step.

STEP 3
Kneading the dough
If you've had problems with handmade bread before, you're probably not kneading the dough long enough. This is a very important step if you want light bread with a good crumb. If you're good at kneading, this step will take you at least 8 minutes. If you're light handed, you'll take at least 10 minutes on this step.You need a firm and stable surface on which to knead your dough. It's best done on a clean bench top. Wipe the surface of your bench top with a clean cloth and warm soapy water. Don't use antiseptic wipes, you could kill the yeast. When you're satisfied the bench is clean, wipe it with a clean tea towel. This surface is ideal for kneading. If your bench top is not suitable, use a large bread board with a slightly wet tea towel folded in half under the board. The moistened tea towel will stop the board moving while you're kneading. Sprinkle a small amount of the same flour you used in the recipe onto your bench top and place the dough on it. Before you start kneading, poke your finger into the dough and see how the indent stays in there. This is a good way to test your dough as you go through the kneading process.

Start kneading the dough. You can use both hands to do this. In the photos, I'm using one hand because I'm taking the photo with the other one. What you're trying to do is develop the gluten by working the dough and getting the gluten strands to develop. You do this using the heal of your hand. Push the top of the dough away from you with the heal of your hand while holding the dough steady with your other hand.


The dough stays right in front of you all the time, but you push a portion of it away with every action. After you've pushed out, fold that portion of the dough back on itself like the top of an envelope. Turn the dough a quarter turn and push it out again with the heal of your hand. Fold it back on itself. Another quarter turn. When you've kneaded for one minute, your dough will look like this:

We can see here how the dough had been folded back on itself and that it's starting to look drier and smoother. Keep kneading for another few minutes and the dough is smoother again. If you poke your finger into it now, the dough will spring back out, not stay indented. Keep kneading until your dough is smooth and elastic, like this.

You can see that the dough is smooth and elastic and if you poke your finger in it will spring out nicely. If you've been kneading for AT LEAST 8 minutes and your dough is smooth and looking like the photo above, then you're ready to go to move on.

Don't rush things though just for the sake of a few minutes because the work you do here makes or breaks your bread. Fold all the bread into itself so the other side forms a nice smooth ball like this:

STEP 4
First rise

Place the ball of dough, smooth side up, in a clean bowl that's been very lightly greased with olive oil. Cover the dough with a clean moist tea towel or a lightly greased piece of plastic wrap. The bread must be covered well so it doesn't start to harden while it's rising. If you've got a cold kitchen the greased plastic wrap might be the better option. You want the dough to rise in a warm draft-free area. If the dough stays cold, it will take hours to rise. So place in in an oven that you've heated to about 150C for a few minutes and turned off. Or you could put it outside in the sun (I do this). Make sure it's covered properly though, you don't want flies or ants in your mix. Or place a heated wheat bag near the bowl. If you have a pot of soup on the stove that is still warm, place the bowl near the stove. If you have a hot water system that is warm during the day, that might be a good place for you. You're looking for a a temperature of around 20 - 24 C. If the area is too hot or too cold it will effect the taste and texture of the finished loaf. Leave the covered dough in the warm spot untouched for about 30 minutes and check. It needs to double in size, like this:

When you dough looks like this, you're ready to go to the next step.

STEP 5
Punching down and forming the dough
Punch the dough to deflate it. It will look like this:

Scoop the dough up out of the bowl, sprinkle flour on your bench top again and place the dough on the flour.Turn your oven on to its highest setting. Start kneading the dough again. Use the same technique as before with the heal of your hand and knead for two minutes:
After two minutes of kneading, flatten the dough and roll it into a cigar shape.When it looks like this, you're ready to add some seeds:

On my loaf I used a mixture of sesame and poppy seeds with oats. This stage is the opportunity to add more nutrition to the loaf with oats, wheatgerm, sesame or poppy seeds, soaked linseed or any other topping you want to use.


Pick the loaf up with the smooth side on top and with your other hand, moisten the loaf all over with water. Roll the loaf in the seeds/oats so that's it's completely covered. The water will stick the coating to the loaf. If you don't want seeds on the loaf but would like a crusty loaf, moisten the dough with the water but don't add the seeds. If you want a softer loaf, don't add the water at this stage but put the loaf straight into a lightly greased loaf tin and sprinkle with a small amount of flour. If you like, you can make a slashes in the top of the loaf.

STEP 6
Second rise
Let the loaf sit in the loaf tin for the second rise until it's lifted a couple of inches but not bulging over the sides.

STEP 7
Baking
You need a hot oven to get a good lift, so when the oven is hot, place the loaf in to cook. After 10 minutes, turn the oven down to 200C and cook for another 15 - 20 minutes, or until you can smell baked bread and the bread is golden brown. Put the bread on a cake rack and get the butter ready because you are about to enjoy your bread.


This photo gives a good overview of our back verandah. It's a bit untidy so look past that. ; ) You can see our aquaponics tank and grow beds, our old washing machine that is attached to the water tank, and the water tank is just in front of the bush house. We installed that tank ten years ago and recently installed another that holds 10000 litres.

You can see lemons ripening on the table, a ladder leading to the roof, where H installed a homemade solar heater for the AP tank and there are lots of recycled plastic pots waiting to be potted up again. Just shows how how many sustainable things you can do in a small space.
It was very disappointing, only one woman came along to the sewing circle. She wanted to learn how to cut out and sew a pair of pants that fit properly. Not a problem, she now has her pants cut out and pinned. It was really good for me to see how easy it looked to do it, although I think it may be one of those skills that looks easy, but isn't. The ladies weren't put off at all by not having more people there and will meet again in a fortnight for the second sewing circle. Hopefully by then a few more women will join up.

The first Brandywines have been picked from the aquaponics garden and are now waiting in the kitchen to be eaten. I might have one with an egg for breakfast, or I might have it with a salad for dinner. Decisions, decisions. Anticipation is a wonderful thing.

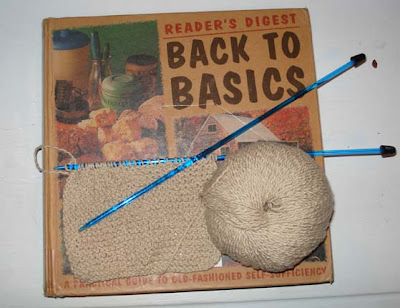
I'll be taking my library books back today - I have this Reader's Digest back to basics book as well as the seed saver's handbook. If you're in Australia and are looking for an interesting book to read, grab this one. It's worth a look.

On top of the book is my latest dishcloth.
Just in case you missed it, there was an interesting article in Time magazine this week: http://www.time.com/time/magazine/article/0,9171,1630816,00.html

Julie from Towards Sustainability was interviewed for the article and she had some important things to say. You can read her blog here: http://crazy-mumma.blogspot.com/

Linda Cockburn was also interviewed for the article. Linda wrote that fabulous book, Living the Good Life. Linda's website is here: http://www.lintrezza.com/

And finally, a plug for Ted Trainer, also interview by Time. Ted's website is here: http://socialwork.arts.unsw.edu.au/tsw/
It will be a fairly busy day today. I have to sow some seeds in the aquaponics garden as well as some brandywine tomatoes for another garden we are making in the front yard. I have some ironing to do, there is a load of washing on at the moment, I will bake a cake and bread, get my notes, notebook, diary and bag ready to take to work tomorrow and later on I will pack the car with the new sewing kit, my sewing machine and some spare lemons I'll give away. I have to take my sewing machine as the new sewing machines didn't arrive at the place I bought the new ones. If I have time, I'll clean out a cupboard in the kitchen that is driving me nuts.

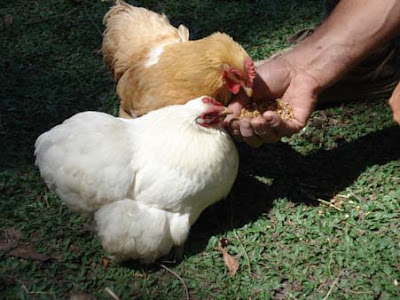
DH is replacing a fan
belt on our old Asko washing machine. It cost $45 to replace the belt, which will probably keep the machine going for another 10 years. We have it on the back verandah attached to the water tank and we use it to wash the dogs bedding and other heavy things like mats and rugs. It saves the new washing machine from that heavy work, and hopefully both machines will keep working well for a long time. H will also clean out the chicken coop and wash the car and the dogs.

Yesterday H picked all the kale
for a big German feast he wanted. I don't eat meat, he only eats it rarely, but he decided he needed some with the kale. One of the meals he loves from his childhood is
Grunkohl und Schweine Wurst or kale and pork sausage, so that's what we both made.


He picked the kale - see photo - and washed it, I cooked a ham hock in half water, half apple cider for an hour, then we added the chopped kale, two chopped onions, four tablespoons of rolled oats (to thicken it), salt and pepper. That cooked very slowly for 45 minites. About 30 minutes before it was ready I added three knackwurst. It was served with our homegrown kipfler potatoes, boiled. H was really pleased with it. There is enough there for two more meals for him. I'll make some soup or beans for myself, so tonight's meals will be a breeze.

If there is any spare
time, I'll relax with some knitting. All in all it looks like a good day.


Veggieboy from http://www.backyardaquaponics.com/ contacted me this morning with some very good links to their members' small, medium and large aquaponics systems. If you're intested in aquaponics, I'm sure you'll learn something from these links:
http://www.backyardaquaponics.com/forum/viewtopic.php?t=1617
http://www.backyardaquaponics.com/forum/viewtopic.php?t=1618
http://www.backyardaquaponics.com/forum/viewtopic.php?t=1619


We've revived an old ritual, H and I. That of the sit down, talk and enjoy morning tea. No matter what either of us are doing, at around 10 am, we stop for tea. It's such a great thing to do. It peps you up for the later morning, it gives you time to talk about whatever with your partner and it gives a gentle rhythm to the day.

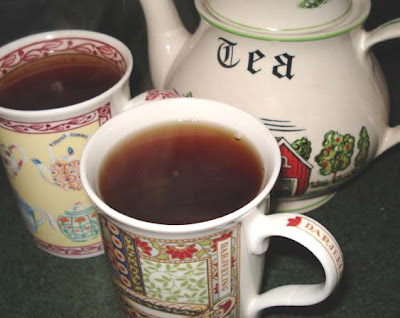
We don't go overboard with what is served with our morning tea. If there are muffins, pikelets, biscuits or cake, we'll have it, but otherwise it will be a stern black cuppa and a talk. If there is a biscuit, there are eyes watching your every move.

Airedale Rosie watches every move when food is about.

I wonder if others are sharing this ritual with us and if so, what are you drinking and eating?
Here is something about the art of the sponge cake that I found this morning. It's worth a read:

http://www.smh.com.au/news/recipes/the-rise-and-fall-of-the-sponge/2007/05/14/1178995046696.html

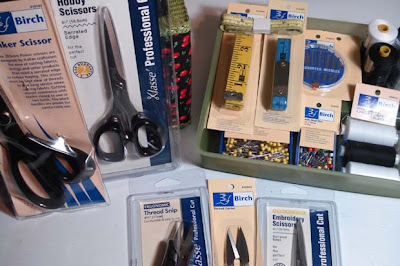
I'm really excited about this! I'm starting our sewing circle at the Neighbourhood Centre next Monday - it will be free and we have two ex-professional sewers who are coming along to help. We'll either work on the projects each person brings along or we'll make things like painting aprons and smocks for the local kindy, or items needed at the local hospital and nursing home. One of our helpers used to make costumes for the Queensland Ballet and Theatre Company so she will help our sewers make up their own patterns as well as show them how best to construct their garments.

Dressmaking is a dying art. There are so many cheap clothes from China now that it doesn't seem worth it to make our own clothes from scratch. But I'm sure there are a lot of people out there who would like to learn the once common skill of making and mending clothing. I guess we'll see on Monday. I'm looking forward to it and I hope we have a lot of eager sewers come along to learn and meet each other.

Yesterday I bought a sewing kit for the Centre. It was quite daunting going into the shopping mall after so long not shopping there, many things had changed, but so much of it is still the same. I was pleased to get out of there. I got quite a nice sewing caddy and have filled it with all sorts of sewing goodies. Here is the photo.

I’ve been trying to remember the point of transition, when I went from learning how to live simply and taking on one project at a time, to really living it. When does it change from being an experiment to a lifestyle?

I suppose the main starting point for me was to stop spending. When I did that and stood back to observe rather than take part in spending, I had a better understanding of how I was manipulated by advertising and my own expectations. It didn’t take long to change those expectations and to become content with what I had. Now I’m at a point where I haven’t been in a department store for a long time – probably three years. I forget the last time I did that kindof shopping.

Now I’m at that comfortable place of finding beauty and satisfaction in my everyday world. I find beauty in the strangest places
. I have found it while cutting hot bread, when harvesting tomatoes, and by extending the hand of friendship. One of these new friends is a 30ish homeless man who is squatting in a local vacant house. On the face of it, we would have nothing in common, but as we share my lunch when I’m at my voluntary job and we talk about books, Nietzsche, selfishness and generosity, there is beauty lurking. And even if I were the richest women on the planet, I couldn’t buy the feeling of contentment I feel at those times.

Newer Posts Older Posts Home

MY BOOKS

MY BOOKS


My books were all published by Pengiun, and are available at Amazon US, Amazon UK and Amazon Au

Search here

Total Pageviews

Translate


I'm Rhonda Hetzel and I've been writing my Down to Earth blog since 2007. Although I write the occasional philosophical post, my main topics include home cooking, happiness and gardening as well as budgeting, baking, ageing, generosity, mending and handmade crafts. I hope you enjoy your time here.

MY FAVOURITE PLACES

  • Grandma Donna's Place
  • Grandma Donna's YouTube
  • Grandma Donna's Instagram
  • This Simple Day
  • Nicole's Instagram

Give More

Give More

Popular posts last year

Making ginger beer from scratch

We had a nice supply of ginger beer going over Christmas. It's a delicious soft drink for young and old, although there is an alcoholic version that can be made with a slight variation on the recipe. Ginger beer is a naturally fermented drink that is easy to make - with ginger beer you make a starter called a ginger beer plant and after it has fermented, you add that to sweet water and lemon juice. Like sourdough, it must ferment to give it that sharp fizz. To make a ginger beer plant you'll need ginger - either the powdered dry variety or fresh ginger, sugar, rainwater or tap water that has stood for 24 hours to allow the chlorine to evaporate off. You'll also need clean plastic bottles that have been scrubbed with soap, hot water and a bottle brush and then rinsed with hot water. I never sterilise my bottles and I haven't had any problems. If you intend to keep the ginger beer for a long time, I'd suggest you sterilise your bottles. MAKING THE STARTER In a...
Image

NOT the last post

This will be my last post here.  I've been writing my blog for 18 years and now is the time to step back. I’ve stopped writing the blog and come back a couple of times because so many people wanted it, but that won’t happen again, I won’t be back.  I’ll continue on instagram to remain connected but I don’t know how frequent that will be. I know some of you will be interested to know the blog's statistics. 
Image

How to make cold process soap

I'm sure many of you are wondering: "Why make soap when I can buy it cheaply at the supermarket?" My cold process soap is made with vegetable oils and when it is made and cured, it contains no harsh chemicals or dyes. Often commercial soap is made with tallow (animal fat) and contains synthetic fragrance and dye and retains almost no glycerin. Glycerin is a natural emollient that helps with the lather and moisturises the skin. The makers of commercial soaps extract the glycerin and sell it as a separate product as it's more valuable than the soap. Then they add chemicals to make the soap lather. Crazy. Making your own soap allows you to add whatever you want to add. If you want a plain and pure soap, as I do, you can have that, or you can start with the plain soap and add colour, herbs and fragrance. The choice is yours. I want to add a little about animal and bird fat. I know Kirsty makes her soap with duck fat and I think that's great. I think t...
Image

Preserving food in a traditional way - pickling beetroot

I've had a number of emails from readers who want to start preserving food in jars but don't know where to start or what equipment to buy.  Leading on from yesterday's post, let's just say up front - don't buy any equipment. Once you know what you're doing and that you enjoy preserving, then you can decide whether or not to buy extra equipment. Food is preserved effectively without refrigeration by a variety of different methods. A few of the traditional methods are drying, fermentation, smoking, salting or by adding vinegar and sugar to the food - pickling. This last method is what we're talking about today. Vinegar and sugar are natural preservatives and adding one or both to food sets up an environment that bacteria and yeasts can't grow in. If you make the vinegar and sugar mix palatable, you can put up jars of vegetables or fruit that enhance the flavour of the food and can be stored in a cupboard or fridge for months. Other traditional w...
Image

Cleaning mould from walls and fabrics

With all this rain around we've developed a mould problem in our home. Usually we have the front and back doors open and that good ventilation stops most moulds from establishing. However, with the house locked up for the past week, the high humidity and the rain, mould is now growing on the wooden walls near our front door and on the lower parts of cupboards in the kitchen. Most of us will find mould growing in our homes at some point. Either in the bathroom or, in humid climates, on the walls, like we have now. You'll need a safe and effective remedy at some point, so I hope one of these methods works well for you. Mould is not only ugly to look at, it can cause health problems so if you see mould growing, do something about it straight away. The longer you leave the problem, the harder it will be to get rid of it effectively. If you have asthma or any allergies, you should do this type of cleaning with a face mask on so you don't breathe in any spores. Many peopl...
Image

Five minute bread

Bread is one of those foods that, when made with your own hands, gives a great deal of satisfaction and delight. It's only flour and water but it symbolises so much. I bake bread most days and use a variety of flours that I buy in bulk. Often I make a sandwich loaf because we use most of our bread for lunchtime sandwiches and for toast. Every so often I branch out to make a different type of loaf. I have tried sour dough in the past but I've not been happy with any of them. I'll continue to experiment with sour dough because I like the idea of using wild yeasts and saving the starter over a number of years to develop the flavour and become a part of the family. However, the loaf I've been branching out to most often is just a plain old five minute bread. By five minutes I mean it takes about five minutes actual work to prepare but it's the easiest of all bread to make and to get consistently good loaves from. If you're having people around for lunch or...
Image

This is my last post.

I have known for a while that this post was coming, but I didn't know when. This is my last post. I'm closing my blog, for good, and I'm not coming back like I have in the past.  I've been writing here for 16 years and my blog has been many things to me. It helped me change my life, it introduced me to so many good people, it became a wonderful record of my family life, it helped me get a book contract with Penguin, and monthly columns with The Australian Women's Weekly and Burke's Backyard . But in the past few months, it's become a burden. In April, I'll be 75 years old and I hope I've got another ten years ahead. However, each year I'll probably get weaker and although I'm fairly healthy, I do have a benign brain tumour and that could start growing. There are so many things I want to do and with time running out, leaving the blog behind gives me time to do the things that give me pleasure. On the day the blog started I felt a wonderful, h...
Image

What is the role of the homemaker in later years?

An email came from a US reader, Abby, who asked about being a homemaker in later years. This is part of what she wrote: "I am a stay-at-home mum to 4 children, ages 9-16. I do have a variety of "odd jobs" that I enjoy - I run a small "before-school" morning drop-off daycare from my home, I am a writing tutor, and I work a few hours a week at a local children's bookstore. But mostly, I cherish my blissful days at home - cooking, cleaning (with homemade cleaners), taking care of our children and chickens and goats, baking, meal-planning, etc. This "career" at home is not at all what I imagined during my ambitious years at university, but it is far more enriching. I notice, though, that my day is often planned around the needs of my family members. Of course, with 4 active kids and a husband, this is natural. I do the shopping, plan my meals, cook dinner - generally in anticipation of my family reconnecting in the evening.  I can't h...
Image

Every morning at home

Every morning when I walk into my kitchen it looks tidy and ready for a day's work. Not so on this morning (above), I saw this when I walked in. Late the previous afternoon when I was looking for something, I came across my rolled up Zwilling vacuum bags and decided they had to be washed and dried. So I did that and although I usually put them outside on the verandah to dry it was dark by then. I turned the just-washed bags inside out and left them like this on a towel. It worked well and now the bags are ready to use when I bring home root vegetables, cabbages or whatever I buy that I want to last four or five weeks.
Image

You’ll save money by going back to basics

When I was doing the workshops and solo sessions, I had a couple of people whose main focus was on creating the fastest way to set up a simple life. You can't create a simple life fast, it's the opposite of that It's not one single thing either - it's a number of smaller, simpler activities that combine to create a life that reflects your values; and that takes a long to come together. When I first started living simply I took an entire year to work out our food - buying it, storing it, cooking it, preserving, baking, freezing, and growing it in the backyard. This is change that will transform how you live and it can't be rushed.  
Image

All previous blog posts

  • 2026 3
    • February 3
      • Workshops starting 1 March
      • Planting vegetable seeds and new workshops
      • Back where we belong
  • 2025 7
    • July 1
    • June 2
    • May 1
    • April 2
    • February 1
  • 2024 25
    • December 2
    • November 1
    • October 2
    • September 3
    • August 1
    • July 3
    • June 1
    • May 3
    • April 2
    • March 3
    • February 2
    • January 2
  • 2023 13
    • December 1
    • November 2
    • October 1
    • September 3
    • August 2
    • February 2
    • January 2
  • 2022 17
    • November 3
    • October 4
    • September 3
    • August 2
    • July 3
    • June 2
  • 2021 50
    • December 1
    • November 6
    • October 7
    • September 5
    • August 4
    • July 5
    • June 2
    • May 2
    • April 6
    • March 4
    • February 4
    • January 4
  • 2020 68
    • December 3
    • November 5
    • October 4
    • September 4
    • August 4
    • July 4
    • June 4
    • May 8
    • April 7
    • March 8
    • February 8
    • January 9
  • 2019 66
    • December 2
    • November 4
    • October 5
    • August 3
    • July 4
    • June 6
    • May 8
    • April 8
    • March 8
    • February 11
    • January 7
  • 2018 82
    • December 1
    • September 2
    • August 10
    • July 4
    • June 11
    • May 9
    • April 12
    • March 10
    • February 10
    • January 13
  • 2017 129
    • December 7
    • November 10
    • October 6
    • September 13
    • August 11
    • July 13
    • June 12
    • May 9
    • April 9
    • March 14
    • February 11
    • January 14
  • 2016 125
    • December 7
    • November 13
    • October 10
    • September 11
    • August 11
    • July 8
    • June 9
    • May 9
    • April 12
    • March 10
    • February 13
    • January 12
  • 2015 184
    • December 7
    • November 15
    • October 20
    • September 18
    • August 19
    • July 18
    • June 12
    • May 15
    • April 12
    • March 21
    • February 13
    • January 14
  • 2014 203
    • December 11
    • November 8
    • October 17
    • September 20
    • August 17
    • July 19
    • June 17
    • May 17
    • April 23
    • March 15
    • February 18
    • January 21
  • 2013 225
    • December 13
    • November 17
    • October 17
    • September 17
    • August 21
    • July 24
    • June 20
    • May 19
    • April 17
    • March 22
    • February 17
    • January 21
  • 2012 245
    • December 17
    • November 20
    • October 20
    • September 18
    • August 15
    • July 24
    • June 21
    • May 26
    • April 23
    • March 23
    • February 19
    • January 19
  • 2011 257
    • December 18
    • November 24
    • October 27
    • September 23
    • August 24
    • July 21
    • June 24
    • May 24
    • April 16
    • March 22
    • February 14
    • January 20
  • 2010 283
    • December 20
    • November 18
    • October 18
    • September 19
    • August 25
    • July 24
    • June 25
    • May 26
    • April 25
    • March 22
    • February 29
    • January 32
  • 2009 293
    • December 29
    • November 18
    • October 23
    • September 25
    • August 22
    • July 28
    • June 22
    • May 21
    • April 27
    • March 26
    • February 24
    • January 28
  • 2008 387
    • December 24
    • November 23
    • October 25
    • September 26
    • August 27
    • July 27
    • June 37
    • May 34
    • April 44
    • March 53
    • February 32
    • January 35
  • 2007 372
    • December 37
    • November 40
    • October 55
    • September 51
    • August 49
    • July 63
    • June 49
    • May 28


Trending Articles

NOT the last post

This will be my last post here.  I've been writing my blog for 18 years and now is the time to step back. I’ve stopped writing the blog and come back a couple of times because so many people wanted it, but that won’t happen again, I won’t be back.  I’ll continue on instagram to remain connected but I don’t know how frequent that will be. I know some of you will be interested to know the blog's statistics. 
Image

Every morning at home

Every morning when I walk into my kitchen it looks tidy and ready for a day's work. Not so on this morning (above), I saw this when I walked in. Late the previous afternoon when I was looking for something, I came across my rolled up Zwilling vacuum bags and decided they had to be washed and dried. So I did that and although I usually put them outside on the verandah to dry it was dark by then. I turned the just-washed bags inside out and left them like this on a towel. It worked well and now the bags are ready to use when I bring home root vegetables, cabbages or whatever I buy that I want to last four or five weeks.
Image

You’ll save money by going back to basics

When I was doing the workshops and solo sessions, I had a couple of people whose main focus was on creating the fastest way to set up a simple life. You can't create a simple life fast, it's the opposite of that It's not one single thing either - it's a number of smaller, simpler activities that combine to create a life that reflects your values; and that takes a long to come together. When I first started living simply I took an entire year to work out our food - buying it, storing it, cooking it, preserving, baking, freezing, and growing it in the backyard. This is change that will transform how you live and it can't be rushed.  
Image

Creating a home you'll love forever

Living simply is the answer to just about everything. It reduces the cost of living; it keeps you focused on being careful with resources such as water and electricity; it reminds you to not waste food; it encourages you to store food so you don't waste it and doing all those things brings routine and rhythm to your daily life. Consciously connecting every day with the activities and tasks that create simple life reminds you to look for the meaning and beauty that normal daily life holds.  It's all there in your home if you look for it. Seemingly mundane tasks like cleaning and cooking help you with that connection for without those tasks, the home you want to live in won't exist in the way you want it to.  Creating a home you love will make you happy and satisfied.
Image

Time changes everything

I've been spending time in the backyard lately creating a contained herb and vegetable garden. My aim is to develop a comfortable place to spend time, relax, increase biodiversity and encourage more animals, birds and insects to live here or visit. Of course I'd prefer my old garden which was put together by Hanno with ease and German precision. Together, we created a space bursting at the seams with herbs, vegetables and fruity goodness ready to eat and share throughout the year. But time changes everything. What I'm planning on doing now, is a brilliant opportunity for an almost 80 year old with balance issues. In my new garden I'll be able to do a wide range of challenging or easy work, depending on how I feel each day. It’s a daily opportunity to push myself or sit back, watch what's happening around me and be captivated by memories or the scope of what's yet to come.
Image

It's the old ways I love the most

I'm a practical woman who lives in a 1980’s brick slab house. There are verandahs front and back so I have places to sit outside when it's hot or cold. Those verandahs tend to make the house darker than it would be but they're been a great investment over time because they made the house more liveable. My home is not a romantic cottage, nor a minimalist modern home, it's a 1980’s brick slab house. And yet when people visit me here they tell me how warm and cosy my home is and that they feel comforted by being here. I've thought about that over the years and I'm convinced now that the style of a home isn't what appeals to people. What they love is the feeling within that home and whether it's nurturing the people who live there.
Image

Back where we belong

Surprise! I'm back ... for good this time. Instagram became an impossible place for me. They kept sending me messages asking if I'd make my page available for advertisers! Of course, I said no but that didn't stop them. It's such a change from what Instagram started as. But enough of that, the important part of this post is to explain why I returned here instead of taking my writing offline for good. For a few years Grandma Donna and I have talked online face-to-face and it's been such a pleasure for me to get to know her. We have a lot in common. We both feel a responsibility to share what we know with others. With the cost of living crisis, learning how to cook from scratch, appreciate the work we do in our homes, shop to a budget and pay off debt will help people grow stronger. The best place to do that is our blogs because we have no advertising police harassing us, the space is unlimited, we can put up tons of photos when we want to and, well, it just feels li...
Image

Making ginger beer from scratch

We had a nice supply of ginger beer going over Christmas. It's a delicious soft drink for young and old, although there is an alcoholic version that can be made with a slight variation on the recipe. Ginger beer is a naturally fermented drink that is easy to make - with ginger beer you make a starter called a ginger beer plant and after it has fermented, you add that to sweet water and lemon juice. Like sourdough, it must ferment to give it that sharp fizz. To make a ginger beer plant you'll need ginger - either the powdered dry variety or fresh ginger, sugar, rainwater or tap water that has stood for 24 hours to allow the chlorine to evaporate off. You'll also need clean plastic bottles that have been scrubbed with soap, hot water and a bottle brush and then rinsed with hot water. I never sterilise my bottles and I haven't had any problems. If you intend to keep the ginger beer for a long time, I'd suggest you sterilise your bottles. MAKING THE STARTER In a...
Image