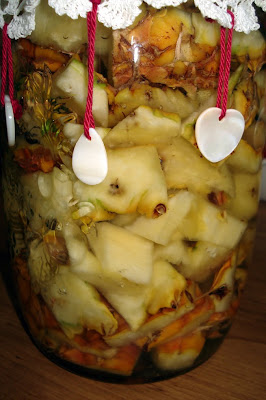
You would have noticed some pineapple in a jar sitting next to the beetroot yesterday. That is the first stage of pineapple vinegar I'm making from scratch. It's another great skill to have because it will mean you use the entire pineapple, not just the juicy, sweet inside. Pineapple vinegar is made from the bits you usually throw in the compost bin, but here you can put them to work for you instead of wasting a lot of the pineapple.

Start with a good pineapple - if it's organic, that's great, but you can use an ordinary pineapple from the market. Cut the top off - if you're in a warm climate, you can plant the top and grow your own pineapple - they take two years to fruit. But back to the kitchen, get your vegetable brush and thoroughly clean the pineapple skin. Rinse off and cut the skin from the pineapple. Cut the pineapple in quarters and cut out the core. You can use the pineapple flesh for any of your usual dishes, you don't need to add it to the vinegar jar.

Chop up the core and skin and put the pieces into a large jar. Mix ¼ cup of sugar in a litre/quart of water and pour it over the pineapple skin. Cover with a cotton cloth. This is a recipe where you're using the wild yeasts and bacteria in the air to help ferment the fruit and sweet water, so you don't want to put a lid on it, you want to keep bugs out and allow the yeasts in. Leave the pineapple jar sit to on the kitchen bench for a few weeks.

After two or three week, this mix might turn brown and then go clear again. That's good! It might also develop a little mould on top, that's fine too. Just scoop it off with a clean spoon. If a greyish gelatinous blob forms on the top of the vinegar, either as it's sitting on the bench or after it's bottled, that's excellent, you've made mother of vinegar. And you can use that mother as a starter to make more vinegar.
Two things are important in vinegar making - the temperature in the room it's made in and oxygen, another reason not to put a lid on the jar. The ideal temperature is between 15C - 25C degrees (60F - 80F). If the temperature is too low, it will take longer to make and won't be as good, and if it's too high, I doubt you'll make mother, but the vinegar will still be fine to use. You can introduce oxygen into the vinegar simply by stirring it every day.

Taste the vinegar after a couple of weeks, it should already be vinegary, you can then remove the pineapple pieces and put them in the compost. Leave the vinegar on the bench for another two weeks to develop the complex character of good vinegar. When you're happy with the taste, strain the vinegar through a clean cotton cloth two or three times and store it in a clean bottle with the lid on. It's perfectly okay to use this as it is, in fact it's a healthier alternative to the regular store bought vinegar. However, if you want to store the vinegar for a long time, you'd best pasteurise it. You do that simply by boiling it in a water bath, the guidelines for pasteurising at home are here. I keep my home made vinegar in the cupboard and use it within about two months.

Pineapple vinegar is excellent as part of a salad dressing and especially good to make a salsa dressing. You could use it to preserve your beetroot or bread and butter cucumbers. It's also a nice gift for someone who likes to cook. This is really easy to make and I encourage you to try it. I'm sure you'll be surprised at the results you get, and it's one more step on the self reliance trail.


.jpeg)


.jpeg)

.jpeg)
.jpeg)

39 Comments
I didn't know that it was possible to make vinigar at home! I will give this a try, will buy a pineapple from the market on Saturday. Far too cold here to grow the top though.
ReplyDeleteWow! I've never come across this idea before so shall certainly try it. Thanks for the tip re beetroot skins. Have a great day Rhonda.
ReplyDeleteThe only vinegar I've ever made was by accident. Apparently if you let a fruit fly into your homemade mead at any point, it will turn to vinegar. And no one needs that much vinegar!
ReplyDeleteI never really knew that this was a possibility either. Thank you for sharing
ReplyDeleteI've made what my grandmother called "pineapple honey" from the skins many times but this idea for the vinegar really excites me!
ReplyDeleteCan't wait to give it a try.
BTW we are growing blood oranges here too.
Cheers! Karen (near Bundaberg)
That's great-do you make apple cider vinegar the same way or could you tell us how?
ReplyDeleteThanks,Maree
Hi Rhonda,
ReplyDeleteThe pineapple vinegar looks great - can you use other fruit to do this? It's just that as we are salicylate intolerant, pineapple is very bad for us, as well as many other acid fruits such as grapes and tomatoes. So regular white vinegar is a problem as it is made from grapes. We use malt vinegar as a substitute but something milder would be nice. I was thinking maybe I could use pears?
Anna
I can hardly wait to buy a nice fresh pineapple to make vinegar! I so appreciate you posting such good and useful tutorials. Have a great day.
ReplyDeleteWell, heres another item for the list! Thank you Rhonda for the Tut! And you use this on salads or in place of store bought vinagar...
ReplyDeleteOh no Evelyn! All that mead.
ReplyDeleteAnna, you can make vinegar from apples and pears, even bananas. I'm going to make apple vinegar as soon as I use what I have stored in the cupboard. I'm sure if you googled, you'd be able to sift through the rubbish and find a good way of making fruit vinegars.
Karen, I know you can grow blood oranges up here but are they still dark red? I've been told the higher up you go in the country, the more blood oranges revert to their original orange colour. How have you found them?
Maree, I'll be making apple vinegar in the next couple of months.
Wow Rhonda! Is there anything you can't do!!! LOL. Looks lovely and pretty straight forward... might try it out in the new year. xo
ReplyDeleteThe pickled beets sound delightful, and I'd like to try the vinegar, but I'm afraid that Acorn Cottage is too cold in the wintertime to make it happily (55F inside) I am able to make kombucha with no problem, much more slowly than in the summer, but it stays alive. Maybe I will try the vinegar anyway. In what way will it "not be as good"?
ReplyDeleteRhonda, we had our first crop this last season and they had a red ring around the outside, but yes they were more orange in the centre.
ReplyDeleteThank you, that explains the colour to me.
Cheers! Karen (near Bundaberg)
Funny, I'm making pineapple vinegar right now! It has been fermenting for about 2 weeks now. I let it ferment with the skins and core for one week, then strained it and now letting it ferment for 2 more weeks. Hope it comes out good... starting to smell vinegary
ReplyDeleteI've never heard of pineapple vinegar before! How interesting -- now I'm thinking of what other fruits it might work for. I wonder if I can make peach vinegar?
ReplyDeleteI love getting something for nothing. I will definitely be trying this - we have a pineapple just ready for cutting. How timely! If you do grow a mother do you just add it to the next batch that you start? Will that make better vinegar? Pineapple honey sounds interesting - I can remember my thrifty mother boiling up the pineapple skin and adding sugar to make pineapple cordial to get the last scrap of flavour out of it!
ReplyDeletethanks for this - I know what I'm doing with our next pineapple! i bet is too hot in our house these days to make the mother, but we get a pineapple every couple of weeks, so I guess i can make it from scratch all the time.
ReplyDeletei was wondering - can it go wrong? can bad mould/bacteria develop, and if so what happens?
thanks
Paula in Brissie
What a great idea! I'll have to try planting my own pineapple--thanks! :)
ReplyDeleteMiss Mia
Yet one more thing I had assumed I had to buy that I discover I can make myself. I'm quite grateful you've shared this and look forward to having a go at it!
ReplyDeleteWow, this is different! I had no idea you could make vinegar like this- and I love it because your using something you'd normally throw away. I might try this some day, but I want to learn how to make apple cider vinegar first. Have you posted anything on that? If not, maybe a tutorial soon? Up here in Canada we don't grow pineapple, but oh my...we have so many apples we don't know what to do with them. Thanks for the post! It's amazing what you can make.
ReplyDeleteThe Girl in the Pink Dress
Hi Rhonda,
ReplyDeleteWhat do you do with the mother? Do you make more vinegar with it?
Lee
Oh my gosh! Thanks so much for the information. I've been trying to make red wine vinegar and wasn't sure how to proceed.
ReplyDeleteLovely post! Can I do the same thing with the apple skins and cores that I am now working with to make Thanksgiving pies? Can I put pineapple and apple together?
ReplyDeleteI am pretty good at making my own Limoncella, but I never thought of making vinegar. Cool!
Happy Thanksgiving from Colorado. See you in Queensland next October. Well, not really you, but Queensland in all her beauty!
I've never heard of pineapple vinegar before! How interesting.
ReplyDeleteI will try this too. Good from so many points of view- using all of the fruit, self-sufficiency and the potential of store-bought vinegars to be petroleum-based.
ReplyDeleteThanks once again, Rhonda!
Getting back to the vinegar conversation, the only stuff I could find on the web officially was about using pears to flavour vinegar. I found a couple of blog posts which said you basically fill the jar with peels, cores and water, cover with cheesecloth and wait... (this may turn out to be what my son calls a 'science experiment' which I will have to hide from my cleaning lady!)
ReplyDeleteI bought some pears yesterday to make jam, will let you know how I get on. Anna
Pineapple vinegar is a new one for me but from your instructions so simple to make. The next time we get pineapple I will definitely try this.
ReplyDeletethis is really great :) i am loving your blog! keep up the good work!!! so helpful for someone like me looking to learn, improve and improvise.
ReplyDeletei am hoping someone can help me... i am trying the pineapple vinegar at home it has been fermenting for three day and a white foam has formed on top and in the liquid. what is it? and has my batch been spoilt? it is also bubbling and has gone a grey/brown colour.any suggestions would be greatly appreciated.
ReplyDeleteThank you for that wonderful pineapple vinegar recipe- I hope to make some this spring!
ReplyDeleteI've been making the pineapple vinegar too,and I too keep getting white foam and to top it off...fruit flys...help!!!
ReplyDeleteI just started my vinegar a few weeks ago. When the white foam pushed the netting off the top of the jars, I took out the pineapple pieces to reduce the volume in the jars. That was at 8 days at 60-70 degrees.
ReplyDeleteIt started clear went darker gold/brown and now is milky beige. Since it still has foam on top and smells like beer or yeast I figure it's on the right track. It takes alcohol to make vinegar - once it gets clear, I'll taste again.
If anyone has more information on this delightful adventure please share.
I've got VINEGAR!! 28 days!
ReplyDeleteI tasted it this morning and I'm still alive and feeling fine.
A big part of sucess is patience. And trust. It will work. Just give it a try and ignore everything that happens to your liquid. Everything.
It will smell bad, like maybe someone forgot to take the garbage out on time but only if you get close. It will foam. It will turn colors. Take the pineapple chunks out after 7-10 days.
Stir it a bit. I think it works faster if you do but I did forget in the beginning. I was watching the top foam/mother. But for the last week I've been stiring. Air is needed for the vinegar to grow. This morning when I sniffed, it smelled almost like vinegar. Surprise. It was vinegar.
I stained it thru coffee filters thinking I could make it clear. Don't think that made any difference as it's still a milky, golden color, just like my natural store purchased apple vinegar. I'm going to let it sit more to develop flavor but I thought I'd let you guys know it really does work.
Temp in my kitchen - 65 to 75 degrees and it took 28 days. No plans to pasturize it.
Do give it a try.
I put this on last weekend after using a pineapple at my daughter's birthday party. It took two days to start fermenting and fizzing - quite strange to look at pineapple and see it looking like soft drink!
ReplyDeleteThe fizzy has almost gone now, it's smelling pineapply but strange. I'm quite looking forward to seeing how it turns out.
Now, what can I use pineapple vinegar for?
Great blog and posts on fermentation. I am a vinegar lover myself.
ReplyDeleteI have made many types of vinegar and although I have heard and read about pineapple vinegar before I have never been all that curious until now. I am curious enough and inspired.
I must say in your post "Making Vinegar the Old Way" I was really impressed with your handmade vinegar jar cloths/ covers. I enjoyed your attention to what many use a simple rag or cheesecloth/muslin. I want some (i don't sew).
Thank you for sharing your creativity.
So I made the pineapple vinegar, but got a thick powdery mold layer on the top. I've scraped it off and it smells like pineapple vinegar, but now am not sure what to do. Thinking I really don't want to use this. Any thoughts? HELP! :(
ReplyDeleteThank you so much, your blog is educative and informative, but can I use plastic container to ferment my pinaepple vinegar?
ReplyDeleteYes, food grade plastic is fine.
DeleteOK so I was just given some pineapple vinegar with the "mother" in it - I've made apple cider the way you just described with apple scraps - but I was told with the mother just to pour a can of unsweetened pineapple over it (I really prefer to use fresh) so HOW do I go about making vinegar with a mother - ??
ReplyDeleteI welcome readers' comments. However, this blog never publishes business links or advertisements. If you're operating a business and want to leave your link here, I will delete your comment .
Note: only a member of this blog may post a comment.