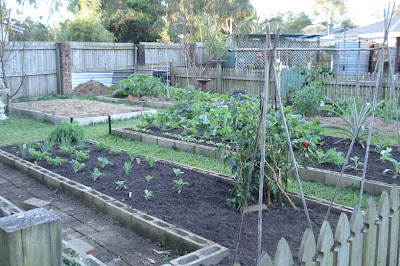
Our vegetable garden is vitally important to us. It gives us the freshest organic food at minimal cost. To keep the cost of the garden down as much as possible, we make our own fertiliser, harvest rain water and save a lot of our own seeds. That has two advantages - it provides us with a closed system - reducing the risk of introducing weeds and disease from outside, and it increases our level of sustainability.
We have two big clumps of comfrey that grow all through the year. Comfrey makes a great fertiliser as it's chocka block full of nitrogen - the element that makes green leaves grow well. Comfrey tea is made by cutting half a bucket of comfrey leaves, putting a brick on them to keep them under water, then filling the bucket to the top with water. You need a lid for the bucket as this brew stinks to high heaven. Leave it for a week or so, then dilute a small amount of the brew with plain water till it
looks like weak tea. And that's your nitrogen fertiliser. This is perfect for plants like silverbeet (swiss chard), lettuce, cabbage, kale and all the leafy greens, but should be used sparingly on fruiting plants like tomatoes, capsicums and cucumbers. Putting too much nitrogen on fruiting plants will cause them to grow lots of green leaves and not so many tomatoes or cucumbers.
The fruiting plants are much better served with worm castings as it provides a rich fertile soil in which they will thrive. Read more about the benefits of microbes in the soil
here and
here. Microorganisms in your garden soil will increase your yield of fruit and vegetables. The simplest way to increase the level of microbes
is to add worm castings to your garden.
I have already written about
setting up a worm farm using an old bathtub, now I'll talk about harvesting the castings and maintaining the worm
farm.
From day one of your worm farm, when the catching bucket under the worm farm is full, you should pour that back into the farm. After about a week or so, you can start using the worm juice as fertiliser. The longer the worm farm goes for, the better the juice will be - beneficial bacteria and various microbes will built up in the juice and castings and will boost your crops when you apply it to the garden.
But let's get back to maintenance. Over the months you can scrape off castings from the top of the farm and use them on your plants. However, there will come a time, depending on how many worms you start off with, when it will be worth your while to rebuild the worm farm and harvest all the castings. In the photo below there are thousands of worms lurking. So how do I get them out of the castings so I can use it on the garden and keep the worms working in the farm? There are a few ways to do this, this is what I do.

I move all the castings over to one side of the bathtub. Use your hands, with gloves if you prefer, to move most of the castings - using a shovel or trowel will kill too many worms. Then, if you have weed mat or a microfibre filter under your castings, pick that up and roll the casts over. You will then have half the tub with only gravel under the filter material and half the tub full of castings and worms. Click on the photos to enlarge them.

Now start building up the empty side. You can do that the same as the instructions for building the worm farm, here I used shredded paper and completely composted horse manure. Before adding the next layer, I hosed this layer down to make sure it was completely wet. Remember though, you don't want your castings wet as the worms are in there and they don't like wet conditions - like like it moist, not wet.

My next layer was straw and any organic food I could find. Make do with what you have on hand. Here I have some old organic chook pellets that we decided were too old to be fed to the chooks and some green leaves picked from the garden. You're after variety here. The worms will eat everything you put in - the paper, manure, chook food and the leaves. Hose this layer to make sure it's completely wet.

Then I covered the new section with an old wet bathmat. The worms will eventually eat that too. I wanted to create a tasty attractive environment so that the worms would travel from the castings over to the new side.

I did this one week ago and when I checked yesterday the worms had already moved into the new food. I'll give it another week and then take all the castings out and use them on the garden. There's about 30 kgs of castings there - a huge boost for our vegetables and fruit. When that side is empty, I simply repeat the layering exercise, and the worms will eventually eat their way back to that side too.
If you've been thinking about starting a worm farm, jump right in. Even if you're in an apartment and want to do some composting, a small worm farm will use up all your kitchen scraps and give you great castings for your indoor plants. And don't worry about constant care. If you've given your worms a good feed and they're in moist conditions you can easily leave them for a week without feeding.


.jpeg)


.jpeg)

.jpeg)
.jpeg)
.jpeg)
16 Comments
Hi Rhonda Jean :) Thanks for the idea of starting a little worm farm. My sweeties will love it, and I think that will make a neat project for this coming fall! Love, Q
ReplyDeleteI have an old bath tub that was left here when the previous people left, I think they used it to hold rain water. All it's been up to now is a breeding place for mosquitoes. I know know what to do with.
ReplyDeleteThank you so much Rhonda
Thanks for the explanation and photos of how to get to the castings. I'm a visual learner, so photos really help me! I have one of those purchased worm farms that stack on top of each other, and really need to start the 2nd layer.
ReplyDeletethanks for the comfrey tea idea. we grow comfrey and thats sounds great. can't wait to try it.
ReplyDeleteI really enjoy your blog, you really take alot of time to show and explain details. thanks
mandi
William and I are going to try worm farming again. We did this once before but now that we have all your knowledge I think it will work! Thanks for sharing as I learn alot from your posts.
ReplyDeleteI just wanted to leave a comment (as I don't normally) and let you know how much I always enjoy reading your blog! I have been going through all your old posts on stockpiling as I am starting to do that and it's a veritable treasure vault of wisdom.
ReplyDeleteI don't really garden (a few roses and potted herbs, that's it) but I do have a worm farm for the mere reason that it means my fruit and veggie scraps don't go into the bin. Plus it's neat to put food in and a week later it's disappeared. I recently also found out quite by accident it's a great way to sprout rockmelon shoots!
Very good post RJ~! I finally got approval through "high command" to get a worm farm going (as long as they don't get brought into the house.), so this information was very timely for me. Thanks so much. P!
ReplyDeleteThe worms love egg shells but i have always found that they tend to hide inside any half shells and this means a little extra care needs to be taken when emoving the castings. I have a blender in the kitchen that we put all our egg shells in. Once a week we add a little water then zap the shells and pour them into the worm farm. This way the worms still get the egg shells but i dont have to tip out the worms when i collect castings.
ReplyDeleteOur capsicums were all given plenty of worm castings when they were plated and have produced such a multitude of crops it has been beyond belief!
this comes at a good time- we bought our very first worm farm yesterday!
ReplyDeleteYou have posted about worm farming at the perfect time! I've been looking into it lately and just yesterday while I was planting strawberries I told my husband he was going to come home one day and think I had lost it because I was going to have a worm farm. He really enjoys that I enjoy gardening for our food but doesn't "get into it" like I do. He'll help me build beds, till the ground and shovel but that's the end of it. To give him a little pat on the back however he came around to the idea of rain barrels...of course I've talked about them for 2 years now but yesterday he said, "you know what we need? Rain barrels." To which I replied. "That's a great idea! I'll look into them this week. Great thinking honey."
ReplyDeleteHe'll come around to the worm farm...eventually.
Very interesting, Rhonda--thanks. I'm not at the point in my life where I can get into worm farming yet, but it's really cool to read about it and tuck it away in my mind.
ReplyDeleteI came over from Niki Rural Writings blog. I'm going to have to spend the next hour looking through your past posts!
ReplyDeleteManuela
Hi Rhonda Jean,
ReplyDeleteI started a worm farm last October. We have the purchased 3 tier system (actually made in Australia!). Because we live in Canada we have to keep the composter in the basement for the winter as it would freeze outside. I started with approximately 1 pound of worms and followed the instructions for setting it up. Unfortunately things are not progressing as it was thought...the worms don't seem to be able to manage more than 1 or 2 small feedings a week and the bedding material is always really wet. I do not add any extra moisture to the system as per the instructions from the seminar that I attended. The first level tray is not yet full enough to require the addition of another layer even though the instructor had suggested that by 6 or 7 months it should be. Do you or any of your readers have any suggestions for me as I am sure that there must be something that I could correct to make the system more effecient?
Thank-you,
Ann
Hello Ann. I've not used the three tier system, but I know of them. There are two things I can suggest.
ReplyDelete1. One pound of worms isn't enough. Have they been reproducing? I started off with a kilo (2.2lbs) and they doubled in a year. I would get another pound of worms but continue feeding as you are now. Hopefully they will start reproducing when they're warmer.
2. Put in more carbon foods - these are dry foods like shredded paper, cardboard or straw. This will help dry the mix out. You should be giving your worms a mix of wet and dry foods - so garden waste and kitchen scraps along with old envelopes and shredded newspaper.
I hope that helps.
Thank-you Rhonda Jean. It is difficult to obtain the worms around here so I guess I will have to wait until the worms I have reproduce more to build up the population. As to the feeding I will try adding more of the carbon foods. I have been adding a little bit but maybe need to increase the amount. Hopefully the worm farm can go outside soon and then it will warm things up.
ReplyDeleteAnn
I am always amazed when I go looking through your blog. Is there anything you don't do??? *BIG CLAP*
ReplyDeleteI welcome readers' comments. However, this blog never publishes business links or advertisements. If you're operating a business and want to leave your link here, I will delete your comment .
Note: only a member of this blog may post a comment.