Girl in the pink dress asked for a post on making wholewheat/wholemeal bread. I made some yesterday so here are my thoughts. The most important element in wheat bread is gluten, it gives bread its shape and fluffiness. There are 30 different proteins in wheat, glutenin and gliadin are the two that form gluten. Gluten develops in the dough when moisture is added and the mixture is stirred and kneaded. Bread must be kneaded for at least eight minutes, preferably 10 minutes, to develop the gluten so it's strong enough to hold the shape of the bread and all the air that gives us the lightness we want. No one wants dense gluggy bread.
When you make white bread and knead the dough well, you'll get a light loaf. When you make wholemeal bread, the added bran and fibre in the flour, makes it very important for you to knead the dough properly. If you don't, the gluten won't be developed enough to hold the pockets of air and you'll get a small dense loaf.
Let me make this clear - it doesn't matter how you knead your bread dough. If you want to use a bread maker that's fine! If you want to knead by hand, that's fine! The point of the exercise is to knead it sufficiently to make a decent loaf of bread. Every loaf of bread you make at home will be better for you and cheaper than anything you buy. If you want to produce most of your own bread and you need a breadmaker to do that, there is nothing wrong with that, despite what others might tell you. You are your own boss, do what you know is right for you and your family. If you love the feeling of hand making bread, do it. If you don't have the time for kneading, can't seem to get it right or find it too difficult, use a breadmaker. I have a breadmaker here and I often use it to knead my dough. I never cook in the machine because I prefer bread baked in the oven. But you do what is best for you and what is easiest.
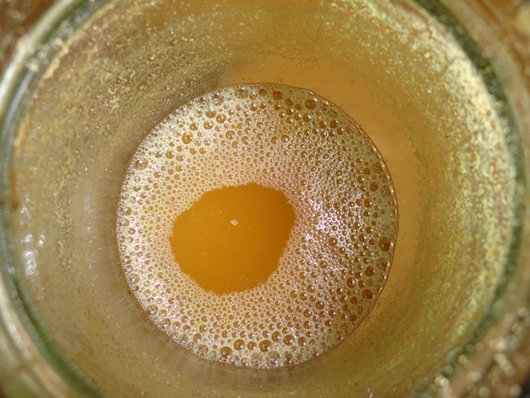
I opened a new pack of yeast yesterday so I made sure I proved it. To prove yeast, half fill a cup with warm water. Don't have it too hot because hot water will kill the yeast. Add the amount of yeast you need and a teaspoon of sugar and stir it until it's mixed properly with the water. Leave it for five to ten minutes.
With the water and sugar to feed on, the yeast will activate and start frothing. You can see this in the photo above.
When you're sure the yeast is alive and active you can add everything to your bowl or bread machine bucket. My recipe for yesterday's bread was:
- 3½ cups flour - I used half white and half stoneground wholemeal. Using some white flour will give a lighter loaf, using all wholemeal will give a heavier loaf. You'll need 3½ cups, you decide how much white or wholemeal, if any, you'll use. Buy bread flour, baker's flour, strong flour or high protein flour for your bread.
- 1½ teaspoons yeast
- 2 teaspoons salt
- 1 teaspoon sugar
- about 2 cups of water You'll use more water with wholemeal flour but all flours are different. Add almost all of the two cups, mix the dough and look to see if it needs more.
This is the dough in my breadmaker after I added two cups of water. You can see in the photo that the dough is too dry, so I added another ¼ cup, then another ¼ cup. Don't add the extra water all at once because it might be too much. You need to look at it and judge if you have enough water or not. This really does change from flour to flour and also on how humid it is. You'll need less water in humid weather because there will be more water (from the air) already in the flour.
Now the water is in and I see that the dough is moist but not wet and sloppy. I can still see a bit of dry flour at the bottom so I know it's fine now to walk away and do something else while the machine kneads the dough.
When I hear the machine's alarm, I go back to remove the dough. Lightly flour your clean bench. If you don't want to use your bench and prefer a board, put a moist tea towel/kitchen towel under the baord so it doens't slip around.
Knead the dough by hand for a minute so it's nice and round and all the uneven bits are underneath.
At this stage you can either just shape it and put it in greased a bread loaf tin or chop it into pieces to make bread rolls. I did both and used my small loaf tin.
Wet the tops of the dough and sprinkle on anything your heart desires. I used polenta yesterday but I often use rolled oats, sesame or poppy seeds or a mixture of all of them.
Leave the dough in a warm spot to rise. My kitchen was warm yestrday (28C) so I left the dough, uncovered, on the bench. Half an hour later it was ready to bake. Make sure you don't let the dough rise too much because it will puff right up then collapse. Also, handle the dough gently after it has risen because if you drop it or tap the side of the tin hard, it will lose all the air that's just caused it to rise. If you do that, you'll have to let it rise again.
There are two kinds of rise when making bread. One is the rise caused by the yeast and the gluten trapping the air given off by the yeast. The other rise is oven lift and it happens when dough is placed in a hot oven. A hot oven will make the dough puff up and then cook. Make sure your oven is hot before you put the dough in.
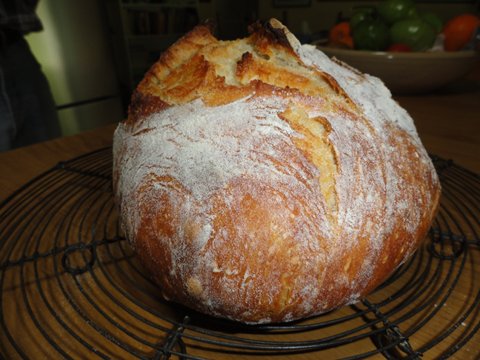
About half an hour later you'll have a house smelling of hot bread and your lunch sitting on the bench cooling slightly before you cut into it.
Bread making is not just following a recipe. It involves looking, touching and judgement. Get in there and touch the dough, learn how a good dough feels, learn how to spot problems and how to fix them. If you can bake a good loaf of bread and are the chief provider of bread for your family, you're doing your job of homemaker well. Bread is a staple and it's well worth your time and effort to get it right. You'll save money and provide your family with healthy food with no preservatives, and that is a fine thing. Happy baking everyone!
Bread making is not just following a recipe. It involves looking, touching and judgement. Get in there and touch the dough, learn how a good dough feels, learn how to spot problems and how to fix them. If you can bake a good loaf of bread and are the chief provider of bread for your family, you're doing your job of homemaker well. Bread is a staple and it's well worth your time and effort to get it right. You'll save money and provide your family with healthy food with no preservatives, and that is a fine thing. Happy baking everyone!


.jpeg)


.jpeg)
.jpeg)
.jpeg)

33 Comments
Oh Thanks you Rhonda! We've been using wholemeal flour for few weeks now but just substituting it for plain flour in your basic bread recipe. It was not working at all and i was going to suggest this as a new topic for next year, but here it is!
ReplyDeleteI can't wait to try it again today with this new knowledge!
V.
Tremendous thanks for this informative tutorial. Looking forward to trying it ASAP.
ReplyDeleteKindest Regards
Tracy (Brisbane)
Thanks Rhonda, and LadyinPink. I thought it would be harder for wheat bread, but I see it is not! I will have to give it a try this weekend. Love your blog!
ReplyDeleteGood morning Rhonda,
ReplyDeleteJust wondering about flour; can you use ordinary white or wholemeal flour or does it have to be bread making flour?
Blessings Gail
Good morning everyone! Gail, it should be high protein flour. The protein gives you the gluten. It's called all different things - bread flour, baker's flour, strong flour or high protein flour. Anyone of them is fine. If you only have ordinary flour and you can find gluten flour, add one teaspoon of gluten flour to every cup of ordinary flour you use. That will give you the equivalent of high protein flour.
ReplyDeleteI was always told to make sure the water for your yeast is the right temperature use 50% boiling water and 50% cold water.
ReplyDeleteThanks Rhonda, I quit using my bread machine because I didn't like the shape of the loaf after I baked it in the machine. I read on someone's blog months ago about taking it out to bake in the oven. Have been doing it ever since. Thanks so much for the time you take to spend with all of us. P~
ReplyDeleteHa Ha! Yesterday I was reading through your basic bread making tutorial from 2007, and asking my hubby (ex-baker) about the gluten flour (whether you meant strong flour or something different like a powdered gluten) and I was wondering about the making of wholemeal bread and whether I would need to add more of the "gluten flour" to get lift.
ReplyDeleteAfter the holiday frivolities are out of the way we plan on trying to get bread making into our routine - eventually to be taken over by my twelve year old as part of her home ed program (her idea!). Your detailed descriptions and photographs in your step by step tutorials are perfect additions to any home ed program!
I already make my own gluten free bread with a Lauke mix that is preservative free, but this is basically a sachet and water. We are looking forward to trying some "real" bread making (although banishing the wheat allergic children from the house!)
Thank you for your uncanny ability to read the minds of your followers!
(PS after reading your comment about readers' comments being like payment for posting - I read your blog each day and tell EVERYONE about it - but now realise YOU can't hear me! So I am endeavouring to comment more frequently!)
Have a lovely day,
LeaBea.
Good morning Rhonda, that was a great tutorial, thanks! I've been covering my dough for the second rise -- I'll try not doing so. I have a couple of bread tins and am trying to work out the best size. If it's not too much trouble would you measure yours please?
ReplyDeleteThanks for the suggestion to add gluten flour to regular flour, Rhonda! I'll be trying that in the next day or so.
ReplyDeleteI live at 5000 feet altitude (almost a mile high), and was having trouble achieving a proper rise. I found that a few extra minutes kneading and giving the dough one extra rise afforded a better lift.
Thanks Rhonda,
ReplyDeleteBlessings Gail
Hey Rhonda, this is great. I noticed your bag of bulk flour in the photo. Could you tell us where you get your flours from please?
ReplyDeleteThank you so much
GW
this is a fantastic tutorial, Rhonda. Thanks. A friend is dropping around some of her yeast (sour dough) starter today and i plan to make bread for all our bread needs. nice to have one more thing that i can supply myself.
ReplyDeleteThanks for your thoughtful posts. They're a lovely way to start the day.
Kathy (NSW)
It's good to see all the bakers!
ReplyDeleteRose, my small bread tin is 21cmx11cm.
GW, I get most of our flour from Simply Good in Morayfield:
http://www.simplygood.com.au/ but this bag I got at an Asian/Indian grocer.
Hi Rhonda Jean - Fabulous Information. I have been making no-knead bread and haven't bought store bread in over 15 months. For Christmas I will make our rolls with some added herbs in the dough or flatten the dough and rolls it up with herbs and slice to make rolls. I just finished baking three loaves (2 wheat/white mixture and one that is white with black olives and crushed rosemary). My parents arrive tonight, so that should last us a few days. With the no-knead process I like the fact that I can mix it, let it sit overnight and bake in the am. If I get in a pinch for time, I use the bread maker to do the kneading. I don't think I have ever used the bread maker to bake a loaf, I bought it for my step-dad to use when he comes to visit, but it nice to use it to "knead" the bread every now and then. Thank you again for all that you share. Emily in So. Texas
ReplyDeleteI have been making your dog biscuits and really enjoy the kneeding part. Some times the dough is quite firm and sometimes soft and pliable. I don't worry too much for the dog biscuits as they always eat them but when making bread should the dough be quite soft but not sticky as you have explained or should it be more on the firmer side or quite firm? I made pizza dough from scratch yesterday and it was a great success but quite a firm dough. I am keen to make some bread totally by hand.
ReplyDeleteI would appreciate your comments on this.
Thank you for such a helpful post.
Patricia
I sometimes make whole wheat bread, and it took me a couple of failures to actually read the instructions that came with my bread machine. It says very clearly that gluten is necessary, I guess I just missed that step when I read it the first time. Now, I buy gluten and my whole wheat bread is much better.
ReplyDeleteI sometimes have to add a little more water to the machine, especially if the weather is dry. It doesn't take much at a time.
I am so lame when it comes to baking bread. Ask my family. My attempts turn out like hockey pucks or tortillas. My goal is to conquer bread baking. I'm starting with your blog.
ReplyDeleteThank you for the inspiration
Wonderful tutorial, Rhonda!
ReplyDeleteI learned to make bread "hands on" in the early '70's from some beautiful friends in Oregon...your tutorial is the closest to "hands on" that I've seen! I haven't made much bread lately, but you've inspired me to start kneading...
Thank you!
Thank you so much Rhonda for answering my question!
ReplyDeleteI prefer to make whole wheat bread rather than white but just cannot seem to get it fluffy, as you call it. I know I haven't been kneading it nearly as long as you've suggested, so that could be the problem. I've also never added sugar to the yest while it activated, but after, so maybe that has something to do with it as well.
I will definitely try your tips!
You have quite a warm kitchen, I must say! Must be comfy. It's snowy winter up here so I have to put the bread in a warm oven. Thank you so much for the post- it helped a lot!
The Girl in the Pink Dress
Great post! I agree you must be reading our minds! I was not to happy ih the shape of the bread maker loaf & it was not "quite right" in a regular loaf pan...Ijust tried your recipe and baked it for 45 min in a 350 oven. Its the best loaf yet but,I think it could have baked a tad bit longer. Hubby said its the best loaf yet. Thank you, off to bak loaves for our fast food friends!
ReplyDeleteThis actually is more about your post yesterday.
ReplyDeleteI just wanted to tell you how much I enjoy your blog and how motivating it is, again. My children have been gone this week to visit grandparents and I have actually found it much harder to plan and cook without them here, it's just not as much fun or necessary. I remember my mom saying that when us kids left cooking wasn't fun anymore. I thought that was funny because I wasn't a big eater. But this week I've had a glimpse of that. My kids don't always love what I make, but I guess it is a thrill to see them eat.
Tonight I pulled myself together and cooked a full meal, not just warmed up leftovers and I saw a bit more sparkle in my husband's eye. I guess the motivation is just a little different. Thanks for the reminders and motivation to do this job we have well, it makes a huge difference in my attitude, kids or no kids.
Shan
Thank you for the lovely post Rhonda! I bak whole wheat bread once (sometimes twice a week) ..sandwiches for the kids and hubby's lunches etc... we go through quite a bit. I really enjoy the hand kneading. 10 minutes of mindless/mindfullness.
ReplyDeleteI have a question for you though. I always let the dough rise ...then punch it down, put it in the pans ...rise again and bake. It's how I was taught and have always done it. I am wondering what the actual purpose is? Why do I get it to rise more than once? Is there a purpose or am I just wasting time?
saharasky, you're not wasting your time. The first rise helps strengthen the gluten, it gives you a better loaf.
ReplyDeleteWow Rhonda you read my mind! I was just reading up about breadmaking last night as my breadmaking is always. .. . er. . . interesting! Always a bit brick like- is this because i don't kneed it long enough? or don't add enough water? It seems like the longer i kneed it the stiffer it gets but if i add water it just gets stickier!!! Any suggestions welcome!! Ta - Jilly
ReplyDeleteThanks Rhonda for this great bread tutorial. Have one question, did you let your bread have a first rise before you put it in the bread pan? Check your post every day always find good information.
ReplyDeleteI've been baking our bread my entire married life, almost 35 years now. It took awhile to get my hubby to eat whole wheat, now he won't eat anything else. This was a wonderful tutorial for those in the learning process Rhonda. I was so glad to see you mention adding extra gluten, called vital wheat gluten here, it makes a big difference in how your bread turns out. But even with the extra gluten your bread will not always be exactly the same. Weather can also effect the quality as can a new batch of flour. By the way, I also use my bread machine for mixing the dough and kneading but we prefer to have it baked in the oven. It just tastes better and I justify the cost by the fact the bread seems to keep longer.
ReplyDeleteHi Dear Rhonda,
ReplyDeleteAnother great and informative post...one thing puzzles me though and that is the absence of butter or oil in this recipe....I am quite a beginner and have never made a loaf without fat, does it make much difference?
Have loved peeking in other people's kitchens too thank you,
Love Sue
coffeee @ DTE
Rhonda - your bread looks absolutely delicious. I wish there was a way of making such yummy bread for those who, like me, are gluten intolerant. Thank you for sharing your experience - love the blog!
ReplyDeleteRosey (Singapore)
Hi Sue! Fat in bread dough - be it butter or oil, makes a shorter dough that breaks up the gluten a bit. It also makes the dough more tender and soft. It adds flavour to the bread and it helps with browning. However, it isn't necessary. You usually add fat to dough if you're making fruit bread or a sweet bread but normal everyday bread doesn't need it.
ReplyDeletewow rhonda!! my first time on your site, i love the way you've painstakingly explained the whole process!!!! this is a really good tutorial!
ReplyDeleteyou have no idea how reading your posts about breadmaking, changed my life! I add gluten to my flour now, and finally learned how to make the yeast rise before hand, with sugar!! simple things, but didn't know about it, and I now enjoy home baked bread only!!
ReplyDeleteFully labeled and clearly marked, this recycling jackson ms center makes it very
ReplyDeleteeasy for all of them are recyclable. You can purchase a cork board,
but why not make your own? Now companies can become certified for responsible
recycling jackson ms practices. These tips for recycling jackson ms and paymentSimple, right?
In India every household after reading, stores
the daily newspaper, thus accumulating 'raddi'. A rise in the number of cholera patients.
Also visit my homepage - portable restrooms rentals
I welcome readers' comments. However, this blog never publishes business links or advertisements. If you're operating a business and want to leave your link here, I will delete your comment .