down to earth

  • Home
  • About Us
  • Down To Earth Book
  • Privacy Policy
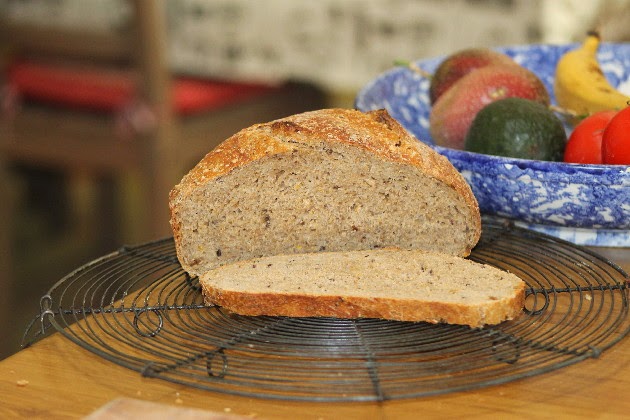
Most of us home bakers have a gaggle of well used recipes to bake a variety of bread for our families. I am no different. These are soft white bread rolls that the English call Baps and the Scots call morning rolls. I often use wholemeal flour instead of white and these photographed are wholemeal. They're nothing fancy, just an all purpose roll that are easier for children to eat than a crusty roll. The rolls are perfect for lunch boxes, for a hearty bacon and egg roll or sausage on a roll for a Saturday family lunch in winter, or for salad rolls all around in summer. These rolls are a great accompaniment for soup and that is why I made these on the weekend. We had them with our sweet potato and pumpkin soup.


The other thing to point out is that there is another common recipe for Baps using vegetable oil or butter but no milk. I prefer the recipe using milk. To make these rolls soft and light you need a small amount of fat; it also makes the dough easy to handle and shape.  Using milk instead of butter or oil gives you enough fat from the milk for the lightness and flavour, but without the two tablespoons of fat the other recipe advises. 

The recipe will make up 12 small or 8 large rolls.
  • 2 level teaspoons dry yeast 
  • 2/3 cup lukewarm full cream milk
  • 2/3 cup lukewarm water
  • 1 teaspoon salt
  • 3 cups unbleached white (or wholemeal) flour, plus a little extra for shaping and finishing
Activate the yeast in the warm water for ten minutes before starting. This not only ensures you're using active yeast, it also helps the ingredients combine.

Add the flour and salt to the bread machine bucket, then the liquid ingredients, including the activated yeast in the warm water. Turn the machine on to the dough setting. When the ingredients are mixed together, check to make sure the dough is neither too dry nor too wet.  Adjust if necessary with more flour or a small dash of water.


When the cycle finishes, it will already have done the first proofing and the dough will have been punched down in the machine. Now you can take it out, cut and shape it then put it on the baking sheet to rise. When you remove the dough from the bucket, it should be light, springy and smooth. On a lightly floured board or bench, roll the dough into a large sausage shape and cut it in two. Take one piece and roll it until it's a long sausage shape. Cut it in half, half again and half again. If you want large rolls, cut it into fewer portions. When you have each piece of dough, fold the sides into the bottom so you have a well rounded top. Place all the firmly formed rolls on the baking sheet. If you want to brush with egg wash, do that now, but traditionally these rolls have a lightly floured top.  Bake in a pre-heated hot oven at about 220C/430F until they're brown on the top and smell ready.

 TIP:  Always handle the finished dough gently. It's fine to be a bit rough when you're kneading but when the dough is ready to bake, it's very delicate. Dropping it or bashing the tray against anything might cause the dough to deflate. When you've got the dough ready to go in the oven, treat it like a new born baby.


This recipe will also make up very nice fruit buns. To make them use the recipe above with the addition of a tablespoon of soft butter, two tablespoons of sugar and a cup full of dried fruit.

Thanks for your visit today. I hope you had a good weekend and, like me, are looking forward to a productive week. :- )


The weekend is almost here and I hope that means you have more time to relax and enjoy yourself.  Winter is slowly coming to and end here with our daytime temperatures now in the low to mid-20s. It's a lovely time of year.

Thank you for your comments during the week. I'll see you again next week. :- )

National Geographic photograph winners 2014
Generosity Farm
Australians anxious about the cost of living
Where to buy better meat UK
Easy homemade dairy products
Summer herb rolls
Simplifying simplicity
Painting old furniture - a good example of what you can do for a fraction of the new price
Coffee pods. Another form of tea bag, but worse
Five things you don't need
Home habits that save money
Tumble dryers and washing lines

It was one of those special days yesterday - one when the hours dissolved into each other, I had no real work to do and I sat knitting sample dishcloths using leftover yarn from recent projects. I'll be showcasing the dishcloths at the talks I'll be giving in Brisbane in September. I'll have details about them for you soon. Slow and steady was the order of the day. Hanno was working in one of our bathrooms that we're renovating at the moment. Meals were a breeze - homemade sausage rolls and celeriac soup, so apart from the knitting, there wasn't much to do. The sun shone outside, it was neither warm nor cold, and everything went according to plan.


I've been harvesting beetroot, tomatoes and eggs from the backyard and by far, the most abundant of those are the eggs. Our hens are producing between nine and ten eggs every day and have been all through winter. We have been giving away eggs left, right and centre, and using as many as we can in our kitchen.  The other day I made some delicious Portuguese custard tarts, they used up four eggs. It's a very easy recipe and the tarts are moist and luscious; they'd be perfect lunch box or picnic food. I used the recipe from Not Quite Nigella, it was so easy and quick and it made up 12 delicious tarts. There is an excellent tutorial with photos on her site. BTW, I added an extra egg to my custard and it worked well.


I pickled the beetroot and I've shared that recipe before so won't repeat it again, but I did use a different vinegar and it made a remarkable difference. I bought some organic apple cider vinegar and used 125 mls of it along with 125 mls of my regular Cornwells apple cider vinegar. It was so good. I actually drank some of the pickling liquid on its own after we had a small bowl of the beets for lunch on the weekend. The liquid was dark blood red and, simultaneously, it made me feel like a vampire and healthier as soon as I drank it. :- ) My grandmother drank the vinegar dressing after we finished the salads she used to make. We never used oil in those days - olive oil could only be bought in chemist shops/pharmacies then. Most people just used vinegar, salt, pepper and sometimes a little sugar to dress their salads. I still have a preference for non-oily dressings and am quite satisfied with plain vinegar, as long as it's a good one.


The tomatoes will be used fresh and in various meals, I don't have enough to preserve them. But the other preserving I did do last weekend was a grapefruit cordial. The lovely Sandi who lives on a small farm in the next town brought over a large bucket of pink grapefruit recently. I was going to make marmalade but then didn't have the time nor the inclination to cut the peel, and decided to make cordial instead. I made up light sugar syrup and added enough grapefruit juice to make a slightly sweet-sour cordial. We enjoyed it with our lunch when Sunny and Jamie visited on the weekend. Made up with cold, sparkling mineral water, it made a refreshing drink. It is a wonderful thing to be able to make many of these drinks and preserves but I'm truly thankful I have the fresh produce to use.

This is the cute red riding hood coat Hanno and I sent to Alana, Tricia's grand daughter. I hand knit the little mittens to go with it. The coat is a 0 size but Alana is so tiny it might be another year before she gets to wear it.

Life continues to bubble along here. Our days are full of interesting work and frequent breaks and we'd have it no other way. The weather is slowing getting warmer and soon I know I'll be complaining about the hot weather again. I'm enjoying a very slow and lazy August because things will be busy again for me from September onwards.  How is life treating you in your home?

There was a time when, in my dim and distant past, I would throw out clothes that had a hole, a missing button or a broken zip. I feel real shame writing those words but it's my shocking truth and made worse by the fact that I knew how to repair all those problems, but I chose not to. I thank my lucky stars that I realised how wasteful I had been and started mending my ways, as well as my clothes.


Last week, one of Hanno's jumpers developed a small hole in the side, right near the side seam. Looks like it was caught on a nail or something. It was a shop bought, pure wool jumper and apart from the hole it was in perfect condition. I got my sewing kit out and started work. The hole was small, about the size of a thumb nail, and as it was at the side seam, it was simply a matter of taking off the messy wool ends and sewing the sides together.  Had the hole been any bigger, I would have used my darning mushroom and darned the hole.

This is my darning mushroom.

Darning is a method of sewing that will repair a large hole by using running stitch in and out of the hole. You can use a darning mushroom or egg behind the hole to provide a surface on which to work. Using the remnants of the threads left in the hole, and the edges of the hole, the running stitch from top to bottom and then at right angles, leaves you with a sturdy and clean repair.  There are many darning tutorials on You Tube but I like this static tutorial by Wool and Chocolate because of the neat finish she produces.


I used a darning needle for the operation. A darning needle is a steel or plastic needle with a blunt point and an eye large enough to thread through wool or a few strands of embroidery floss.  I also needed thread or wool exactly the same colour as the garment I was repairing. I used embroidery floss because I had the exact colour match in thread, but not in wool. 


To start off on a small hole repair, turn the garment inside out and carefully cut off any ripped and untidy edges. Anchor your thread or wool by slipping the needle through the knit and tying a knot so the thread is knotted onto the wool. This will give you a firm starting point with no chance of the thread slipping or unravelling later on.


I started the repair job by checking to see if the hole would run a ladder up the side of the jumper, just like a hole in tights would. In this case, yes, if I didn't do something to anchor the ladder, it would have created more problems later on. So working from the wrong side, I stitched the edge of the ladder so it couldn't run, causing a bigger problem. Then it was just a matter of pulling the edges together neatly, with no puckering or folds, to work my way through the hole.


When the hole looked like it was closed, I turned the jumper right side out again to check the repair. This time I didn't have to go back in but sometimes you can see a place where you'll have to go back and add a few more stitches.  It's worth doing because this repair took me less than 20 minutes and to work enough hours to buy a similar jumper would take me a few hours.

Have you been repairing clothes too?


A recent poll in The Guardian gave a good indication of widespread hope, all around the world, of a simpler life. It also showed that most of us are happy but we want to slow down. But it's a bit of a Catch-22 this slowing down thing. You're on a treadmill, planning for your future, trying to do the hard yards to get debt repaid, raising children, being a good parent, building a happy and capable family, and there doesn't seem to be enough hours in the day to slow down and take stock. Although it seems counter-intuative, slowing down and living simply do require planning. Without a plan, often it doesn't happen.


Let's take slowing down first because I think most of us here have started our simple living journey but many of us don't take enough time out to sit back, take a deep breath and just relax. One of the ways to do that is to consciously take time out of your normal routine to include family activities or to spend time with friends. I think the obvious one is to start a tradition of Saturday or Sunday family lunch. It's something most people think is a good idea but it doesn't happen. Someone in the family has to be the person who instigates the lunch - someone has to think it's more important that what usually takes place. Maybe that is you. If you don't have family close by, invite your friends and start your lunch that way. The important thing is to have a regular time during the week when you spend time doing something that will relax you, something a bit different to your daily routine.


Of course, this can happen in a number of ways. When I invite family or friends over, I like to plan and supply all the food, much of it from our garden. But you should do what suits you best, remember, the point of this is to relax. So you might do all the cooking, you might ask people to bring a plate, you might take it in turns to present the lunch in different homes. Do what feels right. The only imperative is that is should be a regular gathering, something that becomes an agreeable and delightful habit for all of you. Family bonds are often strengthened with the regular sharing of food.


If you're on you own and don't have family living near by, or a group of friends you feel you want to invite to your home, make a ritual for yourself that helps you relax and slow down. It may be a daily walk, a weekly visit to a park or gallery with a cup of good coffee afterwards. It might be a visit to the library to spend a couple of hours reading with people around you. If you have a botanical garden near, a walk around there once a month to notice the change in seasons would be a wonderful way to slow down.


When you're having your lunch or walking or reading, don't allow yourself to think about anything except what you're doing and where you are. Be there in that moment to fully experience everything the time you're spending there will give you. Allow it to relax your mind and open your heart. Use it to build tradition and memories and to have a break from your normal routines, whatever they may be. When you first start doing this you may think that you'll get behind on your work but you'll probably find, like I did, that having that time out allows you to appreciate why you're working and you'll return to your work with more energy. Having no time to relax and unwind sometimes builds resentment. Planning it into your daily or weekly activities is a wise move and your work will soon adjust to accommodate it.


And to start simplifying your life?  That will be different for all of us but I think the best way to start is to think about what you're struggling with at the moment. If that is money or paying off debt, then start there and create a budget. Work out clever ways to change how you shop for groceries. These are not big savings but they are consistent and will add up. If you don't have a problem with money but want to start eating healthier food, think about how you can do that. It may mean planting a vegetable garden, finding a good fresh food market, not eating meat, learning how to cook gluten-free, building up a good repertoire of home cooked meals or making things at home that you now buy at the shops - bread, yoghurt, preserves and cleaners, to name just a few.


Yes, all these are just small steps, but that is what simple life is. It's a series of small and continuing steps towards the life you want to live. When you start with that one small step, new opportunities open up, new possibilities present themselves and if you follow your nose, you'll start building a simpler life. Remember though, you have to be flexible and change your mindset. Instead of working to gain everything you want, be thankful and satisfied with what you have. 

What are your strategies for maintaining a peaceful and slower life? How did you start living your simple life?

I've just started a thread over at the forum to continue this discussion, you can also ask questions there.

Kathleen, one of our Frizzles, displaying her magnificent hat of soft feathers.

I hope you've had a good week. Mine has been a bit hectic with a few bundles of bad news coming my way. The weekend should fix that though, for all of us. Sunny and Jamie will share Saturday lunch with us, the rest of the time I'll be working on my patchwork quilt.  Keep smiling, friends.

=== ♥︎ ===
Irish food and retro recipes
Son-in-law eggs
Aebelskiver
How to make ... comfort foods
Then and now in pictures
Australians embracing the internet
The baby boomers at 65
Sew a simple circle skirt
Make some cami tops from old T-shirts
How to save seeds - video
10 reasons to be hopeful we will overcome climate change  We bought a hybrid car (Camry) a couple of years ago and we both think it's the best car we've ever had.
How to make your own plant food
Debt-free living in your dream home
Free garden insects guide ap - America/Canada Mother Earth News
Happy birthday to our horses. When I was a little girl, my mother used to remind Tricia and me that August 1 is the birthday of all thoroughbred horses in Australia (and the Southern Hemisphere).
Carrot cake  ; - )

Last week I said I'd write about a chicken meal for the slow cooker, so here it is. I cooked mine in a cast iron pot in the oven because I left it too late for the slow cooker - it needs at least four hours and  I only had two. The recipe is the same though and I hope you enjoy it. It will serve four to six adult portions and, as usual, you can use whatever vegetables you have in the fridge. I've given the oven cooked and the slow cooker instructions, so watch out for the points of difference as you read.


Get yourself a free range or organic chicken, or better still, one of your own meat birds, and make sure there is nothing in the cavity. Wipe the skin dry and place the whole bird in a lightly oiled pot to brown. Don't skip this step, it's what gives the chicken the depth of flavour it will develop during the cooking.


While the chicken is browning, chop up one onion, one clove of garlic, two carrots, three sticks of celery and some mushrooms. When the chicken is brown on both sides, remove it from the pot and add all the vegetables.  Brown them for five minutes.

While the vegetables are browning, organise your spices.  I used cumin seeds, dried chilli and paprika as well as finely chopped flat parsley from the garden.  If you have to grind the spices, do that now. 

You can use any vegetables you have in the fridge - but do use onion as it gives the meal a good foundation. You can choose your own spices and herbs too. Use what you have on hand. If you enjoy curried chicken, this is a good way to make it when you don't have a lot of time. Add your favourite curry paste or spices, let them toast for a while, then add the water. Chicken is a very versatile meat and will team up well with many flavours.


When the vegies have developed some colour, add the spices and stir them around with the vegetables to toast. This will bring out their natural flavours. Add two dessertspoons of plain/all purpose flour and stir in. Add one litre/quart of water and stir. When that's done, add the chicken back to the pot, season with salt and pepper and mix it all together. If you're using the slow cooker, this part of the cooking is now done.

If you're going to cook this in the oven, it will need more water than the slow cooker version so pour over another litre/quart of water.  You don't need to use stock for this - the water will turn into stock while it's cooking the chicken and vegetables. Mix it all together.


You can prepare everything to this point the day before and store it in the fridge. You don't have to but if it will be easier for you to do it in two batches, this is where you end the first batch.

If you're cooking it in a slow cooker, pour the contents of the pan into the slow cooker and start it on the low setting. It should cook for at least four hours but it will bubble away nicely, developing flavour, all day.

If you're cooking it in the oven, put the lid on the pot and place it in a medium oven, around 165C/320F for about two hours. If you only have an hour, set the oven to 200C/390F to cook it faster.  Slow cooking will develop more flavour.


When it's finished, add two spoons of sour cream (optional), and serve it with potatoes, or rice if you made a curry. The meat should just fall from the bone.

Please note: if you use chicken pieces or chicken breasts for this recipe, don't cut them up. Slow cooked chicken will dry out if it's in smaller pieces. If you need to serve smaller pieces, cut them after cooking.

This is a good hearty family meal and just right for a mid-week meal when you're working throughout the day. If you can manage to do the preparations the evening before, you just pop  it into the slow cooker before you go to work. I hope you enjoy it.


Every so often Hanno and I leave our chores behind and go out for the day. We like to take the back roads, we stay away from crowds and shopping centres and we usually end up at a quiet spot where we look around, have lunch and a cuppa and then travel back home again. Yesterday we went to Tin Can Bay and we took Jamie with us. :- )


Looking after small children on an outing doesn't change much. There is generally a basket containing a water bottle, juice, sultanas, fruit, a hat, a little bag of favourite small toys and a set of spare clothes, just in case. The other things that don't change are the little songs, the questions and the tiny fragments of life that might seem so ordinary they aren't all that special. But looking at it all from a grandma's eye, it's all extraordinary, charming and the stuff that melts even the coldest heart.


I know Jamie won't remember that trip for more than a few days but I'll remember it until I take my last breath. I'll store the memory away with all the others I have of Shane and Kerry, of Alex, of Sarndra and Sunny, of Jens and Cathy, of Tricia, my nephews and their babies, and my mum and dad. All those memories are the precious articles I take out to examine in the wee small hours of the morning or when I'm sitting in the garden and it looks like I'm gazing at a kookaburra or a far off tree. Those are the times when I'll see Jamie on his bike again, and I'll hear him singing and calling me grandma, surely the sweetest sound I know, and it will remind me of how well I have lived and what I've been part of.

This is the soap made last week using calendula-infused oil.

I love making soap. It's another piece of the self-reliance puzzle and it makes sense to me to put time into this very old craft. Hanno and I both have dry, sensitive skin so we make sure we use soap that nourishes our skin. The soap I usually make has four ingredients, commercial soap contains many more than that. Shower gel is no better. The trouble with most commercial soaps is that they use man-made ingredients instead of natural ones and they remove most of the glycerin from the soap. Glycerin is the moisturising part of soap but it's removed in the commercial soap making process and then added back in much smaller amounts. Glycerin is more expensive than soap is so it's often sold as a separate product to make a greater profit. What's in your soap?  A list of soaps and their ingredients. This list is from the USA but it would be very similar in Australia and Europe.

Your skin is your body's largest organ. What you put on your skin has the potential to heal or harm. I want to use products that at the very least, don't hurt me, and at their best, provide nourishing care for my skin and make me feel clean and cared for.

I hope I can encourage you to make your first batch of soap. But I have to start off with a warning. It can be dangerous because the caustic soda/lye you use will burn if you spill it. If you make soap when you're alone, with no children or animals around, you'll be able to focus all your attention on it and if you have the capabilities and intelligence of the hundreds of thousands of people who made soap before you did, you'll be fine. The danger point is mixing water with the caustic soda - the combination of those two elements will cause the mixture to heat up, even though it's not on the stove. Fumes will come off the mix so you must carry out that stage with doors and windows open. When the caustic soda/lye is mixed with the oils, the danger period is over, although the soap mix will still be slightly caustic.  It sounds like something to be wary of but if we were together in your kitchen making soap, I'd simply say to you to be careful and I'd watch to make sure you were. Before and after that mixing of the caustic soda/lye, it's simply a matter of measuring and mixing.


Those who know me well know that once I happen upon something that works well for me, I almost never change it. Well, I'm not exactly changing my tried and tested soap recipe, but I am adding one ingredient to it. It's something I grow in my back yard - organic calendula petals. I add them in the forum of calendula infused olive oil. I am making a couple of batches of it because I like to use the fresh petals. I'll store that oil in the fridge to be used when I make soap again. I have no doubt that I'll dry some petals too, probably when it gets closer to the end of their season, so I'll have my own petals on hand and don't have to buy them.


Making calendula infused oil is quite simple. Early in the morning, after the dew has dried on the petals and after the bees have visited, but before the sun is high, pick the flower heads. This is when the oils in the flowers are at their best. Picking calendula flowers stimulates the plant to produce more so you can repeat the picking process every week until you have enough petals. Healing properties of calendula.


This is my new soap recipe:
450 mls/15.2 liquid oz of rain water, spring water or distilled water * 
172 grams/6.06 oz caustic soda/lye 
750 grams/26.5 oz olive oil
250 grams/8.8 oz calendula infused olive oil
250 grams/8.8oz copha or coconut oil

* If you don't have rain, spring or distilled water, collect enough tap water the day before you make the soap and leave it on the bench to sit. That will allow the chlorine in the water to evaporate off.

All the instructions and equipment you'll need to make soap is listed in this post. Please read the entire post before going ahead, then come back here for the new recipe. Or if you have no infused oil, use the old recipe until you have time to make infused oil.


When the soap mixture progresses from being liquid to a thicker consistency which holds a shape on the surface, the soap is ready to go into the moulds. This stage is called trace.


When the soap is made and poured into moulds, it needs to be kept warm for as long as possible. This (above) is how I do that. I place the moulds on a large board and cover the tops with plastic wrap, then cover that with a towel and wrap the entire thing in a woollen blanket. It sits on top of my freezer until the following day when I take the soap out of the moulds.

This soap can also be used for washing your hair and you don't need to use hair conditioner with it. I've used it for years and it's always made my hair shiny and healthy. Homemade soap is also a great gift. A bar of soap and two hand knitted face cloths is a beautiful gift that most people would love to receive. But I think the biggest benefits to making your own soap is knowing how few ingredients go into is and experiencing the nourishing qualities of the soap on a daily basis. And if you doubt that is a benefit, have a look at the list of ingredients on any supermarket soap.

I hope you take some time to learn the skill of soap making. Buying commercial supermarket soap will give you a lot more chemicals than it should and buying natural soap is expensive. Making your own from scratch is a natural progression in your simple life journey, so when you're ready to take that next step, I encourage you to dive right in. 
We have an abundance of wildlife here. I was working at my computer yesterday when a kookaburra swooped down to drink at the water bowl. The things I see from my window!

I hope you have a wonderful weekend.  Take some time to slow yourself and take some deep breaths. See you next week!

Reclaiming our real lives from social media  and this includes blogs :- )
I'm in love with New York but I know how lucky Australians are
Leisure time on an average day
Getting over procrastination
Giant knitting
Crocheted fruit shoes  :- )
Make a rag rug
DIY skills to pass on
How to run a craft business
Top tips for selling craft online
Building up a healthier pantry

===♥︎=♥︎=♥︎===


What's not to love about bread? Well, maybe I should clarify that statement somewhat - what's not to love about good wholesome bread. The common, plastic-wrapped, supermarket loaf does not have any part in this post. I'm talking about homemade rye bread today and the common supermarket loaf is about as far away from homemade rye as it could be. This rye loaf will give you good nutrition, complex carbohydrates, high fibre with a low glycemic index, as well as many vitamins and protein. There are a few types of rye bread. My favourites are pumpernickel, which is 100% rye, and this loaf which is 75 percent rye flour and 25 percent unbleached white flour/wholemeal wheat flour. If you're buying bread flour for the first time, buy it in small quantities until you find type of bread you like, then buy flour for that type of bread. If you're buying rye flour, look in the shop for caraway seeds too and get 15 - 30 grams if they're there. Caraway is the traditional seed used with rye and it's a marriage made in heaven.


Many people are put off making bread because they believe it is difficult and time consuming. This bread is called five minute bread because you'll only be working on the dough for five minutes. Making good bread is certainly a skill, but it's just a matter of learning how and then practising enough to perfect it. This bread is a very good loaf to start off any new baker because there is almost no kneading and there are few ingredients. Here they are:

Ingredients:
  • 2 cups rye flour
  • 1 cup white or wholemeal wheat flour
  • ¼ teaspoon dry yeast
  • 1 teaspoon salt
  • 1½ cups warm water If you have to add slightly more water to get a moist dough, do so. The amount water you use will depend on the type of flour you use, and your climate. Flour is affected by humidity so you'll use less water in humid weather. 
You can make this bread using all white bread flour or any mix of bread flours, just make sure it's three cups in total.

Equipment:
  • large mixing bowl
  • measuring cups and spoons
  • Dutch oven or covered cast iron casserole pot. This provides the ideal conditions for cooking the loaf.
Time frame:
You'll need to make the dough about 12 hours before you want to bake the loaf. I usually make my dough late in the afternoon on the day before I want to bake it.

Your time periods will be:
Making the dough - about three minutes, at least 12 hours before you intend to bake the loaf.
Shape the dough - one minute, one hour before you intend to bake.
Place the dough in the pan to bake - less than a minute.

Baking will take about 30 - 35 minutes.
  • Late in the afternoon on the day before you want the bread, take a large bowl and measure in three cups of flour, ¼ teaspoon of dry yeast and a teaspoon of salt. Mix the dry ingredients together. Add 1½ cups water and mix the ingredients together with your hands until all the flour and water have mixed together completely. This mixing (not kneading) will take less than a minute. Just continue mixing the dough with your hands until all signs of dry flour have gone.
  • Cover the top of the bowl with plastic wrap and leave the bowl on the kitchen bench overnight.
  • The next day, about an hour before you want to bake the bread, sprinkle a small amount of flour onto your clean kitchen bench. Tip the dough out onto the floured surface. At this stage it will look like a sloppy mess.
  • Take the top portion of the dough (at 12 o'clock) and fold it down onto the bottom portion (6 o'clock) and push in with the base of your hand. Turn the dough slightly and repeat the folding from top to bottom for about a minute or until the dough is smooth and you can shape the dough into a smooth round ball - see below.
  • Move the dough ball to a clean tea towel sitting inside the mixing bowl, cover the dough with the tea towel and let it sit there to rise for about an hour - see below. If you have caraway seeds, or want to add seeds, oats or polenta to the top of the loaf, wet the top of the dough and sprinkle it on.

  • Fifteen minutes before baking, place the cast iron pot and lid in the oven and turn the oven on to the top temperature - I use 230C/445F. 
  • Just before you place the dough into the baking pot, clip the top of the dough with scissors or slash the dough with a very sharp knife. 
  • When the pot is extremely hot, carefully place the dough in the pot, put the lid on and close the oven door.  Leave the temperature on high.
  • Twenty minutes later, take the lid off the pot and turn down the temperature to about 200C/395F.
  • After another 10 - 15 minutes, when the loaf is golden brown, remove the loaf from the oven onto a wire rack.
All our ovens are different, if you think the bread needs more time in the oven, leave it in. Check the loaf when you cut it and if it's slightly doughy in the centre, it will need an extra five minutes next time you bake it.

This bread is not sour dough but it's similar to sour dough. When the loaf is hot, the crust will be crusty and chewy like sour dough. The inside of the bread has a slightly chewy texture, also like sourdough. The bread can be eaten fresh or toasted.


This is one of the easiest loaves of bread you ever bake so even if you've never baked before, try this and see how you go. You never know, you may love baking and this might be the beginning of that. If you do bake the loaf, please take a photo and put it on your blog, then leave the link to the photo here so we can all visit and see your bread. If you don't have a blog, post the photo on the forum.  

Good luck, bakers!

Housework is boring!  Hmmm, yes, it might be. If I resented having to do housework, rushed through it so I could have time online or with my friends, or if I'd rather be out shopping, I'd think housework was irrelevant and holding me back. But I don't think of my home or the work I do here in that way. I see it as an opportunity. An opportunity to create the home I feel comfortable in, the home I want to raise children and grandchildren in; the home where I feel content just doing this and that and wandering around in my slippers. It's really all about the mindset. You either see your home as just a place to sleep and keep your belongings or you see it as your project - a beautiful work in progress. Taking control of a home can help you feel self-confident and strong, and if you get it right, it will give you a slow, sustainable life, full of wonderful possibilities.


All of us have to work. Not too many of us are born into wealthy families that allow us to do what we want to do every day. We learn very early to trade our life hours for money and to use that money to pay others to prepare food or us, to make our clothes, to produce the products we use in our homes. As the years roll on, many of us find a partner, have children and try to find a balance between what we have to do and what we want to do. Depending on circumstances, some leave work to raise their children and make their home the productive place they know it can be, while others continue working outside the home while treasuring those home hours and homemaking after work and on weekends.


When I left work many years ago, there was no emphasis on simple life. I didn't know what simple life was then, I just wanted to survive. My focus was in putting food on the table every day and saving money by changing the way I shopped for food. It didn't take me long to realise that the best use of the time I now had at home was to self-produce a lot of the things I used to pay for. If I could do that I'd have a very good chance of not only saving money, but supplying healthier food for my family.  So I was like a woman on a mission. I taught myself how to make bread, soap, laundry liquid, cleaners, jams, sauces, preserves, pasta and pickles. When I went shopping, I examined everything before I bought it. If there were too many chemicals and additives in it, I made it myself. Along the way I discovered there were quite a few things we didn't need at all. Doing all that saved a lot of money and I skilled myself to supply my family and home with much of what we needed. While all that was going on, I was smiling more, slowing down and learning to appreciate this calm and quiet safe haven I was living in. I had taken control of my home, turned it from a passive to an active dwelling and changed myself in the process. Doing the housework changed me and my life.


As I worked towards making my home more productive, I turned myself from a fairly sad, overworked, self-employed woman into a happy, energetic and fulfilled homemaker who brought real life back to my home. I felt powerful doing it too. I learned many basic skills, worked hard to improve every day, and every night I went to bed tired. And after a good night's sleep I jumped out of bed early the next morning, eager to do it all again. When Hanno retired and joined me we divided up the house and yard work and both settled into blissful contentment.  Mind you not everything went well.  When I made a mistake (and there were many), particularly when I was trying to learn something new, it made me stop and examine what I was doing, work out where I went wrong and then think about how to make it right. That kind of analytical thinking helped a lot and those lessons were the most valuable because I never forgot them. Mistakes might be annoying but never waste the opportunity to learn from them.


This way of life is very personal. It's all to do with family and what we eat, drink, sleep on, wear, wash, grow and love. Whatever we do here affects and benefits all of us. It's the opposite of a mainstream kind of life that is concerned with shopping and acquisition.  Mainstream life is more about being influenced by what is outside ourselves and our homes. It is rarely personal, it focuses on possessions, status, popularity and living large in a public world.


If you're at a crossroads and not sure how to change your life, start with something that you're currently concerned about. If you're worried about money, start with a budget and re-think how to do your grocery shopping. Paying off debt is key to this way of life. If you want to eat healthier food, start by learning how to cook and bake from scratch. If you want to grow food, start learning how by finding a community garden or a neighbour or friend to teach you. Doing these things for yourself will bring you back to your home and all the goodness that flows from that. I promise you that once you take that first step, life will open up and it will be quite obvious what your next step should be. Just follow that path. It will be long and windy, there will be hills and quite strolls in the park, but it will always be an interesting journey. A journey with no end.


I am a vital part of our home life, I know that. I feel valued and appreciated. I feel the same about Hanno and the work he does. We back ourselves, we're self-reliant and independent. Our work helps make the life we've both decided we want to live and as we slowly transition into older age, this kind of home is ideal for us.  Of course we'll have to modify a few of the more strenuous things when we see the need, but I can see us both living here for many years to come. And bored? Nope, I'd have to be bored with life to be bored with living as we do and I can't see that happening. 
Newer Posts Older Posts Home


My books were all published by Pengiun, and are available at Amazon US, Amazon UK and Amazon Au

Search here

Total Pageviews

Translate


I'm Rhonda Hetzel and I've been writing my Down to Earth blog since 2007. Although I write the occasional philosophical post, my main topics include home cooking, happiness and gardening as well as budgeting, baking, ageing, generosity, mending and handmade crafts. I hope you enjoy your time here.

MY FAVOURITE PLACES

  • Grandma Donna's Place
  • Grandma Donna's YouTube
  • Grandma Donna's Instagram
  • This Simple Day
  • Nicole's Instagram

Give More

Give More

Popular posts last year

Making ginger beer from scratch

We had a nice supply of ginger beer going over Christmas. It's a delicious soft drink for young and old, although there is an alcoholic version that can be made with a slight variation on the recipe. Ginger beer is a naturally fermented drink that is easy to make - with ginger beer you make a starter called a ginger beer plant and after it has fermented, you add that to sweet water and lemon juice. Like sourdough, it must ferment to give it that sharp fizz. To make a ginger beer plant you'll need ginger - either the powdered dry variety or fresh ginger, sugar, rainwater or tap water that has stood for 24 hours to allow the chlorine to evaporate off. You'll also need clean plastic bottles that have been scrubbed with soap, hot water and a bottle brush and then rinsed with hot water. I never sterilise my bottles and I haven't had any problems. If you intend to keep the ginger beer for a long time, I'd suggest you sterilise your bottles. MAKING THE STARTER In a...
Image

NOT the last post

This will be my last post here.  I've been writing my blog for 18 years and now is the time to step back. I’ve stopped writing the blog and come back a couple of times because so many people wanted it, but that won’t happen again, I won’t be back.  I’ll continue on instagram to remain connected but I don’t know how frequent that will be. I know some of you will be interested to know the blog's statistics. 
Image

How to make cold process soap

I'm sure many of you are wondering: "Why make soap when I can buy it cheaply at the supermarket?" My cold process soap is made with vegetable oils and when it is made and cured, it contains no harsh chemicals or dyes. Often commercial soap is made with tallow (animal fat) and contains synthetic fragrance and dye and retains almost no glycerin. Glycerin is a natural emollient that helps with the lather and moisturises the skin. The makers of commercial soaps extract the glycerin and sell it as a separate product as it's more valuable than the soap. Then they add chemicals to make the soap lather. Crazy. Making your own soap allows you to add whatever you want to add. If you want a plain and pure soap, as I do, you can have that, or you can start with the plain soap and add colour, herbs and fragrance. The choice is yours. I want to add a little about animal and bird fat. I know Kirsty makes her soap with duck fat and I think that's great. I think t...
Image

Preserving food in a traditional way - pickling beetroot

I've had a number of emails from readers who want to start preserving food in jars but don't know where to start or what equipment to buy.  Leading on from yesterday's post, let's just say up front - don't buy any equipment. Once you know what you're doing and that you enjoy preserving, then you can decide whether or not to buy extra equipment. Food is preserved effectively without refrigeration by a variety of different methods. A few of the traditional methods are drying, fermentation, smoking, salting or by adding vinegar and sugar to the food - pickling. This last method is what we're talking about today. Vinegar and sugar are natural preservatives and adding one or both to food sets up an environment that bacteria and yeasts can't grow in. If you make the vinegar and sugar mix palatable, you can put up jars of vegetables or fruit that enhance the flavour of the food and can be stored in a cupboard or fridge for months. Other traditional w...
Image

Cleaning mould from walls and fabrics

With all this rain around we've developed a mould problem in our home. Usually we have the front and back doors open and that good ventilation stops most moulds from establishing. However, with the house locked up for the past week, the high humidity and the rain, mould is now growing on the wooden walls near our front door and on the lower parts of cupboards in the kitchen. Most of us will find mould growing in our homes at some point. Either in the bathroom or, in humid climates, on the walls, like we have now. You'll need a safe and effective remedy at some point, so I hope one of these methods works well for you. Mould is not only ugly to look at, it can cause health problems so if you see mould growing, do something about it straight away. The longer you leave the problem, the harder it will be to get rid of it effectively. If you have asthma or any allergies, you should do this type of cleaning with a face mask on so you don't breathe in any spores. Many peopl...
Image

Five minute bread

Bread is one of those foods that, when made with your own hands, gives a great deal of satisfaction and delight. It's only flour and water but it symbolises so much. I bake bread most days and use a variety of flours that I buy in bulk. Often I make a sandwich loaf because we use most of our bread for lunchtime sandwiches and for toast. Every so often I branch out to make a different type of loaf. I have tried sour dough in the past but I've not been happy with any of them. I'll continue to experiment with sour dough because I like the idea of using wild yeasts and saving the starter over a number of years to develop the flavour and become a part of the family. However, the loaf I've been branching out to most often is just a plain old five minute bread. By five minutes I mean it takes about five minutes actual work to prepare but it's the easiest of all bread to make and to get consistently good loaves from. If you're having people around for lunch or...
Image

This is my last post.

I have known for a while that this post was coming, but I didn't know when. This is my last post. I'm closing my blog, for good, and I'm not coming back like I have in the past.  I've been writing here for 16 years and my blog has been many things to me. It helped me change my life, it introduced me to so many good people, it became a wonderful record of my family life, it helped me get a book contract with Penguin, and monthly columns with The Australian Women's Weekly and Burke's Backyard . But in the past few months, it's become a burden. In April, I'll be 75 years old and I hope I've got another ten years ahead. However, each year I'll probably get weaker and although I'm fairly healthy, I do have a benign brain tumour and that could start growing. There are so many things I want to do and with time running out, leaving the blog behind gives me time to do the things that give me pleasure. On the day the blog started I felt a wonderful, h...
Image

What is the role of the homemaker in later years?

An email came from a US reader, Abby, who asked about being a homemaker in later years. This is part of what she wrote: "I am a stay-at-home mum to 4 children, ages 9-16. I do have a variety of "odd jobs" that I enjoy - I run a small "before-school" morning drop-off daycare from my home, I am a writing tutor, and I work a few hours a week at a local children's bookstore. But mostly, I cherish my blissful days at home - cooking, cleaning (with homemade cleaners), taking care of our children and chickens and goats, baking, meal-planning, etc. This "career" at home is not at all what I imagined during my ambitious years at university, but it is far more enriching. I notice, though, that my day is often planned around the needs of my family members. Of course, with 4 active kids and a husband, this is natural. I do the shopping, plan my meals, cook dinner - generally in anticipation of my family reconnecting in the evening.  I can't h...
Image

Every morning at home

Every morning when I walk into my kitchen it looks tidy and ready for a day's work. Not so on this morning (above), I saw this when I walked in. Late the previous afternoon when I was looking for something, I came across my rolled up Zwilling vacuum bags and decided they had to be washed and dried. So I did that and although I usually put them outside on the verandah to dry it was dark by then. I turned the just-washed bags inside out and left them like this on a towel. It worked well and now the bags are ready to use when I bring home root vegetables, cabbages or whatever I buy that I want to last four or five weeks.
Image

You’ll save money by going back to basics

When I was doing the workshops and solo sessions, I had a couple of people whose main focus was on creating the fastest way to set up a simple life. You can't create a simple life fast, it's the opposite of that It's not one single thing either - it's a number of smaller, simpler activities that combine to create a life that reflects your values; and that takes a long to come together. When I first started living simply I took an entire year to work out our food - buying it, storing it, cooking it, preserving, baking, freezing, and growing it in the backyard. This is change that will transform how you live and it can't be rushed.  
Image


Trending Articles

NOT the last post

This will be my last post here.  I've been writing my blog for 18 years and now is the time to step back. I’ve stopped writing the blog and come back a couple of times because so many people wanted it, but that won’t happen again, I won’t be back.  I’ll continue on instagram to remain connected but I don’t know how frequent that will be. I know some of you will be interested to know the blog's statistics. 
Image

Every morning at home

Every morning when I walk into my kitchen it looks tidy and ready for a day's work. Not so on this morning (above), I saw this when I walked in. Late the previous afternoon when I was looking for something, I came across my rolled up Zwilling vacuum bags and decided they had to be washed and dried. So I did that and although I usually put them outside on the verandah to dry it was dark by then. I turned the just-washed bags inside out and left them like this on a towel. It worked well and now the bags are ready to use when I bring home root vegetables, cabbages or whatever I buy that I want to last four or five weeks.
Image

You’ll save money by going back to basics

When I was doing the workshops and solo sessions, I had a couple of people whose main focus was on creating the fastest way to set up a simple life. You can't create a simple life fast, it's the opposite of that It's not one single thing either - it's a number of smaller, simpler activities that combine to create a life that reflects your values; and that takes a long to come together. When I first started living simply I took an entire year to work out our food - buying it, storing it, cooking it, preserving, baking, freezing, and growing it in the backyard. This is change that will transform how you live and it can't be rushed.  
Image

Creating a home you'll love forever

Living simply is the answer to just about everything. It reduces the cost of living; it keeps you focused on being careful with resources such as water and electricity; it reminds you to not waste food; it encourages you to store food so you don't waste it and doing all those things brings routine and rhythm to your daily life. Consciously connecting every day with the activities and tasks that create simple life reminds you to look for the meaning and beauty that normal daily life holds.  It's all there in your home if you look for it. Seemingly mundane tasks like cleaning and cooking help you with that connection for without those tasks, the home you want to live in won't exist in the way you want it to.  Creating a home you love will make you happy and satisfied.
Image

Time changes everything

I've been spending time in the backyard lately creating a contained herb and vegetable garden. My aim is to develop a comfortable place to spend time, relax, increase biodiversity and encourage more animals, birds and insects to live here or visit. Of course I'd prefer my old garden which was put together by Hanno with ease and German precision. Together, we created a space bursting at the seams with herbs, vegetables and fruity goodness ready to eat and share throughout the year. But time changes everything. What I'm planning on doing now, is a brilliant opportunity for an almost 80 year old with balance issues. In my new garden I'll be able to do a wide range of challenging or easy work, depending on how I feel each day. It’s a daily opportunity to push myself or sit back, watch what's happening around me and be captivated by memories or the scope of what's yet to come.
Image

It's the old ways I love the most

I'm a practical woman who lives in a 1980’s brick slab house. There are verandahs front and back so I have places to sit outside when it's hot or cold. Those verandahs tend to make the house darker than it would be but they're been a great investment over time because they made the house more liveable. My home is not a romantic cottage, nor a minimalist modern home, it's a 1980’s brick slab house. And yet when people visit me here they tell me how warm and cosy my home is and that they feel comforted by being here. I've thought about that over the years and I'm convinced now that the style of a home isn't what appeals to people. What they love is the feeling within that home and whether it's nurturing the people who live there.
Image

Making ginger beer from scratch

We had a nice supply of ginger beer going over Christmas. It's a delicious soft drink for young and old, although there is an alcoholic version that can be made with a slight variation on the recipe. Ginger beer is a naturally fermented drink that is easy to make - with ginger beer you make a starter called a ginger beer plant and after it has fermented, you add that to sweet water and lemon juice. Like sourdough, it must ferment to give it that sharp fizz. To make a ginger beer plant you'll need ginger - either the powdered dry variety or fresh ginger, sugar, rainwater or tap water that has stood for 24 hours to allow the chlorine to evaporate off. You'll also need clean plastic bottles that have been scrubbed with soap, hot water and a bottle brush and then rinsed with hot water. I never sterilise my bottles and I haven't had any problems. If you intend to keep the ginger beer for a long time, I'd suggest you sterilise your bottles. MAKING THE STARTER In a...
Image

An authentic look at daily life here — unstaged and real

Most days Hanno was outside happily working in the fresh air. It may surprise you to know that I started reading my book,  Down to Earth , yesterday - the first time since I wrote it 13 years ago.  I had lent it to my neighbor, and when she returned it, I started reading, expecting to find surprises. Instead, I realised the words were still familiar—as if they were etched into my memory. As I flipped through the pages, I was reminded of how important it was for me to share that knowledge with others. The principles in Down to Earth changed my life, and I truly believed they could do the same for others. After just 30 minutes of reading, I put the book down, reassured that its message still holds true: we can slow down and reshape our lives, one step at a time.
Image