29 August 2014

Weekend reading

It's coming to the end of winter now. Our season changes next Monday and I'm looking forward to the warmer weather this year. I wonder if I'll still feel the same when the humidity sets in. Whatever your climate, I hope you're enjoying what it has to offer. Soon it will be part of our history. Thank you for visiting me. xx

Mimi from Manger blog making apple tart - You Tube
Matron of Husbandry is someone I admire very much. This is a classic post of hers: Too much = Enough Over the years we've known each other, she's been a unique figure, working and writing about her life, livestock and land. Not only is she a skilled and experienced farmer, she also understands the ins and outs of what she's doing and why systems work.
NSW calls for national ban on shampoo additives
Ladies, a plate - a lovely NZ baking site
Sydney's doll hospital - I remember my mum telling me about this when I was  little girl
Zero Waste Week - a challenge to send nothing to land fill
DIY 50 hour candles
And finally, just a short comment on this headline at the top of The Guardian this morning: Angelina Jolie and Brad Pitt marry in France. I won't link to it because I expect it to be as irrelevant to you as it is to me.  But I've mentioned it because it surprised me. I thought they were already married and had been for years. Who knew! This has made my morning. I love it when I find out I have no idea about pop culture.  :- )
SHARE:

28 August 2014

What am I doing? And a hamper to be won

LIBRARY TALKS
If you'd like to meet Hanno and I and listen to a talk on simple and frugal living, the details are below. The talks are free and sponsored by the Morton Bay Council. We can take a few more bookings at all the venues but Arana Hills and Redcliffe are almost fully booked.
  • Wednesday 3 Sept, 1pm at Arana Hills Library.
  • Thursday 4 Sept, 10am at Bribie Island Library.
  • Friday 5 Sept, 10am at Caboolture Library.
  • Wednesday 10 Sept, 10.30am at Redcliffe.
I'll be talking about green cleaning, dishcloths, budgeting, chooks and slowing down and much more, and you'll have plenty of time to ask questions. If you have one of my books and want it signed, bring it along. I'll have both books there on sale as well.

FORUM
The server we use at the forum crashed so no one could get onto the forum for the past two days. To make up for this, I'm offering an ecostore products hamper for one lucky winner who lives in Australia.  If the winner is overseas, I'll send an Amazon book voucher. To enter, simply go to the forum and tell me what you were doing on the two days when you couldn't get to the forum. I think we'll have some interesting, and maybe some funny, stories to read.


WHAT AM I DOING?
At the moment, we're looking after Jamie while Sunny gets a few things organised for her new sushi business. It starts on 24 September at the Caloundra Woolworths.  I've started writing again. I'm working on the final book in the series that will be published in February 2015. This book is a baking book and I'm being very careful about including a lot of hints and tips about baking consistently good bread and cakes. This isn't only a recipe book, it will help you with proving, kneading, oven rise and flours and should get you on the road to getting a healthy, delicious loaf on the table everyday for your family.

I'll be in and out of the blog when I can be so don't give up on me. This is just one of those busy seasons.

SHARE:

26 August 2014

Making kimchi with Sunny

I'm sorry the quality of this photo isn't what it should be but it's the only one I have. I only had my phone with me to take the photos and in this one I pointed it toward the overhead light. The rest of them are much better.

Our much loved daughter-in-law, Sunny, invited us over for lunch on Saturday. Outside it wasn't so good, the rain was pelting down, but inside Sunny had prepared a tray of perfectly cut fresh vegetables, prawns and chicken, as well as a few sauces. We were having rice paper rolls. It's a great way to prepare a fresh and healthy lunch for a group because everyone makes their own rolls. It was absolutely delicious. Afterwards I helped Sunny peel garlic for kimchi which she'd already started. Sunny is Korean and she's a chef so I thought you might like to know how to make authentic Korean kimchi. I didn't do anything except test taste the batch I was to take home and peel some garlic. :- )


It's important to get the cabbage right. Kimchi is made using wombok - Chinese cabbage, and this was a one-wombok kimchi. Earlier in the morning, Sunny had cut up one whole wombok and salted it using ½ cup rock salt diluted in 1½ cups cold water. Pour that over the cabbage and using your clean hands, move the cabbage around, making sure the salted water makes contact with all the cabbage. This process is used to draw water out of the cabbage. If you don't do it, the water will come out anyway, but it will come out when the kimchi is made and it will result in a watery mix and a watered down flavour. Sunny said it's best to do this on the morning when you want to make kimchi, not overnight, because you can keep an eye on it so it doesn't go too soft.  You don't want crisp cabbage but it should still have some crunch.  The salting process will take about five or six hours, when the cabbage has shrunk in the bowl quite a bit and is soft but still has a crunch, that is when you can wash the salt off the cabbage and thoroughly drain it.  It should look like the bowl of cabbage above.

While she worked, Sunny told me about how Koreans have kimchi days similar to the tomato sauce making days Italian families have. The grandmas organise the families and will make a 100-wombok kimchi, mainly with the help of the daughters-in-law. Sometimes they will make a 500-wombok kimchi and those larger quantities are stored in huge stoneware pots, which are buried until another pot is needed.


About an hour before you need it, mix one cup of plain (all purpose) flour in two cups of water, in a saucepan. Bring the mix to the boil, stirring as it heats, and when it's thick, take it off the heat and allow it to cool completely.  When the cabbage is ready, place three medium onions and about 20 cloves of skinned garlic in a blender (or whatever amount of garlic you want to use). Add a small amount of water and blend until everything is broken up but not quite smooth. Add that to the cooled flour mix. Above you can see Sunny mixing her onions and spices into the flour mix.

The little bowl on the right is the flour and spice mix for the kimchi I took home. It had much less chilli than Sunny's kimchi. She likes hers very hot.

You can also add one tablespoon of sugar, a teaspoon of ginger powder or fresh ginger if you have it, as much gochugaru (Korean pepper flakes), fresh chilli or chilli powder as you like, Daikon cut into fine strips and green onions. It really depends on the season - here we have no daikon at the moment so Sunny used the green ends of green onions instead. Use your common sense by adjusting the amounts of spice and garlic according to your taste. Sunny also used fish sauce, about a tablespoon full, and mixed it in with the flour mix.  When you have your flour and spice mix ready, pour it over the cabbage and, using your hands again, rub it into the cabbage and make sure it covers the entire cabbage. You can see Sunny doing that below, with a gloved hand.


Sunny gave me a one litre plastic bucket of the fresh kimchi to take home and this is it below. When she filled it, it came up to the lid but over the following hours, water continued to drain from the cabbage and it sunk down in the bucket.  Kimchi is a fermented dish, similar to German sauerkraut, and at this stage it must sit, covered, on the kitchen bench for the fermentation to start. I left mine out for about 30 hours but it will depend on how strong you want the flavour of the kimchi to be. The longer you leave it, the more the probiotics will build up. It can stay on the bench for up to three days. Like all fermented foods, it contains the beneficial bacteria your body craves.


When the bucket of kimchi had reduced in size a bit, after about 30 hours, I put it in the fridge. It was covered with a lid and Sunny wrapped the entire bucket in plastic wrap as well, to make sure the smell didn't seep out into the fridge.

You can see from the photo above that the juices are red from the chilli and sauces. I tipped the bucket upside down a few times to marinate all the cabbage.

And now it's sitting happily in my fridge alongside my Maleny Dairies yoghurt, a half jar of home preserved pickled beetroot, a jar of golden calendula petals macerating in olive oil and the other strange goodies that identify the fridge of a home producer. I'm pretty sure yours looks similar. And that reminds me, this recipe is okay to use if you're lacto-fermenting too. Sunny said her friend makes her kimchi using Yakault - the little probiotic drink. If you have whey add some to this if you want to add Lactobacilli. 

You eat kimchi on its own as a snack or as a side dish for BBQ or fish. I want to use it to make these kimchi devilled eggs. I think they look delicious. I just have to wait for a while for the brew to mature.  Here are a few more ideas: 10 things to do with kimchi. I hope you can make some up to try it.

SHARE:

22 August 2014

Weekend reading


I hope you have time to relax on the weekend and read this week's selection. I'll see you again next week.

The push to ditch renewables could hand coal and gas industries billions.  If you're as angry as I am about this move to dilute what all Australians should be doing - moving to more sustainable energy options, I encourage you to email your local federal member. I am. You can find their contact information here.
SHARE:

21 August 2014

Wabi-sabi - a reminder

I've been thinking a lot about wabi-sabi this year. If you've never heard of the term, it's a Japanese concept about being comfortable with imperfection. I'm very close friends with imperfection and have been all my life but as I grow older, I see it in almost everything I do and in all the beauty that surrounds me - including my family and grand sons. Nothing is perfect and it seems to me that if you strive for perfection, you'll be disappointed more often than not. I don't want to spend time being disappointed when I can just as easily be accepting and even look for wabi-sabi and celebrate it, just like the Japanese do.

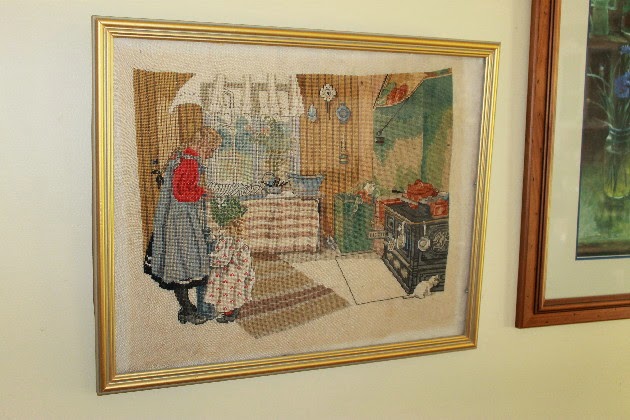
The kitchen on my wall.
The kitchen - a print of the original.

A friend of mine, Gerri, who lives in France and who I met through this blog, sent me a petit point tapestry of Carl Larsson's The Kitchen. Carl Larsson was a Swedish painter (1853 - 1919) and is a favourite of mine, has been since I discovered him when I lived in Germany many years ago. The Kitchen is the depiction of a young girl with a toddler, possibly her sister, in their Swedish kitchen. The older girl is churning butter and the little one is watching her, possibly knowing that one day it will be her job to do that for the family. On the sideline a wood stove holds simmering soup pots, a tiny white cat is almost out of sight, the washing up sits beside a wash bowl and the curtain blows softly in the breeze. And it is that curtain that gets me every time. Little things.

When Gerri sent it to me she said it had been sitting on the wall in her kitchen for many years and now she wanted me to have it. She explained she'd never finished it and if I wanted to, to go ahead. Well, I didn't want to finish it off because to me, it held the history of Gerri and her kitchen just the way it was. I wanted the tapestry to be what it was, not what it was supposed to be. It was more interesting to me as an artefact the way it was. It now hangs on my kitchen wall. Authenticity framed, captured under glass, a wabi-sabi masterpiece. A reminder.

Also in that frame I placed a letter from Gerri, in an envelop with French stamps, and a tiny note on the back of the frame asking: "do you know what this is? Blog 21 August 2014" I suspect that when I die, my family will go through all these things and I hope they'll discover what it is and keep it as their own reminder.  

In her wonderfully descriptive explanation of Wabi-sabi - the art of imperfectionRobyn Griggs Lawrence,  says: 

Broadly, wabi-sabi is everything that today’s sleek, mass-produced, technology-saturated culture isn’t. It’s flea markets, not shopping malls; aged wood, not swank floor coverings; one single morning glory, not a dozen red roses. Wabi-sabi understands the tender, raw beauty of a gray December landscape and the aching elegance of an abandoned building or shed. It celebrates cracks and crevices and rot and all the other marks that time and weather and use leave behind. To discover wabi-sabi is to see the singular beauty in something that may first look decrepit and ugly.

Wabi-sabi reminds us that we are all transient beings on this planet—that our bodies, as well as the material world around us, are in the process of returning to dust. Nature’s cycles of growth, decay, and erosion are embodied in frayed edges, rust, liver spots. Through wabi-sabi, we learn to embrace both the glory and the melancholy found in these marks of passing time.

I guess that says it all and also reminds me why I've been thinking about it more as I age. I think that when I die I'll be a case study in wabi-sabi. And I have to tell you I'd rather go out as a frayed edged, grey haired, spectacled, wabi-sabi grandma than anything else. It comforts me knowing that the history of things, and of people,  plays an significant part in what we are and who we become.


SHARE:

20 August 2014

Spreads, dips and sandwich fillings

This may not be the most exciting of posts but it's sometimes a struggle to find good wholesome crackers, dips and spreads for snacks, lunches and to accompany drinks when friends drop around. Add to that the ongoing need of parents to send children to school with a good lunch, and you'll know that having a few recipes for these things up your sleeve is a real plus.

If you do have children going off to school, any of the crackers and dip or spreads, along with a container of salad or chopped crisp vegetables, such as carrot and celery sticks, would make a nice change in the lunch box. Add a banana and apple and you'd have the perfect lunch for an older child.

School lunches and snacks


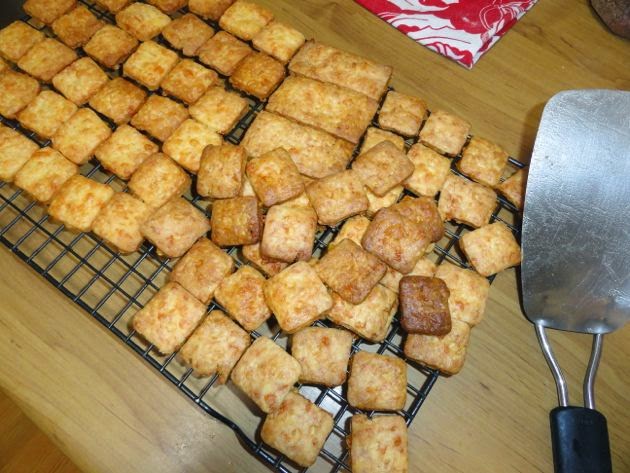
I try to home produce as much as I can and biscuits, crackers, breads, dips, spreads and fillings are high on my list because so many of the commercial products contain preservatives and artificial additives. I prefer not eating anything like that, and want to serve wholesome food to my family and friends. Many of my recipes are based on my farmers cheese and cheese crackers. The recipes for both are here, they contain only natural ingredients and they're very easy to make. I hope they provide a good basis for some of the goodies you'll make up. And here are some other cracker recipes:


Food additives to avoid

Last year, my sister Tricia gave me a lovely book called Vintage Tea Party. It holds many old favourite recipes for high tea, morning tea and light meals that are more a snack than a meal. One recipe caught my eye a while ago and I've made it a couple of times since.  It's potted salmon and you can make up a jar of it and keep it in the fridge for serving on toast triangles or crackers.


 Potted Salmon 
  • Tin of salmon (skin removed), or if you're lucky enough to have fresh, cooked or smoked salmon, use that.
  • 40 grams/3 oz melted butter, hold some back for sealing the top of the salmon
  • Pepper
Place the ingredients in a food processor and process until a smooth paste forms.  Add the salmon to a sterilised jar and pour over the remaining melted butter. This is how the salmon was traditionally stored in the fridge, with a butter seal. Serve with crackers or as a spread for sandwiches. It is delicious served with pickled cucumbers - homemade, of course.

  Potted tuna 

This is a similar recipe from Not Quite Nigella but it can't be stored as long in the fridge. It makes a great cracker or bread spread and is excellent with drinks when friends come over.

 Triple layer dip  - another great dip for a party.


 Chicken spread  
For this spread you'll need to get into the habit of saving a cup of cooked chicken when you've made a roast chicken.  Or you can cook a chicken specially for lunches, finely dice the chicken and store it in one cup portions in the freezer.
  • 1 cup farmers cheese (see my recipe above)
  • 1 cup diced cooked chicken
  • Small red onion or one green onion, finely chopped
  • Salt and pepper
  • As much chilli as you like - either fresh or powdered
Combine all the above, mix well and serve on bread or crackers.

 Beetroot dip 
  • 4 beetroot, cooked, skinned and cooled
  • One clove garlic, crushed or finely grated
  • 1 cup farmers cheese (see my recipe above)
  • 2 tablespoons mayonnaise
  • Salt and pepper
Place all the above in a food processor and blitz until the cheese and beetroot is just combined. You don't want a smooth paste for this, it needs some texture. Serve as a dip with crackers.


  Yoghurt cheese - labneh/quark  
When you finish making your yoghurt, or using good commercial plain yoghurt, pour about two cups of yoghurt into a strainer lined with cheesecloth. You need to drain the whey off and as this will take a while, place the strainer in a large jug and store it in the fridge overnight. The following day you'll have a ball of fresh cheese and a jug of whey. Use the whey in your baking or fermenting. If you store it in a sealed jar, whey will keep for about six weeks in the fridge.

To make your cheese, finely chop some chilli and herbs of your choice and add it to the cheese. Add salt and pepper to taste and mix well. Store in a sealed container in the fridge. This is delicious on bread, particularly rye bread, crackers or toast.

These are all good recipes so you can steer clear of those additive-packed dips, spreads, biscuits and chips you buy at the supermarket. All these recipes are delicious and easy to make.  Do you have any recipes like this to share? Please only add those with no additives or artificial flavourings, and no soup mixes or MSG. We all need to have a good selection of these kinds of foods. I'm looking forward to seeing what you can share with us.

SHARE:

18 August 2014

Bathroom renovation DIY

I am often praised for just living the way I want to live: I want to sew, bake, mend, tend the garden and spend time with my family. And that gives me a lot of pleasure as well as structure and purpose to my days. When the praise comes, I appreciate it but I never receive a compliment without knowing that this is a team effort - Hanno is here too, working away and helping both of us live our simple lives. 

Before.

As some of your know, we're slowly preparing ourselves and our home for a time when we can't do as much as we can now. Hanno has good days and bad days with his health and occasionally he can't walk due to the pain of crystal arthritis/gout in his ankles and feet. He has a good GP whom he trusts and between them they work out what is best for his health. What is obvious though is that prolonged heavy work is no longer possible and whatever work he does, is done as it can be done and not to a timetable.  Part of Hanno's treatment is an emergency supply of cortisone tablets prescribed by his specialist. He is to take it only when the other medications don't work. About a month ago, we had one such time and he started taking the cortisone for the first time. Within the first couple of days the pain and swelling went but he had to continue taking the pills according the instructions, and that would take him through the following month. During that month he renovated the bathroom.

After.

Some of the tiles on the bathroom floor had been stained for some time. The original tiler had left traces of glue and who knows what else on the tiles and although it was invisible, over the years it stained and continued getting worse. We also had an old vanity unit in that bathroom that needed replacing. Neither of us want to live in a home that is falling to pieces and if we can repair and replace while we still have the strength and will to do it, that is what we'll do.  We decided to buy a new vanity and taps and when Hanno removed the old unit, we discovered it had already been moved three times - we'd moved it once.  He started off by removing the old vanity, lights and plumbing, then he painted the walls and ceiling and retiled the toilet floor.


Each day Hanno did the work he felt he could do, he took frequent rests and slowly it all started coming together. We realised that to replace the bathroom tiles would cost us about two thousand dollars and we didn't want to spend that much. We got a quote for a few hundred dollars from a local floor tile cleaner, and when they cleaned the tiles we were both amazed at the change. The tiles look new again. We bought the new vanity, taps and mirror and just had the plumber come in to connect it all up again. Kerry helped with some of the heavy lifting and with putting the new mirror up, Hanno did the rest of the work. And now it looks amazing. Sadly, the effects of the cortisone have worn off now so he's got some pain back but he's really happy he did the work and I'm happy and proud of him for doing such a fine job. I cooked him a favourite meal to say thanks.

If you can do your own house maintenance and renovations, it will always be much cheaper. I think we would have spent about four thousand dollars if we'd had someone do all that work for us. In the end it cost us about one thousand; one quarter. It makes sense to keep on top of all these jobs so they don't get too damaged or expensive to fix, and certainly to change what you need to change as you get older so you can live in your own home as you transition from young old to old old.

We're changing our vegetable garden later in the year, and I'll write more about that when it happens. Small slow steps are not always easy or fast, but they get us to where we want to be.

SHARE:

17 August 2014

Brisbane talks


SHARE:

13 August 2014

Menu planning

Menu planning can help reduce the cost of living for most of us. It encourages you to think about your food choices, it helps create a healthy balance of meals throughout the week, it gives the potential for less food waste and, for most of us, it reduces the amount of money spent on food.  I think there are two main ways to plan your menus:
  1. you plan before you shop
  2. you plan after you shop
Everything else is dependent on how your household runs. Variations that will impact on what you have to buy include growing food at home, bartering, the amount of time you are able to spend in the kitchen, the number of people in the household, the distance away from the shops, how food is stored in your home, and possibly many other things. So for those reasons, I won't be giving you a list of menus, it is up to you to start working on your menus and shopping lists, dependent on your own circumstances. Basically, you use a calendar-type form containing all the meal times you need meals for. When you decide on a meal you write in down in place then work out if you have everything to make that meal. If you don't, the ingredients you don't have are added to your shopping list. Put aside a couple of hours to set up and prepare your first menus but it won't take that long every week. Keep all your weekly menus because they can be reused when you have enough of them to provide a good rotation.

How to use a menu plan
Menu plan templates


I encourage you to use what you have on hand and what you grow yourself before you think about what to buy. If you shop weekly, the produce you already have in the house shouldn't be too old to consistently do this.  When you start writing up your menus, this produce should be used on those first couple of days.  If you have the time, make as many things at home as you can and if you do that, it will mean you buy more ingredients and less ready-made meals or jars of sauce etc.

 If you menu plan before you shop,  read through the flyers, know by experience where the best value for money is found and shop in those supermarkets. Make up your menu plan and your shopping list at the same time and try to make a regular time to do that every week. Go through your fridge and pantry and note what you have on hand and what needs to be used first and plan you menus accordingly. If you have food  left over from the previous week that should be the first item on your menu, that makes way for the rest of the week which will be based on what you buy that week, what you're growing or bartering, the season and your food preferences.  Try to plan double batch cooking into your plan so you cut down on cooking time, and make sure you plan for breakfast, lunch, dinner and snacks. Make up your menus and your shopping list at the same time.

  If you menu plan after you shop,   some of the above will apply but your main focus will be on shopping for fresh seasonal food, what you can find that you want to cook with, and the rest of your week's groceries, and all for a good price. A problem you might find with this method is that you overbuy and then waste food, so keep that in mind and have a general idea of your week's menu in mind when you buy. Before you shop, check your pantry and stockpile and make sure you stock up ingredients that you're running short of. When you come home with your bounty, sort out what you have, then plan your menus around it. Again, double batch cooking is a time and money saver and make sure you have a plan for every meal and snacks.


Just a quick note on loss leaders: a loss leader is a popular product advertised at a much reduced price. It's a real temptation to go to the store to buy that product. The people who place the advertisement hope you'll buy the loss leader then stay and do all your shopping in their store. Don't be tricked into moving away from your preferred supermarket. If you want to buy the loss leader, make it worth your while and buy as many as you can afford, then leave the store and continue shopping back at your local best supermarket.
Don't forget to mark your special family days, such as birthdays, on your calendar because these will have to be planned for in your menu plan. And if you're cutting down on the amount of meat you eat, maybe you can consider buying organic/free range meat. You might spend the same amount but you'll be eating healthier meat from animals that have lead a decent life.


If you're a new cook, make sure you start building up your recipes to include favourite meals as well as new meals you think the family will enjoy. Always think of the nutritional value of new meals as well as the time they take to prepare and the cost per meal.

I know quite a few ladies from the US and Canada use coupons to cut down on what they spend but here in Australia coupons are generally only for takeaway food or processed food that's not worth buying. I'd be interested in knowing if you've found coupons for healthy food and groceries.

But this post is about menu plans and I'm mainly interested in reading how you do that. Tell us your meal plan secrets.

= = = ♥︎ = = =

If you want to be more prepared this Christmas, Judy has started a Christmas gift, decoration and card list over at the forum. There are lots of good ideas there and plenty of motivation to get started so you can avoid rushing later in the year.
SHARE:

12 August 2014

Food and grocery budgeting - it's more than money


Although I don't write about it nearly as much as I think about it, food budgeting is one of my favourite topics. It's the first area I concentrated on when I started living a more simple life, it's what convinced me that we could indeed live this way and I believe it's the one area where almost everyone can save money. If you can provide good food for the table while saving money doing it, that spare money can go towards debt reduction or something you love. And the good thing is, the money you save on food can be continued savings every week, if you put your mind to it. I have to say too that although spending an extra twenty dollars a week on food won't break the bank here, I think a prudent and thrifty approach to the amount we spend on food, or anything, is a significant and meaningful way of living our simple life. The trick is finding the balance - good food for a good price or value for money, always.


However, food budgeting isn't just about saving money on food, it's more about the wise management of food spending, storage, planning, as well as developing and maintaining a good set of skills.


Of course, it all starts before we ever get to the shops with menu planning, growing food at home, and making many of the things we used to buy. If you plan your menu you'll waste less food and probably spend less money.  Don't feel guilty or inadequate if you don't have the time right now to do all this. There are times in your life when you will be more involved in home production rather than in buying what you need. When you can do it, take the opportunity to get involved in providing for yourself and your family. If you're not there yet, just accept it for what it is and do what you can do. I'll write about menu planning tomorrow.

While I like to think the way I budget here is more about the right food choice for us rather than the cheapest food I can find, there are some little things that make a difference to how much I spend, while still getting the food I want. For instance, I use the delicious milk from my local Maleny Dairies for drinking, cooking, cheese and yoghurt. On the odd occasion I don't have their milk, I use powdered milk for yoghurt and cooking. If you can, work out your own substitutes for those times when you can't get what you'd prefer. Being prepared and organised will help you in those times and you'll be able to avoid buying the most expensive replacement.


One way to reduce the cost of the food budget is to cut cut down on meat consumption. We aim at the three/four rule: three days with meat, four without. Sometimes it's the other way around but I never worry if it is, it generally works it's own way out. If you are going to do this you should find a good vegetarian cook book or web site. At the very least you should understand a bit about "complete protein" - meat and fish are complete proteins, lentils, legumes and nuts aren't, but by combining proteins, you can make complete proteins. For instance, baked beans aren't a complete protein but baked beans on wholemeal toast is. The bottom line many of us eat too much protein. We all need protein but it doesn't have to be animal protein. Learn more about complete protein here.


I guess my top tip would be to start with what you have. So if you're about to shop or menu plan, check to see what you have in your fridge and freezer and if you're growing food or keeping livestock, work out what is available for the kitchen in the next week. Another wise strategy is to barter your excess food for food you need. This requires contact with a lively community or at the very least, a vibrant street of like-minded folk. It's amazing what you can do with bartering once you get into it.


Once you have the food in the kitchen you have to know how to store it correctly so you can cut down on food waste. Stockpiling, preserving, baking your own bread, biscuits and cakes, making your own sauces, jams, relishes and dressings, as well as cleaners and laundry products, will cut your spending at the supermarket. All these skills can be learnt and built upon. Every thing you make yourself will be cheaper and probably tastier and healthier than the commercial version. If you can, build up your home production skills and you'll reap the rewards. One of the reasons I love making my own is that I don't have to ingest all those preservatives and artificial additives that are usually in commercial food. Making my own cleaners and laundry products helps me live with far less chemicals than I would if I had to rely on commercial cleaners. I still get the job done but with less money spent and less risk.


I want you to remember that we're all bound by the time we have available to do all the things I mentioned above.  You may not have time to bake bread or make soap or cheese but I'm sure you could work some of it into your days. For instance, making a batch of washing liquid will take about 15 minutes, organising the slow cooker with your evening meal will take a few minutes but will save on the time you spend preparing a meal when you return from work. Think about how you can change things around to do a few of these things.  Be satisfied with what you can do now and when you have more time you can do more. Don't feel guilty about what you can't do just do what you can and be pleased with that.

I'll carry on with a post about menu plans tomorrow. It's an important topic and it's one of the ways to really cut down on what you spend on groceries.  In the meantime I'm interested in reading about your ideas on food budgeting. What do you have success with? If you've reduced your food expenses and buy healthy food, tell us how you did it.

SHARE:

11 August 2014

Baps or morning rolls in the breadmaker

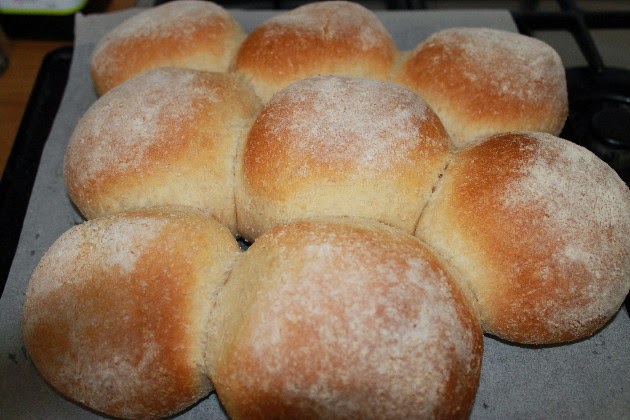
Most of us home bakers have a gaggle of well used recipes to bake a variety of bread for our families. I am no different. These are soft white bread rolls that the English call Baps and the Scots call morning rolls. I often use wholemeal flour instead of white and these photographed are wholemeal. They're nothing fancy, just an all purpose roll that are easier for children to eat than a crusty roll. The rolls are perfect for lunch boxes, for a hearty bacon and egg roll or sausage on a roll for a Saturday family lunch in winter, or for salad rolls all around in summer. These rolls are a great accompaniment for soup and that is why I made these on the weekend. We had them with our sweet potato and pumpkin soup.


The other thing to point out is that there is another common recipe for Baps using vegetable oil or butter but no milk. I prefer the recipe using milk. To make these rolls soft and light you need a small amount of fat; it also makes the dough easy to handle and shape.  Using milk instead of butter or oil gives you enough fat from the milk for the lightness and flavour, but without the two tablespoons of fat the other recipe advises. 

The recipe will make up 12 small or 8 large rolls.
  • 2 level teaspoons dry yeast 
  • 2/3 cup lukewarm full cream milk
  • 2/3 cup lukewarm water
  • 1 teaspoon salt
  • 3 cups unbleached white (or wholemeal) flour, plus a little extra for shaping and finishing
Activate the yeast in the warm water for ten minutes before starting. This not only ensures you're using active yeast, it also helps the ingredients combine.

Add the flour and salt to the bread machine bucket, then the liquid ingredients, including the activated yeast in the warm water. Turn the machine on to the dough setting. When the ingredients are mixed together, check to make sure the dough is neither too dry nor too wet.  Adjust if necessary with more flour or a small dash of water.


When the cycle finishes, it will already have done the first proofing and the dough will have been punched down in the machine. Now you can take it out, cut and shape it then put it on the baking sheet to rise. When you remove the dough from the bucket, it should be light, springy and smooth. On a lightly floured board or bench, roll the dough into a large sausage shape and cut it in two. Take one piece and roll it until it's a long sausage shape. Cut it in half, half again and half again. If you want large rolls, cut it into fewer portions. When you have each piece of dough, fold the sides into the bottom so you have a well rounded top. Place all the firmly formed rolls on the baking sheet. If you want to brush with egg wash, do that now, but traditionally these rolls have a lightly floured top.  Bake in a pre-heated hot oven at about 220C/430F until they're brown on the top and smell ready.

 TIP:  Always handle the finished dough gently. It's fine to be a bit rough when you're kneading but when the dough is ready to bake, it's very delicate. Dropping it or bashing the tray against anything might cause the dough to deflate. When you've got the dough ready to go in the oven, treat it like a new born baby.


This recipe will also make up very nice fruit buns. To make them use the recipe above with the addition of a tablespoon of soft butter, two tablespoons of sugar and a cup full of dried fruit.

Thanks for your visit today. I hope you had a good weekend and, like me, are looking forward to a productive week. :- )


SHARE:

8 August 2014

Weekend reading


The weekend is almost here and I hope that means you have more time to relax and enjoy yourself.  Winter is slowly coming to and end here with our daytime temperatures now in the low to mid-20s. It's a lovely time of year.

Thank you for your comments during the week. I'll see you again next week. :- )

National Geographic photograph winners 2014
Generosity Farm
Australians anxious about the cost of living
Where to buy better meat UK
Easy homemade dairy products
Summer herb rolls
Simplifying simplicity
Painting old furniture - a good example of what you can do for a fraction of the new price
Coffee pods. Another form of tea bag, but worse
Five things you don't need
Home habits that save money
Tumble dryers and washing lines
SHARE:

6 August 2014

Busy producing this and that


It was one of those special days yesterday - one when the hours dissolved into each other, I had no real work to do and I sat knitting sample dishcloths using leftover yarn from recent projects. I'll be showcasing the dishcloths at the talks I'll be giving in Brisbane in September. I'll have details about them for you soon. Slow and steady was the order of the day. Hanno was working in one of our bathrooms that we're renovating at the moment. Meals were a breeze - homemade sausage rolls and celeriac soup, so apart from the knitting, there wasn't much to do. The sun shone outside, it was neither warm nor cold, and everything went according to plan.


I've been harvesting beetroot, tomatoes and eggs from the backyard and by far, the most abundant of those are the eggs. Our hens are producing between nine and ten eggs every day and have been all through winter. We have been giving away eggs left, right and centre, and using as many as we can in our kitchen.  The other day I made some delicious Portuguese custard tarts, they used up four eggs. It's a very easy recipe and the tarts are moist and luscious; they'd be perfect lunch box or picnic food. I used the recipe from Not Quite Nigella, it was so easy and quick and it made up 12 delicious tarts. There is an excellent tutorial with photos on her site. BTW, I added an extra egg to my custard and it worked well.


I pickled the beetroot and I've shared that recipe before so won't repeat it again, but I did use a different vinegar and it made a remarkable difference. I bought some organic apple cider vinegar and used 125 mls of it along with 125 mls of my regular Cornwells apple cider vinegar. It was so good. I actually drank some of the pickling liquid on its own after we had a small bowl of the beets for lunch on the weekend. The liquid was dark blood red and, simultaneously, it made me feel like a vampire and healthier as soon as I drank it. :- ) My grandmother drank the vinegar dressing after we finished the salads she used to make. We never used oil in those days - olive oil could only be bought in chemist shops/pharmacies then. Most people just used vinegar, salt, pepper and sometimes a little sugar to dress their salads. I still have a preference for non-oily dressings and am quite satisfied with plain vinegar, as long as it's a good one.


The tomatoes will be used fresh and in various meals, I don't have enough to preserve them. But the other preserving I did do last weekend was a grapefruit cordial. The lovely Sandi who lives on a small farm in the next town brought over a large bucket of pink grapefruit recently. I was going to make marmalade but then didn't have the time nor the inclination to cut the peel, and decided to make cordial instead. I made up light sugar syrup and added enough grapefruit juice to make a slightly sweet-sour cordial. We enjoyed it with our lunch when Sunny and Jamie visited on the weekend. Made up with cold, sparkling mineral water, it made a refreshing drink. It is a wonderful thing to be able to make many of these drinks and preserves but I'm truly thankful I have the fresh produce to use.

This is the cute red riding hood coat Hanno and I sent to Alana, Tricia's grand daughter. I hand knit the little mittens to go with it. The coat is a 0 size but Alana is so tiny it might be another year before she gets to wear it.

Life continues to bubble along here. Our days are full of interesting work and frequent breaks and we'd have it no other way. The weather is slowing getting warmer and soon I know I'll be complaining about the hot weather again. I'm enjoying a very slow and lazy August because things will be busy again for me from September onwards.  How is life treating you in your home?

SHARE:

5 August 2014

Mending a woollen jumper

There was a time when, in my dim and distant past, I would throw out clothes that had a hole, a missing button or a broken zip. I feel real shame writing those words but it's my shocking truth and made worse by the fact that I knew how to repair all those problems, but I chose not to. I thank my lucky stars that I realised how wasteful I had been and started mending my ways, as well as my clothes.


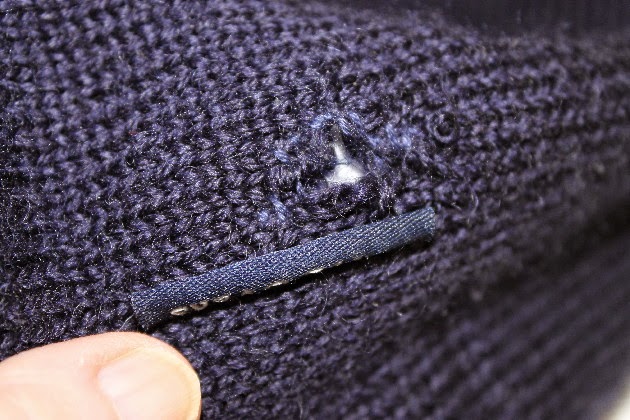
Last week, one of Hanno's jumpers developed a small hole in the side, right near the side seam. Looks like it was caught on a nail or something. It was a shop bought, pure wool jumper and apart from the hole it was in perfect condition. I got my sewing kit out and started work. The hole was small, about the size of a thumb nail, and as it was at the side seam, it was simply a matter of taking off the messy wool ends and sewing the sides together.  Had the hole been any bigger, I would have used my darning mushroom and darned the hole.

This is my darning mushroom.

Darning is a method of sewing that will repair a large hole by using running stitch in and out of the hole. You can use a darning mushroom or egg behind the hole to provide a surface on which to work. Using the remnants of the threads left in the hole, and the edges of the hole, the running stitch from top to bottom and then at right angles, leaves you with a sturdy and clean repair.  There are many darning tutorials on You Tube but I like this static tutorial by Wool and Chocolate because of the neat finish she produces.


I used a darning needle for the operation. A darning needle is a steel or plastic needle with a blunt point and an eye large enough to thread through wool or a few strands of embroidery floss.  I also needed thread or wool exactly the same colour as the garment I was repairing. I used embroidery floss because I had the exact colour match in thread, but not in wool. 


To start off on a small hole repair, turn the garment inside out and carefully cut off any ripped and untidy edges. Anchor your thread or wool by slipping the needle through the knit and tying a knot so the thread is knotted onto the wool. This will give you a firm starting point with no chance of the thread slipping or unravelling later on.


I started the repair job by checking to see if the hole would run a ladder up the side of the jumper, just like a hole in tights would. In this case, yes, if I didn't do something to anchor the ladder, it would have created more problems later on. So working from the wrong side, I stitched the edge of the ladder so it couldn't run, causing a bigger problem. Then it was just a matter of pulling the edges together neatly, with no puckering or folds, to work my way through the hole.


When the hole looked like it was closed, I turned the jumper right side out again to check the repair. This time I didn't have to go back in but sometimes you can see a place where you'll have to go back and add a few more stitches.  It's worth doing because this repair took me less than 20 minutes and to work enough hours to buy a similar jumper would take me a few hours.

Have you been repairing clothes too?


SHARE:
Blogger Template by pipdig