30 September 2011

On my mind ...

This is a Friday photo feature that anyone with a blog can join. To take part, post a photo on your own blog, write a short caption explaining it, and link it back to here from your blog by saying you're part of "On my mind". Please write a new post, don't link to an older one. When you've done that, come back here and add a comment below, with a link to your blog.


Today I'm thinking about this little fellow. He's a sacred kingfisher and this little one lives here, darting in and out and making the mad screech they have. I've seen him catch lizards and lots of insects as he usually sits on our front fence to eat them. I took the photo above a few weeks ago as he sat on the fronds of our tree fern. Yesterday, as I was talking to Sarndra on the phone, he flew into the glass window I was sitting behind. He fell and looked to be unconscious but when I went outside to find him, he was gone. I'll look around the garden this morning to see if he's injured and hiding.
~*~*~

Thank you all for your wonderful comments and good wishes this week. I've been overwhelmed by the number of you who have sent encouragement and support via email too, there must be over a hundred there. I have no hope of answering all of them, so please accept this as my thanks. I really do appreciate your kindness.

ADDITION: I went to look in the garden at first light and didn't find him. Hanno has been working in the front yard this morning and he hasn't mentioned him so I'm guessing he was well enough to fly back to his nest. If he can do that, he might be okay.

SHARE:

29 September 2011

Writing for the Weekly

About a month ago I wrote about a photographer coming to our home to take photos for the Women's Weekly. Well yesterday, the edition I am featured in, went on sale. I have to tell you I am very happy with the article and photos, and to all those Women's Weekly readers who come here this week for the first time, welcome!


I made my entrance into the Weekly in their budget edition, and have been dubbed "the queen of thrift". That's fine by me, we do focus on thriftiness here, as well as many other life enriching activities. I think that managing money wisely and paying off debt is the key that unlocks the door to independence. Once that door is open you realise that life is not about working to pay off debt. Sure, you need to work hard to set yourself up and build a home that you feel comfortable in, but mindless spending delays you reaching the point when your debts are paid back and you can concentrate on the things you love doing.

For those of you living in other countries, the Women's Weekly is the magazine that most Australians know about and almost all of us have read. So you can imagine how pleased I was to be featured in it. Well, that was not the only excitement. A phone call came through a couple of weeks ago from the managing editor, Michelle Endacott, asking if I'd be interested in writing a monthly column for them.

Is the Pope Catholic?

I sent that first column in yesterday, it will be in the next edition, in November. I was asked not to tell you about the column because the announcement was at the end of the article; I was happy to oblige. No public announcement, but I did tell my family and some close friends. Everyone was so happy for me. My sons Shane and Kerry were surprised and delighted, my daughters-in-law were as excited as I was, my friends were really pleased. Ali, at the Centre, said she went "all tingly" when I told her. Hanno was very proud.

So now I hope to live up to expectations and do my best. I will be striving to do that and to help show how wonderful life can be when you slow down, adopt a frugal mindset, pay off debt and make your home the one place you know you can relax, let go of stresses and be your true self. Living more simply has the potential to give you a life like no other and the rewards are not far off in the distant future. As soon as you commit to this and start taking your own small steps, the payoffs are dotted frequently along the way. There is no destination in a simple life, the journey itself is the reward.
SHARE:

28 September 2011

Green cleaning recipes - version 2

I did a post on green cleaning recipes in 2007 and over the years since then I've changed some of the things I do with my cleaning and altered some of the recipes. I give out those recipe in several of my workshops and every time I cut and paste them I tell myself to do a new post. It's time to review, edit and add a new green cleaning post.


You should be able to buy the ingredients for all these cleaners at your local supermarket. Please note that washing soda is different to baking soda. Sometimes there are two types of washing soda on sale - washing soda crystals and washing soda powder, buy the powder, it's easier to dissolve.


When you add your cleaner to a bottle, make sure you mark all the bottle with the name of the cleaner. If you reuse a bottle that previously contained other cleansers, make sure the bottle is completely clean and marked before you fill it with your homemade cleanser.

HOMEMAKER’S JOURNAL
It’s a great organisational tool and safety measure to keep a record of all the cleaners you use. If you ever have an accident with the cleaners, or one of the kids swallows some, you’ll need to tell the doctor what the ingredients are so I recommend you keep these cleaning recipes together in a Homemaker’s Journal. You can also keep food recipes in it as well seed catalogues, garden plans, patterns and other bits and pieces that are helpful in your home. I have made a Homemaker's Journal using an old a three-ringed binder. That way I can add and remove pages when necessary. There is a  post here about making a journal.

HOMEMADE CLEANING RECIPES

LAUNDRY LIQUID
Makes 10 litres
You may add any essential oil of your choice to these homemade cleaners. Oils like tea tree, eucalyptus, lavender or rose are ideal but are not an essential ingredient. They are not necessary to the recipe but do not detract from the effectiveness by adding them.

Ingredients
  • 1½ litres water
  • 1 bar Sunlight or generic laundry soap or any similar pure laundry soap, grated on a cheese grater OR 1 cup of Lux flakes
  • ½ cup washing soda – NOT baking or bicarb soda
  • ½ cup borax
Tools
  • Saucepan
  • 10 litre bucket
  • Slotted spoon or wooden spoon for mixing

Above you can see the process. The ingredients are measured into a saucepan containing one litre/quart of water. Add one cup of soap flakes, half a cup of borax and half a cup of washing soda. Turn on the heat and stir. Bring the mix to the boil, stirring as it heats, and by the time the mixture is boiling, ALL the ingredients should be dissolved.

So, you've nearly finished and it's only taken less than ten minutes so far. When you're sure the ingredients are completely dissolved, pour the mixture into your bucket then fill to the top with water from the hot tap and stir it together thoroughly. You've made laundry liquid. And it's cost you about $2 Australian. Ten litres of laundry liquid at an Australian supermarket costs about $80! When you take into account the making, pouring and storing, it's taken you about 30 minutes. I make this about once every four months. If you have a large family, you might make it every two months. And it will save you about $80 every time you make it. How long would you have to work to make $80? Saving it is much easier.

Once you have the laundry liquid in your bucket, stir it around again, then start filling your containers. It's important to leave enough room in the containers to shake the liquid before you use it because it will separate. As you can see, I store my laundry liquid in a five litre blue container, a three litre glass jar, a one litre glass jar and a 750 ml bottle. I use the bottled laundry liquid for cleaning. It's great as a stain remover, for cleaning up spills, for cleaning around light switches, door handles, walls and floors. I use that little blue scoop to put the liquid into my front loader washing machine and I always use the one litre jar as my working jar. When it's empty, I refill it from the larger containers.


Above is the laundry liquid after it's been sitting for 24 hours. It's clearly separated into layers - the top layer is gel-like, the bottom layer is watery. You need that space in your container to shake and mix before you use it.


And here is my cleaning liquid that I shook just to show you what it looks like. So don't think you've done anything wrong if your mixture separates, it's fine, it just needs a good shake. This is safe in septic tanks but not for grey water. The borax in the mix builds up as boron in the garden and that is harmful to plants. If you want to use your grey water, don't add the borax.

Sometimes you don't have time to make up the liquid, so here is the powder version:
LAUNDRY POWDER 
  • 4 cups grated laundry or homemade soap or soap flakes (Lux)
  • 2 cups borax
  • 2 cups washing soda
Mix all the ingredients thoroughly and store in a plastic container with a lid. Use 2 tablespoons per wash. Again, this powder will not make suds and again, it's perfectly okay.

HEAVY DUTY WASHING POWDER
For use on worker’s greasy or dirty overalls, football and sports uniforms or fabric that has food spills.
  • 2 cups grated Napisan or Sard soap or 2 cups of oxybleach powder (Napisan or the generic equivilent)
  • 2 cups grated laundry or homemade soap
  • 2 cups borax
  • 2 cups washing soda
Mix all the ingredients thoroughly and store in a plastic container with a lid. Use two tablespoons per wash. The powder will not make suds. For a very heavily stained load of washing or tradesperson’s clothes, if you have a top loader let it fill with water and start working, then turn the machine off when the powder is dissolved. In a front loader, operate the machine to dissolve the powder and then stop the machine for an hour to soak the clothes. Leave to soak for an hour, or overnight, and then turn the machine on and continue washing as normal.

STAIN REMOVER 
½ cup laundry liquid, rubbed into the stain, will remove many stains. Rub the liquid in with your finger tips, let it sit for 30 minutes, then wash as normal.

FABRIC SOFTENER
½ cup white vinegar in final rinse

SOAKER and WHITENER FOR STAINED NAPPIES/DIAPERS
Bicarb soda (baking soda) is a good for soiled nappies. Dissolve ¼ cup of bicarb soda in a bucket of warm water, soak for at least an hour or overnight, then wash the nappies in hot water with homemade laundry liquid. Add ½ cup of vinegar to the final rinse and let them dry in the sun.

ALL-PURPOSE CLEANER #1 - spray
Nellymary has a post on making citrus vinegar which is a good old fashioned general cleaner. Her post is here. You can make a similar cleaner using lavender leaves and flowers or, for the Australians, lemon myrtle leaves.

ALL-PURPOSE CLEANER #2
½ cup washing soda
2 litres warm water
Mix together and store in a sealed container that is marked with the name. Can be used as a floor cleaner – tiles, laminate or vinyl or for general cleaning of walls, counter tops or sinks.

CLEANING SILVER
This method works by a chemical reaction between aluminium, salt and bicarb soda. Put the plug in the kitchen sink. Lay a piece of aluminium foil on the base of the sink and add your silverware. Pour in enough boiling water to cover the silver.
Add one teaspoon of bicarb soda and one teaspoon of salt to the water. Let it sit for about ten minutes. The tarnish will disappear without you touching it. Rinse and dry.

CREAMY SOFT SCRUBBER - a good bath cleaner
Simply pour about ½ cup of bicarb into a bowl, and add enough laundry liquid to make a texture like thick custard. Scoop the mixture onto a sponge, and start scrubbing. This is the perfect recipe for cleaning the bath and shower because it rinses easily and doesn’t leave grit.
Note: Add 1 teaspoon of vegetable glycerin to the mixture and store in a sealed glass jar, to keep the product moist. Otherwise just make as much as you need at a time.

WINDOW CLEANER # 1
¼ - ½ teaspoon liquid or grated soap
3 tablespoons vinegar
2 cups water
spray bottle
Put all the ingredients into a spray bottle, shake it up a bit, and use as you would a commercial brand. The soap in this recipe is important. It cuts the wax residue from the commercial brands you might have used in the past.

WINDOW CLEANER # 2
Vinegar and newspapers
Pour a little vinegar onto a sheet of newspaper and wipe windows. Remove all the grime and polish the window with a clean sheet of newspaper.

FURNITURE (WOOD) POLISH
½ teaspoon olive oil
¼ cup vinegar or fresh lemon juice
Mix the ingredients in a glass jar. Dab a soft rag into the solution and wipe onto wooden surfaces. Seal in the glass jar and store indefinitely.

FLOOR CLEANER – tiles, vinyl or laminate
½ cup white vinegar plus 2 litres hot water in a bucket and a clean mop will clean up all but the worst floor. If you have a really dirty floor to deal with, add a squirt of homemade laundry liquid to this mix.

WOODEN FLOOR CLEANER - Ammonia will strip floor wax (one cup to a bucket of hot water)
2 tablespoons homemade vegetable soap - grated
½ cup vinegar
500 mls strong black tea
bucket warm water
Combine all the ingredients in the bucket and wash with a mop.

MOP CLEANING
A clean mop is a necessity when cleaning floors. If you start with a dirty mop you’ll just loosen the dirt on the mop by making it wet again and then spread that on the floor. When you finished your cleaning jobs, rinse the mop out to get rid of the loose dirt, rinse the squeeze as much water out as you can, then dry the mop in the sun.

CLEANING RAGS
Instead of buying cleaning rags or Chux, recycle your old towels and flannelette sheets. If you've kept your towels going for as long as you can, or you find a rip in a sheet that's already been mended a few times, cut them up and use them as cleaning rags. After all that wear, they'll be soft and absorbent, and just the thing to help you clean your home. If you're cutting up a fitted sheet, use the old elastic in the garden to tie up your tomatoes.


REMOVING CRAYONS FROM A PAINTED WALL
Add a few drops of water to some bicarb and make a thick paste. Wipe over the crayon marks and scrub off with a terry cloth.

HOMEMADE TOOTHPASTE
¼ cup cooking salt or any natural salt.
¼ cup bicarb soda
Make up ½ cup at a time and store it in a sealed jar. Just sprinkle some of the powder onto your toothbrush and clean your teeth in the normal way. This powder is bitter and takes a little while to get used to but it works well. You could add a few drops of peppermint essential oil to mask the taste.

HOMEMADE SHAMPOO
This works very well. Say goodbye to all those expense hairdresser shampoos. 
Dissolve a tablespoon of bicarb soda in a cup of water. If you’ve got children, it might be better doing this in a squirt bottle.
Wet hair thoroughly and apply the mixture to the hair, massaging it in well.
To rinse, just run water through your hair, or you could use a splash of vinegar. The vinegar smell will go when your hair is dry.
You’ll be amazed at how good your hair feels. It will be clean and healthy.
This is an excellent shampoo for long and frizzy hair or short hair.

HOMEMADE DEODORANT
Add some bicarb to a shaker and use that. Dabbing a bit of bicarb under your arms is very effective as long as you wash every day.

Please add your favourite homemade cleaner in your comment. I'm always happy to try new cleaners and ways of cleaning.


SHARE:

27 September 2011

20 ways to cut back on spending


With world finances getting jittery again, maybe it's time to highlight a few measures to help us all spend as little as possible while remaining comfortable in our homes.
  1. Spend less than you earn. Not just today and this week, but all the time.
  2. Spend only on needs, not wants.
  3. Make up a workable and realistic budget and stick to it.
  4. Stockpile food and groceries - this is your insurance policy that even if the worst happens, you'll still be able to feed the family.
  5. If you have to find some money you don't have to pay bills cut out unnecessary expenses like internet, mobile phone, cable TV, magazines, coffee at the cafe etc.
  6. Cook from scratch.
  7. Never waste food, eat your leftovers and have a couple of meatless meals every week.
  8. Take lunch and a drink to work and school.
  9. Monitor your electricity, water and gas use. Learn how to read your meters.
  10. When you're cooking on the stove top, bring the food to the boil with the lid on, then turn the power down to a simmer. Leaving the gas or electricity on full will waste it.
  11. Turn off lights and TV when you leave the room. 
  12. Turn off stand by appliances when you're not using them and when you go to bed.
  13. Stop buying cleaning products and make your own using bicarb and vinegar.
  14. Make your own laundry liquid. There is a recipe for it here.
  15. If you haven't already done it, think about putting in a vegetable garden. If you've already got one, think about adding fruit and herbs.
  16. If you have no space to grow vegetables, buy your fruit, vegetables, eggs and honey at a local market. The prices will probably be cheaper than the supermarket.
  17. Check out your local butcher shop. The prices will probably be lower than the supermarkets and the quality of meat better. (We bought lamb on special at one of the big supermarkets last week and the quality of it was vastly inferior to what we usually get from our local butcher. Lesson learned.)
  18. Teach yourself to knit and sew. There are many sites on the internet with very good instructions, tutorials and sometimes, videos. Try MADE, Instructables, Knitting Help.
  19. Make your home the kind of place you want to spend time in. Invite friends around instead of going out for coffee or drinks.
  20. Self reliance and a thrifty mindset will help you get through most things. Start with one thing, then move on to the others when you're ready.

It doesn't take much to go out and spend, all you need is money or a credit card and some time. Not spending takes thought, planning, work and determination. But being prudent with your resources, especially when the economy is shaky, will give you peace of mind and the feeling that you're doing as much as you can to look after yourself and your family. 


I believe that we should all live our lives in a way that makes us happy and fulfilled. Enrichment doesn't come from acquisition, it's more complex than that. In my experience, enrichment and fulfilment come when I know I'm doing my best and living each day according to my values. It's not tied up with products, keeping up with the Joneses and following fashion. So if you're just starting out on a more simple life and you're a bit apprehensive about trying some, or all, of the list above, I encourage you to dive right in. I expect you'll get more out of it than you ever imagined.

If you have some more tips to share and add to the list, please do so. I'm looking forward to seeing what you come up with.


SHARE:

26 September 2011

Elder flower cordial

We have not bought soft drink/soda or many years but during summer I like having a cold soft drink on hand to serve the family and for anyone who drops buy. We've had many glasses of lemon, orange and passionfruit cordial here, as well as homemade ginger beer, now I've added elder cordial to the list of cool drinks I can serve. We planted our elder bush last year and although it was in flower almost all year, it produced only a few heads of berries. I didn't make anything with them, there were too few, but I hope that as the bush grows, so will our chances of harvesting a bucket of dark elderberries.


We've just had the first full flush of elder flowers since we cut the bush back a few months ago. In a couple of his books, John Seymour recommends picking the flowers early in the day and choosing those on top of the bush that have had the full benefit of the sun. So armed with my trusty Fiskars clippers, I removed about three quarters of the flowers and set to work. The elder flowers must be used straight away.  The cordial recipe is simple, and similar to the one I use for lemon cordial, with the exception of added citric acid and the flowers have to be covered with boiling syrup and then steeped for 24 hours. I used Sophie Grigson's recipe here but added a cup of lemon juice as I had some in the fridge I wanted to use. There is a very small amount of cyanide-like compound in the stems of elders, so make sure you pick the flowers off the stems. You don't have to be obsessed with removing every stem, and don't be scared of it, just make sure you leave most of them out of your cordial.


The cordial is cloudy here but it clears after it settles.

The cordial is delicious served with iced water, ice and a mint leaf or with cold sparkling mineral water. I will also use it  to make ice cream and sorbet over summer, and to give as Christmas gifts. This made about about 3.5 litres/quarts of cordial. I also half filled a plastic bottle to freeze. This is the first time I've made elder flower cordial and I want to make sure it's as freezable as my other cordials. Overall, this is a simple recipe and a welcomed addition to my summer drinks repertoire. It's a keeper.

SHARE:

24 September 2011

Weekend reading

I've been meaning to share some blogs with you and here is my chance. I hope you take the time to slow down and read while you take a breather.

First there is the Lund kids blog The Lund family is a family of 11, living on a homestead in rural USA. I think it might have been Andrew who came up with the ingenious idea of using a washing machine to press apples for juice but you can read all about it yourself, and much more, on the blog.


Want some new recipes with mouth watering photos? Go no further than Cityhippyfarmgirl.  An Australian writer, a great cook and an interesting blog.

Trying to save and pay off debt? Read Frugal and Thriving - a great Australian blog with many ideas for all of us frugalistas.

I only came across Small Things last week but I've been won over by the charm of it. And those brown and green baby pants! I'll have to make some for my babies.

I'm not sure how I found MADE, but I'm glad I did. There are some excellent sewing tutorials here, and the blog itself is interesting and exciting.

My Zero Waste is a UK blog about reducing waste. Definitely worth a read.

Anther great UK blog - My Tiny Plot has a wealth of information about growing goodies in the backyard.

See you all again on Monday!

LATE ADDITION: I just read Amanda's gift for a boy post - it's wonderful, so add this to your list.
SHARE:

23 September 2011

On my mind ...

This is a Friday photo feature that anyone with a blog can join. To take part, post a photo on your own blog, write a short caption explaining it, and link it back to here from your blog by saying you're part of "On my mind". Please write a new post, don't link to an older one. When you've done that, come back here and add a comment below, with a link to your blog.


I'll be organising seeds today. Simple. Quiet. Fun.
SHARE:

22 September 2011

Rest and recover

This is our local Sunday market.

We had a very busy week here. Sunday we drove to the Gold Coast to visit our family, stopping in at our local market on the way to buy fresh fruit and seedlings. Monday was Hanno's birthday, it was a quiet celebration this year, he had a doctor's appointment and we spent some time in the garden. On Tuesday, I went to the Centre for my craft group - Crafternoon. That is developing into a wonderful group of women who meet to talk and work on whatever craft project they have going at the time. One of the ladies, Bev, brought along some books with ideas for school fetes and suggested we do up some small projects like little dolls and mice, dishcloths and odds and ends to sell at our local kiosk to raise funds for the Centre. This is a great idea and something we'll start doing next week. Any chance of extra money coming in helps us keep going. We get no government funding and rely on donations and grants to continue opening the doors every day. I love meeting people, and there are some in every group, who are generous and supportive. Our Centre gives a lot to our community but without some form of local financial support, we can't pay the bills.

I was at the Centre again yesterday, this time for a work shop on green cleaning and making laundry liquid. I call these workshops "Kitchen Table Talks" because women used to sit together at kitchen tables and drink tea while they shared their recipes and talked about how they work. There were six of us there yesterday, sitting around a table covered with a table cloth, sharing tea and chocolate biscuits, and discussing various ways of cleaning without using harsh chemicals. It is always very reaffirming to connect with women who "get it", who understand that change will only happen if we change ourselves first. One of those ladies, Moira (affussa), came because she's been reading this blog for a long time, so it was good to meet her face to face.

When I came home, baby Jamie was just going back to sleep while Opa gave him a bottle of breast milk. Sunny and Kerry had arrived earlier in the afternoon and took the chance to have some time together while Opa took charge of the baby. Hanno is so good with him. Apparently Jamie had been asleep but the phone rang and he woke, Hanno had settled him down again, but then I came home and he woke up again and screamed. Nothing settled him until Hanno took him outside and walked around the garden with him, talking quietly in his ear about the chooks. After about 30 minutes he was tired again, so Opa fed him again, he went back to sleep and had just woken up when Sunny and Kerry came home. Then he was a very happy boy.

On the way home from the Centre, I picked up a parcel at the post office, which had come all the way from New Mexico. It was from Sharon who has sent some beautiful gifts for Jamie and Alexander. I gave it all to Sunny and she dressed Jamie in a few of the little jackets.  Here is a photo. Thank you Sharon and Claude!


I have a few things to do today, but I'm looking forward to breakfast with the family before they head back to the Gold Coast again. Hanno has another doctor's appointment, so late in the morning, when everyone's gone, I'll get through my work and hopefully I can relax and recover from this busy week. I used to be full of energy and could work long hours, now I  am worn out after a few hectic days. It's one of the very few drawbacks of ageing. So I'm looking forward to some slow days ahead when I'll do my housework and take a lot of time with knitting, gardening and relaxing. I hope you have a chance to rest and recharge too. What are you doing today?


SHARE:

21 September 2011

Gardening is more than the vegetables


When Hanno removed the fence from the front of our kitchen garden it created space for a seat looking into the garden. Yesterday I showed you the seat we placed there, a recreated wonder of wood and steel, now sitting under the elder tree, overlooking the greenery and the chicken coop beyond. What a grand spot to sit and think about the harvests to come and future gardens, or to just rest awhile. Every garden needs such a place, every one of us deserve one.

 The latest crop of potatoes is breaking through the soil.

Corn at both ends. Some almost ready to harvest, some just planted. There are also Daikon radish, heirloom tomatoes and lettuce - again, some ready, some just planted.

Gardening is not only about the work involved, it's about reconnecting with the earth and touching things that are natural and honest. It's about renewal and recovery.  Ask any gardener how they feel after they spend time in their garden and although many will tell you they're tired, many more will say they feel relaxed and energised.  You can discover your creative self in a garden, and given half a chance, gardens have the power to heal jagged nerves and soothe troubled minds. What better place to breathe deeply and let go of your stresses - it's all fresh air, sunshine, seasonal smells, migrating birds or visiting local ones, bees buzzing, the sounds of your neighbourhood, and you.

 Portuguese cabbage is flowering. Soon we'll harvest the seeds for next year.


Here we have Daikon that is flowering much too early, before the radishes are long enough. We won't collect this seed.

Never go into a garden and expect perfection. It's probably there at various times but you'll more likely encounter spent leaves, weeds, empty spaces and overgrowth. But keep looking because you'll also find seeds germinating, flowers half open, bees collecting pollen, wasps looking for water, vegetables growing to plump maturity and vines twirling and snaking along a fence. Take some time to sit and look around. In our garden there is a distinct feeling of abundance and growth, and when you stop and take time to really look, even when nothing is happening, everything is.

This corn will probably be ready to pick next week.

When something is harvested, we used that space again, straight away, with followup seedings.

Our garden is a productive kitchen patch, not a show garden. There are plants ready for harvest and those just planted, follow up seedings go in whenever plants are past their prime, it changes constantly, it keeps delivering its promise over and over again. There are weeds - chickweed grows wild here, and will do until we mulch properly. That's fine with us. We don't mind the weeds. They'll be removed when we have the time, now there is other work to do - work that will help boost production and keep the vegetables growing. The weeds will wait till we have time for them.


I have been a vegetable gardener for more than 30 years and I am thankful that my life has moved in ways that allowed me to spend time in many productive vegetable gardens. Sometimes I wish I was a novice again - taking those first steps towards organic gardening, remembering plant names and the conditions they need. They were exciting days, when I realised that the work carried out each day sowing, planting, clipping, mulching and watering would result in harvests fit for a king's table. But there were also days when just being in the garden was enough. Gardening never gets old and boring, it gets better the more you know. If you're at that first step stage, I envy you. The wonderful world of microbes, insects, flowers, plants, seeds and the freshest of vegetables is at your finger tips.


When you look around a garden, even the most humble like ours here, you see the birds flying through, bees dipping into flower heads, clothes drying on the line, a cat asleep on the straw mulch and vegetables waiting to be picked, you feel that anything is possible. And maybe, here in the garden, it is.


SHARE:

20 September 2011

Reusing and recycling - a trail of great ideas

Few of us have reached the point of buying nothing at all - complete self sufficiency. We will never be self-sufficient here and I'm not aiming for that, but I am very serious about self-reliance, reducing what we buy and reusing and recycling what we own. I have written about this subject many times but the message needs to be constantly reinforced - to myself as much as anyone else. This is where we can make a big contribution towards waste reduction, and therefore the flow-on affects of less air, water and land pollution and fewer rubbish dumps emitting invisible gasses in our own local communities. Some of us here believe global warming is a real concern, some don't, but most people would agree that sensible and correct waste disposal is everyone's responsibility.

Before we go anywhere near the subject of reusing and recycling, our first aim should be to reduce the number of products we buy and bring home, and the amount of packaging on those products. Almost all packaging goes straight to the rubbish bin. Reducing what we buy makes sense on so many levels - we save money, we have less to care for, we don't get caught up in fashion and fads and simply by not bringing more into our homes, we reduce pollution that will result from it. I know that I am responsible for everything I buy, but I always try to remember that I'm also responsible for the packaging that comes with it. It's easy enough to think that paper, plastic, cardboard and polystyrene - all common packaging materials - can be compressed and sent to the dump with our rubbish. However, just sending it there doesn't mean the materials magically disappear. They will go there and depending on what it is, if it is a natural material or a synthetic one, it will increase the size of your local landfill and add more gasses to your local area. Just sending it to the dump doesn't get rid of the problem, it just moves it from one location to another.

Don't start me off on jar recycling. I think it's the ultimate madness to package so many products in one-use glass jars. I recycle glass jam jars and use them for homemade jams, and Cornwell's vinegar bottles for my cordials and vinegars.

This is an old meat safe - made originally to store meat in, before the days of refrigeration. I found this one at a second hand shop and after a good scrubbing now use it to store my bread and scones. Here is a step-by-step guide to making a meat safe from wood and wire. Recycled wood, of course.

A reused old spice and herb rack serves us well now to store Hanno's pills, vitamins, emu oil and tea tree oil.
I wonder if you recognise this.  It's our old satellite dish, drilled to create drainage holes and planted with succulents. It's now sitting on top of that tree stump we created when the old camphor laurel was cut down.

In the backyard, we're using an old stone bird bath top as a water container for the chooks. It's on the ground, just near their favourite summer resting place, so they can stand in it if they get too hot in summer.

This is our chook house. Apart from the concrete floor and the roosts, the entire structure and nesting boxes were made with recycled materials. That includes the guttering on the roof and down-pipe that allows us to collect rainwater from the roof.

This plastic container was recycled from being a one-use strawberry punnet to being a seed box for some of my heirloom tomato seedlings. It already contained ample drainage holes and when I first planted the seeds, I used the top of the box to create a propagation-greenhouse box. Now the seedlings are up and growing, the top remains open.

Hanno made this garden seat, and it's brother which sits on the front verandah, after finding them in a decayed state sitting on the footpath, waiting to be picked up by the council dump truck. He stripped off the old timbers, sanded back the metal, primed and painted them, put on recycled boards and sealed the entire bench. Now it's sitting in front of the elder tree looking into the vegetable garden. It's the perfect place to sit in the early morning or late afternoon.

The garden is the place to find recycled steel reinforcement grids now used for climbing frames.

These steel star pickets have been reused for hundreds of tasks over the years. Now they're rammed into the earth at the corners of each garden bed to prevent the hose being dragged over the beds.

And here we have the ultimate in food recycling - the worm farm.

We're always working on reducing our waste, sometimes we're more successful at it than at other times but recycling and reusing are built into our lives now and are a part of what we do. Before anything is "thrown away" in the rubbish bin, we think if it can be reused for another purpose. Often the answer is yes.

I like seeing photos of the ways other people deal with their "rubbish" and seeing a photo often makes me remember it better than just reading about it. I particularly love seeing photos of ingenious ideas that make me think: "I wish I'd thought of that!" or "What a great idea!".  So I decided to start the ball rolling on this and show a few of the things we're doing here to reuse and recycle rather than send our rubbish to land fill. I hope you will add your own photos on your blog and link to here. If you add your link in your comment, I'm am absolutely sure that we can build a very useful and motivational trail of reusing and recycling ideas that have the power to change how people deal with their rubbish.

I hope you involve yourself with this. I know when I see great ideas being implemented in everyday homes, it makes me believe I can do it too. By sharing our photos and the idea of recycling and reusing, we recognise it as being important  enough to think about, talk about and do, not just today and tomorrow, but as a permanent part of our simple lives. These small steps are what make a difference.

SHARE:

19 September 2011

Yoghurt - make it yourself

Thank you all for your kind thoughts for us as we grieve for Alice. Last week was a very sad one for us and it helped  knowing  that Alice touched the hearts of so many. We spent a couple of quiet days here together, then drove down to the Gold Coast yesterday and had Sunday with our family. Seeing them all with the babies did us a lot of good and now we're ready to move forward and settle into life again, without a dog.

~*~*~

I've been asked to do another post on making yoghurt and last week, when I was working at the Neighbourhood Centre, I was talking it about with our student Julie. Hi Julie! She has never made yoghurt so I told her this would be here and to try it. It's so easy.

There are many ways to make yoghurt, this is how I do it. I don't buy appliances and equipment that I don't need so for this method you will probably already have everything you need in your kitchen. If you make it in the afternoon, it will be ready the next morning. Yoghurt is milk that is fermented with beneficial bacteria. Other fermented products include cheese, wine, beer, kimchee, sauerkraut and kefir. 

You should make your yoghurt in sterile conditions and store it in a sterile container. The aim is to eliminate all the pathogens by pasteurising the milk. Even it is already pasteurised, the milk might have bacteria in it and you want to make sure that only the bacteria you want in there are present. When the harmful bacteria are gone, you introduce the probiotic bacteria in the form of yoghurt or yoghurt starter. The beneficial bacteria produce lactic acid during the process of fermenation. The acid conditions in the milk help preserve it because harmful bacteria find it difficult to colonise in acidic conditions.

EQUIPMENT 
  • A preserving/canning jar big enough to contain the amount you want to make - I used a 1.5 litre/quart jar
  • Whisk or fork to mix in the yoghurt
  • Spoon to scoop out the yoghurt
  • Large saucepan to sterilise the jar, or an oven
  • Small saucepan with a thick bottom to pasteurise the milk
  • Two towels
INGREDIENTS
  • 1.4 litres/quarts milk - this can be full cream, skim, UHT, powdered - any milk you have on hand will do
  • 2 tablespoons good quality natural yoghurt with live cultures and no added gelatine
  • 2 tablespoons powdered milk

METHOD
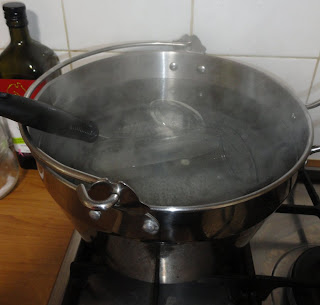
  1. Fill the large saucepan, place the jar, lid, whisk and spoon in the pan and bring to the boil then keep it boiling for ten minutes. Turn off the heat and leave everything in the saucepan until you're ready for it.
  2. Pour the milk into the smaller saucepan.
  3. Add two tablespoons of milk powder and whisk it in making sure the milk powder is completely dissolved in the milk.
  4. If you have a thermometer, clip it to the side of the saucepan and turn on the heat.
  5. Heat to 90C/195F - if you don't have a thermometer, it will be at the right temperature when small bubbles start forming around the outside of the milk.
  6. Take the milk off the heat and let the saucepan sit in a sink, half filled with cold water. This will help cool down the milk quickly.
  7. When the milk reaches about 45C/113F - but no higher than 50C/122F  - add two tablespoons of yoghurt and whisk in thoroughly. Adding the yoghurt to the milk when it's too hot will kill the beneficial bacteria but you need the milk to be warm enough to activate the bacteria, so make sure it's within that temperature range.
  8. Taking your time to whisk the ingredients thoroughly will give you a smooth yoghurt.

Buy a good quality yoghurt to be your starter. It needs to contain live bacteria and no gelatine.
Make sure you whisk in the powered milk and the yoghurt properly.
Pour the warm milk into a warm jar - do this step quickly so you don't lose too much heat.

FILLING THE JAR
  1. When the yoghurt is made, take the sterilised jar out of the water and place it on the bench to cool down slightly. While the yoghurt is still hottish and the jar is still warm, add the yoghurt to the jar and seal the lid. 
  2. Wrap it immediately in one towel, then the second towel so you have a nice parcel.
  3. Let this sit on the kitchen bench away from the drafts. You want this to retain the heat for as long as possible. Don't open the jar, don't stir it, don't shake it. Just leave it to sit in a warm location, that, and time, is all it needs.
  4. Late in the afternoon, heat the oven up for about 5 minutes, then turn off the heat.
  5. Place the parcel in the oven and leave it there, untouched, till the next morning.
  6. When you take it out, the milk will be yoghurt.
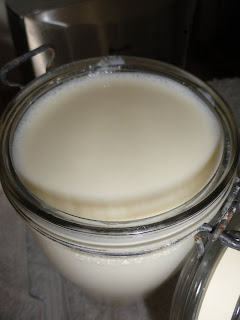
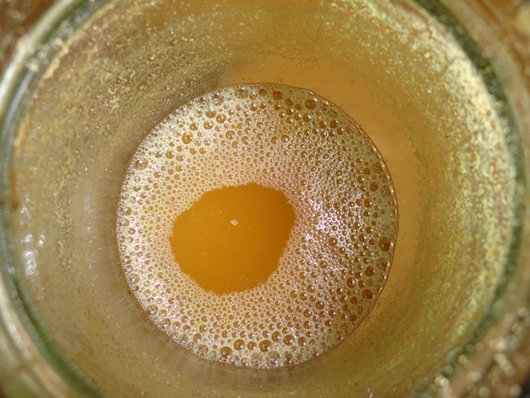
This is my jar the next morning. It has been lying on its side and you can see in the photo above that the whey has started to separate from the yoghurt. The whey is that yellow fluid.

With the lid off, you can see the indentation of the writing on the jar lid has transferred to the yoghurt.
Nice, thick yoghurt.
I keep a few tablespoons of the yoghurt that I made in a container in the freezer to be used for the next batch. 

And that's it!  Less than 30 minutes to make this delicious and nutritious yoghurt. Store it in the fridge. I believe the yoghurt I make is the equal of the good quality I buy to use as a starter, but it's cheaper. You can enjoy it straight from the jar but if you want a sweet yoghurt, add some jam or honey to it. I use our homemade jam and it's absolutely delicious.


This is the finished cheese with the whey in a jar. Whey will store safely in the fridge for at least a month. You can use it in your baking as a substitute for milk and it will give you absolutely wonderful results.

Hanno loves yoghurt made into a sort of cream cheese/quark/labnah - yoghurt cheese. To make this all you have to do is to strain the yoghurt in a clean cotton cloth placed in a strainer, sitting over a jug. Cover it and put it in the fridge for at lease one day, preferably three. The whey will drip into the jar, the flavour of the yoghurt will develop and you'll get a nice thick cheese. We use this as a savoury cheese and add extra ingredients like chilli jam (or chilli flakes), chopped green onions, finely chopped cucumber or herbs, pepper and salt. 

I know many of you already make your own yoghurt but if you haven't, try this. I'm sure you won't be disappointed.

SHARE:
Blogger Template by pipdig