Thank you all for your kind thoughts for us as we grieve for Alice. Last week was a very sad one for us and it helped knowing that Alice touched the hearts of so many. We spent a couple of quiet days here together, then drove down to the Gold Coast yesterday and had Sunday with our family. Seeing them all with the babies did us a lot of good and now we're ready to move forward and settle into life again, without a dog.
~*~*~
I've been asked to do another post on making yoghurt and last week, when I was working at the Neighbourhood Centre, I was talking it about with our student Julie. Hi Julie! She has never made yoghurt so I told her this would be here and to try it. It's so easy.
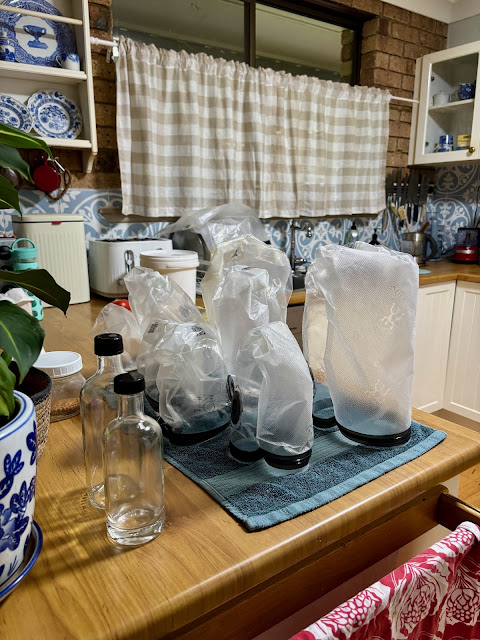
There are many ways to make yoghurt, this is how I do it. I don't buy appliances and equipment that I don't need so for this method you will probably already have everything you need in your kitchen. If you make it in the afternoon, it will be ready the next morning. Yoghurt is milk that is fermented with beneficial bacteria. Other fermented products include cheese, wine, beer, kimchee, sauerkraut and kefir.
You should make your yoghurt in sterile conditions and store it in a sterile container. The aim is to eliminate all the pathogens by pasteurising the milk. Even it is already pasteurised, the milk might have bacteria in it and you want to make sure that only the bacteria you want in there are present. When the harmful bacteria are gone, you introduce the probiotic bacteria in the form of yoghurt or yoghurt starter. The beneficial bacteria produce lactic acid during the process of fermenation. The acid conditions in the milk help preserve it because harmful bacteria find it difficult to colonise in acidic conditions.
EQUIPMENT
- A preserving/canning jar big enough to contain the amount you want to make - I used a 1.5 litre/quart jar
- Whisk or fork to mix in the yoghurt
- Spoon to scoop out the yoghurt
- Large saucepan to sterilise the jar, or an oven
- Small saucepan with a thick bottom to pasteurise the milk
- Two towels
- 1.4 litres/quarts milk - this can be full cream, skim, UHT, powdered - any milk you have on hand will do
- 2 tablespoons good quality natural yoghurt with live cultures and no added gelatine
- 2 tablespoons powdered milk
METHOD
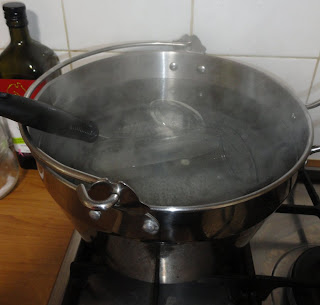
- Fill the large saucepan, place the jar, lid, whisk and spoon in the pan and bring to the boil then keep it boiling for ten minutes. Turn off the heat and leave everything in the saucepan until you're ready for it.
- Pour the milk into the smaller saucepan.
- Add two tablespoons of milk powder and whisk it in making sure the milk powder is completely dissolved in the milk.
- If you have a thermometer, clip it to the side of the saucepan and turn on the heat.
- Heat to 90C/195F - if you don't have a thermometer, it will be at the right temperature when small bubbles start forming around the outside of the milk.
- Take the milk off the heat and let the saucepan sit in a sink, half filled with cold water. This will help cool down the milk quickly.
- When the milk reaches about 45C/113F - but no higher than 50C/122F - add two tablespoons of yoghurt and whisk in thoroughly. Adding the yoghurt to the milk when it's too hot will kill the beneficial bacteria but you need the milk to be warm enough to activate the bacteria, so make sure it's within that temperature range.
- Taking your time to whisk the ingredients thoroughly will give you a smooth yoghurt.
Buy a good quality yoghurt to be your starter. It needs to contain live bacteria and no gelatine.
Make sure you whisk in the powered milk and the yoghurt properly.
Pour the warm milk into a warm jar - do this step quickly so you don't lose too much heat.
- When the yoghurt is made, take the sterilised jar out of the water and place it on the bench to cool down slightly. While the yoghurt is still hottish and the jar is still warm, add the yoghurt to the jar and seal the lid.
- Wrap it immediately in one towel, then the second towel so you have a nice parcel.
- Let this sit on the kitchen bench away from the drafts. You want this to retain the heat for as long as possible. Don't open the jar, don't stir it, don't shake it. Just leave it to sit in a warm location, that, and time, is all it needs.
- Late in the afternoon, heat the oven up for about 5 minutes, then turn off the heat.
- Place the parcel in the oven and leave it there, untouched, till the next morning.
- When you take it out, the milk will be yoghurt.
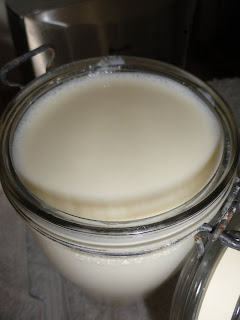
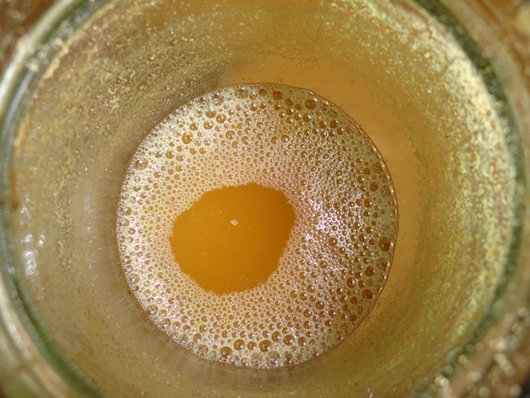
This is my jar the next morning. It has been lying on its side and you can see in the photo above that the whey has started to separate from the yoghurt. The whey is that yellow fluid.
With the lid off, you can see the indentation of the writing on the jar lid has transferred to the yoghurt.
Nice, thick yoghurt.
I keep a few tablespoons of the yoghurt that I made in a container in the freezer to be used for the next batch.
And that's it! Less than 30 minutes to make this delicious and nutritious yoghurt. Store it in the fridge. I believe the yoghurt I make is the equal of the good quality I buy to use as a starter, but it's cheaper. You can enjoy it straight from the jar but if you want a sweet yoghurt, add some jam or honey to it. I use our homemade jam and it's absolutely delicious.
This is the finished cheese with the whey in a jar. Whey will store safely in the fridge for at least a month. You can use it in your baking as a substitute for milk and it will give you absolutely wonderful results.
Hanno loves yoghurt made into a sort of cream cheese/quark/labnah - yoghurt cheese. To make this all you have to do is to strain the yoghurt in a clean cotton cloth placed in a strainer, sitting over a jug. Cover it and put it in the fridge for at lease one day, preferably three. The whey will drip into the jar, the flavour of the yoghurt will develop and you'll get a nice thick cheese. We use this as a savoury cheese and add extra ingredients like chilli jam (or chilli flakes), chopped green onions, finely chopped cucumber or herbs, pepper and salt.
I know many of you already make your own yoghurt but if you haven't, try this. I'm sure you won't be disappointed.






.jpeg)



.jpeg)
.jpeg)
.jpeg)
.jpeg)
41 Comments
Thank you for this tutorial, it is very helpful! I have made yogurt once before, which I posted about, but this is very helpful as most of the tutorials I have seen always include using specialized equipment that I just do not want to buy! I am so sorry about sweet Alice, my thoughts are with both you and Hanno. My cats are so important to me, so I understand your sorrow in seeing her go. She had a lovely life I am sure, and was surrounded by her home and loved ones until the day she died, which is all any of us can ask for. Thank you for continuing to be an inspiration to all of us!
ReplyDeleteBrenna
consciousearthveg.blogspot.com
Yoghurt and soft cheese as so easy to make - it should be a commonplace action. But nowadays, too many people have allowed themselves to become detached from how their food is made.
ReplyDeleteEven Israel. Earlier this Summer, there were protests about the rise in the cost of cottage cheese, when barely a generation ago it would have more often than not been home made.
Glad you both spent time with family. It can be very healing.xx
ReplyDeleteThank you for this recipe!! The thickened yoghurt looks like what they call Greek yoghurt. When you make the cheese can you use it in place of cream cheese? Can the cheese be frozen if you make too much to use at that time? After reading this I know I can do this! Sarah
ReplyDeleteThat yoghurt looks lovely Rhonda, I might try putting powdered milk in my yoghurt too....but I have recently been using a Yoghurt Maker which I got at an op-shop for $5. which works great for me and my time, as I can mix up the milk and culture while cold....pour into the sterilised jars, lids on and 8 hours later...I have yoghurt too....isn't it great that we can all make our own yoghurt.....I love it.
ReplyDeleteHi Rhonda, I'm glad to hear that you and Hanno shared some time with your family over the weekend. Your home may seem 'quieter' for a while, without the presence of Alice, and I hope the happy memories make the period of grieving easier. Thanks for sharing your yoghurt recipe and method. I use the same ingredients and make it in the yoghurt maker, but I would like to try this recipe. I like the idea of making cheese from it too...that's something I have wanted to do for quite a while!
ReplyDeleteSarah, it tastes like tart cream cheese and it can certainly be used like cream cheese. It can be frozen.
ReplyDeleteThanks for the detailed instructions, Rhonda! I have made yoghurt over the years, now and again, and it's always been a hit and miss affair! We eat a lot of it and you have prompted me to give your way a try - and thats what this blog is all about isn't it? .... inspiration and motivation! Thank you!
ReplyDeleteI make yoghurt without a thermometer. If I'm using liquid milk, I heat to the point that it is just starting to boil and then let it cool to blood temperature - the point at which it feels neither cool nor hot to the finger. Even easier is to use powdered milk, mixed at a two thirds the normal ratio - i.e. two cups of cold water rather than three to one cup of powder. Then simply add boiling water from a kettle until the resultant milk mix is blood temperature, before adding a few spoonsful of live yoghurt.
ReplyDeleteYou can save energy keeping the yoghurt warm overnight by wrapping your container in a toweland putting it on top of the fridge to use the spare heat if it's not too cold where you live. I live in Canberra and in the winter when it regularly gets down to -5 C, I wrap my yoghurt in a towel and put it in my eski overnight with a hot water bottle.
I picked up some fresh raw milk last Thursday to make yoghurt. I hope to get to it in the next few days. There is nothing like homemade yoghurt. And then making the quark. So easy, so little time involved. I love adding homemade basil pesto to the quark - spread on toast - YUM! I learned about making the quark from you a few years ago. Thank you again! Sincerely, Emily in So. Texas
ReplyDeleteThank you Rhonda I have been wanting to try this I will copy this post and try it. I buy a lot of yogurt and I would like to save that money. B
ReplyDeleteI have never made yogurt before and yours looks delicious. I like the fact that it is simple and no fancy machines to get.
ReplyDeleteThank you Rhonda, this has to be the best written recipe for this that I have seen online thus far. I will definitely have to try it out now!
ReplyDeleteHi Rhonda,
ReplyDeleteI like the way that you always rise to the occasion. You have a reservoir of inner strength that is very admirable. So pleased you spent the day with the family, that's healing in itself, especially the babies.
Vickixx
I had a lot of trouble getting a nice thick homemade yoghurt so I've done a bit of experimenting. I get the best results if I use unhomogenised milk and, as you say Rhonda, a good quality yoghurt. I've been using the Barambah brand you show here and it's a winner.
ReplyDeleteThanks Rhonda! I used to make it but stopped after number three was born. I often had to fiddle with it not setting, but I must get back into making it again. The towel method sounds good. It is a warm day here so I might try it later on today.
ReplyDeleteYummy! To me yogurt is like bread, and other cheeses, it makes itself! Good job.
ReplyDeleteHappy Birthday to Hanno for today
ReplyDeleteDee, thank you so much for remembering Hanno's birthday. He's 71 today! We're taking it easy because he's not feeling well but he reads the comments every day so I know he'll be delighted to see your message.
ReplyDeleteHi Rhonda, I have my yoghurt all wrapped up on the bench as I type this. I normally use a commercial yoghurt maker but not a commercial mix. Today you inspired me to try it your way. I hope it works because I don't have a thermometer at the moment so I guessed at the temperature.
ReplyDeleteI also made the Rouladen on the evening that you posted the recipe. I have put up a post on my blog with a photo of the meal as well as some ideas I've tried from other blogs. http://greenhavengoodlife.blogspot.com/2011/09/show-and-tell.html
Have a lovely day!
I've made (4) gallon batches of yogurt/greek yogurt/cream cheese using the crockpot method. It is the easiest thing ever. I love the savings and doubt I'll ever have to buy much store yogurt ever again. Isn't that a great feeling. Next, I want to make ricotta from the whey. Then, mozarella sounds like something I could handle.
ReplyDeleteI have a question if you ever use goat milk. I know you can make yogurt from goat milk, but does it have cream, and can you make goat butter, and if so, can it be used like cow butter?
thanks,
brenda from arkansas
Have not had homemade yoghurt for ages. My mum used to have an electric yoghurt maker. I shall have a go at your version soon. Many thanks for sharing this in such brilliant explanatory fashion!
ReplyDeletehi rhonda
ReplyDeletei am an avid yoghurt maker! i used to make it in my crockpot and with yoghurt i bought in the store, but found the results varied (as the temperature would vary in the kitchen etc na di hated sometimes being disappointed with the results)...i finally gave in and bought a $20 yoghurt maker from aldi that has the little jars and some yoghurt starter from a cheesemaking website and i have had excellent results every time... i decided to buy the starter as it worked out cheaper for me to do that than buying yoghurt from the store (it also keeps in the freezer for a LONG time with no variances in results) i also love keeping my finished yoghurt in the separate little jars... i make some sweetened and some plain and it all sits there like little bought jars ready to go! and what's even greater is i have some old jam jars that are the same size that fit in the yoghurt maker as well so i can make multiple lots if i want... my children love it and want to eat it straight from the jars!
amy
p.s- i forgot to add that i also started using UHT milk instead of fresh (because i can buy it at the same cost) and it totally eliminates the need for heating the milk to the right temperature... simply mix together and put in the yoghurt maker and perfect yoghurt every time! that kind of time saver is HUGE for a busy mum like me! my mum has a cow and i've convinced her to start making it with her raw milk as well!
ReplyDeleteamy
Thank you Rhonda for the very clear instructions. This week I am going for it - yogurt following your recipe and feta cheese via Gavins "Little Green Cheese". Just one question: When you take the starter from the freezer, how do you defrost it - giving it time on the benchtop or speeding the process up or using it in its frozen state?
ReplyDeleteAutumn has arrived here in Sweden with a bang. Lots of lovely mushrooms to pick in the woods as compensation.
Belated birthday congratulations and I hope Hanno feels better now,
Greetings from Uppsala/Ramona K
I used to make a weekly jar of yogurt many, many years ago, but all I remember is that my equipment consisted of a cardboard box and a light bulb. May be time to start doing it again, one way or another. Thank you for this info.
ReplyDeleteHi Rhonda,
ReplyDeleteI was thinking about buying a youghut machine that keeps the temperature steady, but now I think I will try out your method instead :-)
One question: is the powdered milk important for the process, or can I leave it out?
My tip for yogurt making is to put the finished milk mixture in a insulated cooler stuffed with towel rags and let it sit overnight. It is still warm the next day and you get perfect yogurt. Saves energy too.
ReplyDeleteI make my own yogurt but havn't used the powdered milk....maybe it will help mine to thicken up a bit. It really is easy to do and saves a lot of pennies!
ReplyDeleteI have dabbled with making yoghurt before, but I think I might give it another go and try the cheese too.
ReplyDeleteRamona, it good to "see" you again. I take the yoghurt from the freezer the day before and let it defrost in the fridge, but I would be happy to defrost it on the bench.
ReplyDeleteMette, I know some people don't like using powdered milk. It's fine to leave it out, it's only purpose is to thicken the finished yoghurt.
Hooray! Thanks for this post, Rhonda! I think I've been making a lot of mistakes when I was doing it previously. I made a huge batch (almost 3x your recipe), and I just left the "starter" for the next batch in the fridge with everything else. I also wasn't sterilizing the utensils, which I see is super important. Let's see if I can make better yogurt THIS time! :)
ReplyDeleteI've just tried it for the first time, I had some for breakfast with a spoonful of homemade pineapple jam....heaven! Thank you!!
ReplyDeleteHowever, it was a bit grainy. Is this normal or did I make a rookie mistake somewhere?
Thank you for this. I'm all about making everything from scratch, but for some reason yoghurt has always scared me a little. I guess I feel like if I mess it up, I'll get sick, and haven't wanted to take that chance. This post really makes it seem nearly foolproof, as long as I follow a few simple rules. I'll be trying this out tomorrow!
ReplyDeleteI bought some yoghurt culture from Green Living Australia, I think it comes out much cheaper, even with the shipping. First I make the yoghurt with the culture, then for a few next times (I don't really know how many times, some say until it doesn't turn out as thick, but I've never found that to be the case) I use the leftover yoghurt for culture. You only need the tiniest amount of the powdered culture, so even if you made yoghurt every once in a while (and only use the powdered culture), it still comes out cheaper.
ReplyDeleteThanks for this post, Rhonda!
ReplyDeleteI have some questions though. Do you leave it wrapped in towels when you place it in the oven? Does it have to lie on its side? Do you serve the soft cheese with crackers or how??
Thanks!
Vanessa
I didn't know you could freeze the starter culture, I presumed that would kill it off, thank you! I miss my yoghurt maker very much, maybe I should call it into action again! I think I was making a mistake with the gelatine yoghurt as i could never get it to thicken much, even with adding the powdered milk.
ReplyDeleteThank you for your article - very informative. I have a question though - sometimes when I add the warm milk to the culture, the mix curdles. What am I doing wrong? :)
ReplyDeleteGreat article, I've got a question but don't know where to find the answer.
ReplyDeleteI've been making my own yoghurt for some time. I simply take 1 litre of room temperature organic UHT milk, a tiny bit of yoghurt culture (from greenlivingaustralia) mix it up and incubate for ~12 hours in an easyio using the standard level of hot water as per easyio instructions. It makes good yoghurt but runny compared to store bought stuff.
I have avoided putting in extra milk solids (powder) into my yoghurt like all store yoghurt because it seemed a bit unnatural. The obvious result is that my yoghurt has always been runny which I have had to accept.
Cheers, James
The other day I had a brain fart and managed to fill my canister with room temperature water rather than boiling water without noticing. After 15 hours I go to pull out my yoghurt but the water was cool and my yoghurt was still milk! Not wanting to let it go to waste, I replaced the water with boiling water and let it properly incubate for a further 10 hours or so. The result was a quite thick and stronger tasting yoghurt.
The question I have is, is this safe? I've read that raw milk left at room temperature will clabber but UHT milk will go rancid. Leaving the UHT milk at room temperature for 15 hours seemed to do something that thickened the yoghurt but am I running the risk of culturing bad bacteria?
Hi Rhonda. I know this post is old so you may not see this comment. but I made your yogurt from your most recent book (which I love). This morning I went to check on it under my blanket near the heater and the consistency was more like think egg whites. Not like the nice thick one I expected. Do you know what I could have done wrong? It was probably there for around 10 hours- Is that long enough?
ReplyDeleteImogen, I can't tell what went wrong without being there. You may have used a started yoghurt with no live cultures, you may not have used enough of a weak yoghurt. The longer you leave it to sit outside the fridge, the stronger the flavour will be so if you don't want a strong yoghurt, strain the yoghurt you made and remove some of the whey. That will make it thicker. You can do that by placing an open weave cloth in a strainer/colander, add the yoghurt and let it sit while the whey drains off. Use the whey in your baking instead of milk.
DeleteI welcome readers' comments. However, this blog never publishes business links or advertisements. If you're operating a business and want to leave your link here, I will delete your comment .