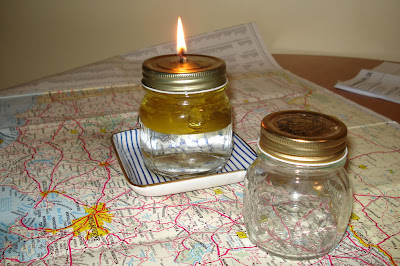
I mentioned a few days ago that I was working on a little oil lamp. Well, I fiddled with it for a few days, tested wicks and oil levels, I now have a perfectly serviceable oil lamp that burns clean for hours, with no smell. I was looking for a replacement for paraffin candles and saw a photo of a small oil lamp on a website somewhere but when I made my own version of it, it burned for a minute and went out. I never give up on these things so it was a battle between me and the lamp for a day or two. Let me tell you we both won. I won because the lamp burns as I want it to, the lamp wins because it looks good and gives a lovely mellow yellow glow, just like a candle.
All you'll need to make one of these lamps is a small glass jar with a lid that fits properly, a short strip of pure cotton or pure linen, a small amount of oil and water, and a plate to sit it on.
- I used a small canning/preserving jar - the one above is about 350 ml (12oz) but when I make another, I'll use a smaller jar of 250 mls (8½ oz). The lid needs to attach firmly. You could use recycled jars as long as it's sturdy thick glass.
- Poke a hole in the lid with a can opener or a hole punch.
- Half fill the jar with water and then carefully pour oil onto the top of the water to fill the jar almost to the rim.
- Push the pre-soaked wick through the hole and have it sitting about ½ inch above the lid.
- If the wick goes out soon after you light it, add more oil so the oil level is almost at the top of the jar. Having the oil close to the lid seems to give the greatest chance of success.

Using half water half oil means you have less oil sitting in a jar for long periods. The oil will warm up a little when the lamp is in use and this might mean it would go rancid over a period of time. The amount of oil in the lamp above burned for many hours.
Oil: I used olive oil because it burns clean with no smell and it has a high flash point. That means is won't catch fire easily, it just burns the wick slowly. You could also use rice bran oil, another clean burning oil with no smell. You could use old cooking oil but it will smell of whatever you cooked in it.
This is a nice little lamp that could be used for emergency lighting or could replace paraffin candles, which, if you burn them every night, cost a lot over the course of a year. Paraffin is made with petrochemicals, so you probably want to replace your paraffin candles with something that better suits your simple life.
Mother Earth News did an article here a couple of weeks ago about oil lamps that is worth a read. They did a different version of the lamp, which I tried and it worked well. I put mine in a recycled aluminium candle holder (above), they put theirs in a canning jar which I think would work better over a long period. I just wanted to test the idea of it.
This is nothing major, it's just another small step towards a better life and serves to remind us that we don't have to buy every thing we need. Many things can be made at home and used for their purpose without it costing too much at all.




.jpeg)


.jpeg)
.jpeg)
.jpeg)

54 Comments
Thankyou for the instructions. I'm going to try this today. I don't like using parafin candles and I have tried to buy beeswax candles but they are much more expensive.
ReplyDeleteOh Rhonda I love the lamp!! I can't wait to make some. You and your blog are awesome and so full of wonderful ideas and tips.
ReplyDeleteLaurie
Thank you for the instructions. This will definately find a place in our home. One question... The wick, you said, is 4 inches long. I'd need to make sure the wick extended only into the oil, though, and not the water, correct? Thanks for your wisdom and insights. I'm enjoying reading your blog and stretching myself...I started to write beyond my comfort zone, but actually, it's more like into NEW comfort zones.
ReplyDeleteWhat is that smaller tea light? Did you make that, too? I'm just trying to learn about candle-making and I have a few supplies, but I haven't worked up the nerve to actually try anything yet!
ReplyDeleteThank you, thank you Rhonda! Can't wait to make a few of these for my home.
ReplyDeleteI will post the link to your tutorial and blog on the Homesteadblogger Front Porch tomorrow. I'm sure the readers there will love this idea, too.
Blessings,
Catherine :)
Hi everyone, thank you!
ReplyDeleteChris, yes, the wick needs to stay in the oil. In my lamp it tended to do that without my intervention. Make the wick shorter if you need to.
Laura, the tea light is my version of the Mother Earth oil lamp, check out the link to see their lamp. Instead of placing their coiled wick in a tea candle holder, they put theirs in a canning jar.
YAY! I've been peeking back here quite a bit lately because I've been waiting for this one! I wanted to buy regular oil lanterns, but found that they are quite expensive here, as well as the oil to fill them. :( Thank you for posting this, I will definitely be making a few! :D
ReplyDeleteCourtney
that looks really neat. I have some light blue tinted mason jars that are imo too small to do anything with. I might have to do this!
ReplyDeleteThanks for sharing!!!
I just found this link today and came across to give it to you, only to find you've already posted about it!
ReplyDeletehttp://www.motherearthnews.com/Do-It-Yourself/Make-Olive-Oil-Lamp.aspx
They also mention putting essential oils in the olive oil to make them smell nicer, and they also talk about a particular grade of olive oil that will make them even cheaper to use. Might be worth a quick look, anyway...
Along with the other comments
ReplyDeleteI would also like to thank you!
Gathering the supplies and making some soon....
Blessings
What a great idea Rhonda, I'm up for trying it.
ReplyDeleteWhere did you get the sweet little jar....I'm in northern NSW, so I should be able to locate if you got it from a major store.
Nanette
My dh and I just discussed oil lamps. Thank you so much for the instructions. We will try them. With my dh just recently getting laid off we are looking for even more ways to not only save but to rely less on others. Thank you!
ReplyDeleteLovely - I'll be trying this once I'm home again. I imagine it will be lovely for nice, soft light in the winter - very inspiring.
ReplyDeleteThis is very similar to the oil lamps my orthodox church uses. You can also get wicks and little floats to feed them through from any orthodox supplier. They always use plain cheap olice oil not extra virgin as the extra virgin seems to clog the wicks. Just my 2 cents worth and I am keeping this in mind for hurricane season since we live on the Gulf Coast USA. We had no electric for a week last year after hurricane Ike.
ReplyDeleteCute, cute, cute! Love this idea. After sitting with lighted candles for two weeks during an ice storm power outage this past winter, I know these would be a better and safer alternative. Thank you!
ReplyDeleteI have done a similar oil lamp but without any water.I really like the reasoning behind the water in the jar.I have all of the items I think I will be trying your lamp out this evening.
ReplyDeleteAs always good job
Rois
Thank you so much for the instructions. I am definitely going to have a few of them around for emergencies. :)
ReplyDeleteThanks so much!! I never would have thought to use olive oil! I hate the oils sold in the hardware store, they stink something awful! Can't wait to give this a try :)
ReplyDeleteCool Ronda, I'm glad you put your directions up. I have made one today and it has been alight for a couple of hours now. However, the flame is so tiny that it doesn't actually illuminate anything. Would you know how I can make it into a proper little flame? Would it be the wick I'm using? I'm using a strip of cotton table napkin, cut just like your directions, and not touching the water...
ReplyDeleteHow neat, I want to make this.
ReplyDeleteThank you for this. I've been waiting eagerly for the instructions ever since you mentioned it, because I have definately been looking for a replacement for parafin candles.
ReplyDeleteI have also bought some beeswax from a local beekeeper, and plan to try to make some beeswax candles too, so will try your suggestions for wicks on those.
There's a method in one of the Little House books for making 'button lamp' -- similar idea, but with tallow. The same lamp is also called a 'slush lamp'. Making a Middle-Eastern style lamp (same principle as this one) would be a fun project for those who like pottery.
ReplyDeleteWith all the candles I've been given as gifts, I must admit I won't have to call on this how-to for a while!
Thanks for the instructions, Rhonda. Love the new photo of yourself.
ReplyDeleteDolores Jones
Belle, the little bottle looks like some I bought in Coles.
ReplyDeleteThese lamps look like a great idea & useful to have on hand for the frequent blackouts we get here.
This is wonderful. I don't know if I'll use it anytime soon, as we have summer here and not so much need for candles and lamps, but I'll keep it in mind for some day! Thank you!
ReplyDeleteRhonda, thanks for the tutorial. I've been waiting on this one also as I love candles but we're unable to have them in our home.
ReplyDeleteI was wondering about safety issues...If this tips over, does the flame spread or go out? How hot does the jar get? (I noticed that it was on a plate).
Thanks!
Kaye
Aw, that is so cute! They are wonderful little candles aren't they. I never thought of adding the water, that will save on using so much oil all at one time, think how pretty colored water would be or with some since stones in there too.
ReplyDeleteThanks for the instructions.
Karyn
Great idea!
DeleteI love reading your blog Rhonda. There's so much good useful information to be had here on making things and gardening, but there's also a calm steady voice echoing what I've always known to be true - about making your home your safe place, your haven for your family. Thank you for all your practical advice and for helping to point out the most important things are not really things at all. I love how you focus on things like debt and being more resourceful while living more 'green' at the same time. I hope and pray that I'll be able to leave full time employment soon and be home more to employ more of the methods you teach. God Bless you for sharing so much with us. Denise in NC (USA)
ReplyDeleteclever idea
ReplyDeletereminiscent of biblical times pottery used then is also an option today for those of you who throw on a wheel.
I saw an artist with an array of them at a show some time back and they were selling well
Fabulous. I will be looking for the smal mason jars at yard sales, with this specific project in mind.
ReplyDeletevery cool. this might be a good way for me to recycle babyfood jars! I think I might purchase some wicks from the craft store, though.
ReplyDeleteHi Rhonda! As always, you offer a very valuable,do-able, charming, idea!! How kind of you to share. I am especially glad to know about making our own wicks from one hundred percent cotton/linen strips!! Thank you, yet again, for sharing your knowledge. It's always appreciated.
ReplyDeleteWarmly,
Tracey
Rhonda you have so many useful tips, I look forward to your blog every day. These little lamps are perfect. I love the ambient light of candles but when you burn as many as I do, especially in winter when our days are short, it can get expensive. These are very lovely and will try making them right away.
ReplyDeleteThanks,
Margaret
Rhonda,
ReplyDeleteThanks! I've been wanting to make an oil lamp for quite awhile and when I checked your blog... there was the neatest little oil lamp that you had made!! LOL I don't like the paraffin candles so I'm going to be busy making some of 'your' oil lamps. Love reading your blog and I'm working on simplifying my home as much as possible. Thanks again, for your timely post! Hugs, Aunt Bea
Looks like another neat project to add to my list of new things to try!
ReplyDeleteI have written about getting my Aladdin Lamp going, but these little lamps would work fine for many situations - especially for providing light in multiple rooms after a hurricane takes down our power :-) The Aladdin lamp puts out a lot of light, but it also gets really hot!
Okay, I love, love, love this lamp! I am envisioning making several of them at home for our own personal use, but I will also nick some glass baby food jars from friends so I can make these little lamps to give as Christmas favors. Thank you so much for this post!
ReplyDeletei made one!!!! it is so cool. how do you make the flame bigger?? Mine stays tiny.
ReplyDeletesarah, fiddle with the wick until it's the right flame for you. Pull it up further, make it wider etc. I get a nice candle like flame, but only after I adjusted it a bit.
ReplyDeleteThanks so much for posting on this--I have been thinking about purchasing an oil lamp, but my preparedness list is pretty long, so this might help me cross a need off without as much expense. I hope you don't mind I linked to this and your blog on my blog--I figure the more people who find out about such good information, the better!
ReplyDeleteExcellent article, thanks for the lamp how-to. Olive oil is such a great resource to have from a preparedness perspective. We've recently been exploring lighting in an emergency and other quick ways to make an oil lamp. This is our quick fix with a tuna can: http://bit.ly/13gGxp
ReplyDeleteYou can also use Baby oil or Mineral oil in your lamp. If your lamp gets turned over, it will put it'self out.
ReplyDeleteYou GENIUS!!! *THANK YOU!* for sharing this~I have it bookmarked for later FUN! (((((HUGS))))) sandi
ReplyDeleteI like your oil lamp but the idea of water and oil don't mix, I would use straight oil.
ReplyDeleteThat is why I used the water, because it doesn't mix. Oil is lighter than water so it rises to the top, closer to the wick. Then you don't have to fill the jar up with oil.
ReplyDeleteHi there -
ReplyDeleteGreat idea, but also remember if you know anybody who distills their own liquor ask them to collect the foreshots for you and you can use this instead of oil - although I'd add a few drops of scented oil into it prior to burning.
:)
Hello ...
ReplyDeleteI did exactly as you wrote.. made a wick out of plated cotton string so it was 3 strands, soaked it in the oil, lit it.. the wick burnt down fast and the lamp went out.. any clues anyone what I did wrong?
One thing I did that was good was put a mirror tile behind the lamp, so got two lamps with the reflection but it only stayed lit for max 5 minutes... HELP!
You'll have to experiment with the type of wicks you use.
DeleteThank you so much! I used a small wine bottle for mine, added some decorative pebbles for the bottom, and I love it! So easy, I had everything I needed in the house. I used a white 100% cotton t-shirt for the wick.
ReplyDeleteIt's been burning for over an hour!
The oil floating on water is pure genius. :)
This is a awesome idea! I was wondering if you know if you added a little bit of scented oils in with the other oil to make it smell....do you think that would work??
ReplyDeleteI prefer plain everything but I'm sure adding scented oil would work.
DeleteThanks so much! This is great. It took me five minutes to make, most of it adjusting the wick to burn just right. Now I have decided to use no electric lights for two days. I love the warmth it creates. :)
ReplyDeleteHello..I was wondering, dor these little oil lamps, could you use regular oil lamp fuel?
ReplyDeleteSure you can.
DeleteNew comments are not allowed.